HP J4899B User Manual - Page 22
Installing or Removing mini-GBICs, Notes, Caution - support
 |
View all HP J4899B manuals
Add to My Manuals
Save this manual to your list of manuals |
Page 22 highlights
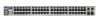
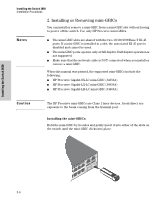
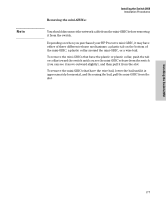
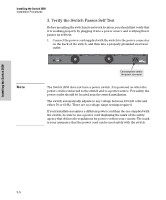
Installing the Switch 2650 Installing the Switch 2650 Installation Procedures 2. Installing or Removing mini-GBICs You can install or remove a mini-GBIC from a mini-GBIC slot without having to power off the switch. Use only HP Procurve mini-GBICs. Notes ■ The mini-GBIC slots are shared with the two 10/100/1000Base-T RJ-45 ports. If a mini-GBIC is installed in a slot, the associated RJ-45 port is disabled and cannot be used. ■ The mini-GBIC ports operate only at full duplex. Half duplex operation is not supported. ■ Make sure that the network cable is NOT connected when you install or remove a mini-GBIC. When this manual was printed, the supported mini-GBICs include the following: ■ HP Procurve Gigabit-SX-LC mini-GBIC (J4858A) ■ HP Procurve Gigabit-LX-LC mini-GBIC (J4859A) ■ HP Procurve Gigabit-LH-LC mini-GBIC (J4860A) Caution The HP Procurve mini-GBICs are Class 1 laser devices. Avoid direct eye exposure to the beam coming from the transmit port. Installing the mini-GBICs: Hold the mini-GBIC by its sides and gently insert it into either of the slots on the switch until the mini-GBIC clicks into place. 2-6 GPoigrt-sT 38 37 40 39 42 41 44 43 46 45 M 48 47 47 50 T M MGPoBirnItCis- 48 ! 49 T Use only one (T or M) for each Gigabit port
-
 1
1 -
2
-
3
-
4
-
5
-
6
-
7
-
8
-
9
-
10
-
11
-
12
-
13
-
14
-
15
-
16
-
 17
17 -
 18
18 -
 19
19 -
 20
20 -
 21
21 -
 22
22 -
 23
23 -
 24
24 -
 25
25 -
 26
26 -
 27
27 -
28
-
29
-
30
-
31
-
32
-
33
-
34
-
35
-
36
-
37
-
38
-
39
-
40
-
41
-
42
-
43
-
44
-
45
-
46
-
47
-
48
-
49
-
50
-
51
-
52
-
53
-
54
-
55
-
56
-
57
-
58
-
59
-
60
-
61
-
62
-
63
-
64
-
65
-
66
-
67
-
68
-
69
-
70
-
71
-
72
-
73
-
74
-
75
-
76
-
77
-
78
-
79
-
80
-
81
-
82
-
83
-
84
-
85
-
86
 |
 |
