HP LH4r HP Netserver LH 3/LH 3r to LH 4/LH 4r - Page 15
Removing Covers and the CPU, Baseboard
 |
View all HP LH4r manuals
Add to My Manuals
Save this manual to your list of manuals |
Page 15 highlights
2 Removing Covers and the CPU Baseboard CAUTION Wear a wrist strap and use a static-dissipating work surface connected to the chassis at all times. Before you can install the new LH 4 CPU baseboard, there are several components to remove from the LH 3: • Remove the bezel and covers 2 and 3 to get access to the HP NetServer's interior • Remove the LH 3 CPU baseboard • Remove the old CPU baseboard guide and the air baffle from the LH 3 chassis. Removing the Bezel and Covers The HP NetServer has three hand-removable cover panels and a bezel: • Cover 1 covers the side where the I/O board is located. • Cover 2 covers the area above the CPU baseboard. • Cover 3 covers the side where the CPU baseboard is located. 11
-
 1
1 -
2
-
3
-
4
-
5
-
6
-
7
-
8
-
9
-
 10
10 -
 11
11 -
 12
12 -
 13
13 -
 14
14 -
 15
15 -
 16
16 -
 17
17 -
 18
18 -
 19
19 -
 20
20 -
21
-
22
-
23
-
24
-
25
-
26
-
27
-
28
-
29
-
30
-
31
-
32
-
33
-
34
-
35
-
36
-
37
-
38
-
39
-
40
-
41
-
42
 |
 |
11
2
Removing Covers and the CPU
Baseboard
CAUTION
Wear a wrist strap and use a static-dissipating work surface
connected to the chassis at all times.
Before you can install the new LH 4 CPU baseboard, there are several components
to remove from the LH 3:
•
Remove the bezel and covers 2 and 3 to get access to the HP NetServer’s
interior
•
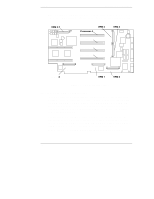
Remove the LH 3 CPU baseboard
•
Remove the old CPU baseboard guide and the air baffle from the LH 3
chassis.
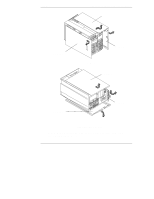
Removing the Bezel and Covers
The HP NetServer has three hand-removable cover panels and a bezel:
•
Cover 1 covers the side where the I/O board is located.
•
Cover 2 covers the area above the CPU baseboard.
•
Cover 3 covers the side where the CPU baseboard is located.