HP LH4r HP Netserver LH 3/LH 3r to LH 4/LH 4r - Page 31
Finishing the Hardware Upgrade
 |
View all HP LH4r manuals
Add to My Manuals
Save this manual to your list of manuals |
Page 31 highlights
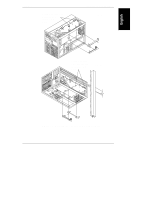
Chapter 3 Installing LH 4 Components Finishing the Hardware Upgrade As the last step in the LH 3/LH 3r to LH 4/LH 4r upgrade, attach the new nameplate to the top of the front surface of the front bezel, as follows: 1. Orient the nameplate so that it can be read correctly when attached. 2. Secure the nameplate to the front bezel, as follows: ◊ For the LH 4, pry off the LH 3 nameplate in the upper left corner, then snap the LH 4 nameplate into place. ◊ For LH 4r with the HP rack front bezel, insert the tab at one end of the nameplate into the slot in the bezel, bend the nameplate slightly, and simultaneously insert the snaps on the back of the nameplate and the tab at the other end of the nameplate. ◊ For the LH 4r with the Compaq rack front bezel, insert the snap at one end of the nameplate, and then insert the other snaps successively. 3. Attach the label reading "intel inside pentium II xeon" to a convenient location near a corner of the front bezel. 27
-
 1
1 -
2
-
3
-
4
-
5
-
6
-
7
-
8
-
9
-
10
-
11
-
12
-
13
-
14
-
15
-
16
-
17
-
18
-
19
-
20
-
21
-
22
-
23
-
24
-
25
-
 26
26 -
 27
27 -
 28
28 -
 29
29 -
 30
30 -
 31
31 -
 32
32 -
 33
33 -
 34
34 -
 35
35 -
 36
36 -
37
-
38
-
39
-
40
-
41
-
42
 |
 |