HP LaserJet M5000 LaserJet Analog Fax Accessory 500 - Send Fax Driver Guide - Page 12
Con the billing-code feature (optional), Install the driver, Install the driver in Windows XP
 |
View all HP LaserJet M5000 manuals
Add to My Manuals
Save this manual to your list of manuals |
Page 12 highlights
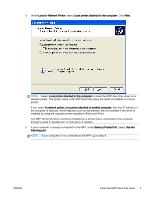
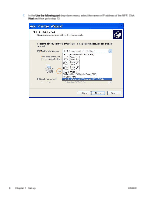
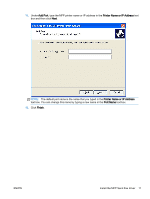
Configure the billing-code feature (optional) HP MFP Send Fax supports the use of billing codes when sending faxes. NOTE: The billing-code feature is optional. 1. From the Home screen, scroll to and touch the Administration button. 2. Open the following menus: ● Fax Settings ● Fax Send Settings ● Fax Send Setup ● Billing Codes 3. Touch the Enable Billing Codes feature to enable billing codes. NOTE: To disable billing codes, deselect the Enable Billing Codes feature, touch the Save button, and then skip the remaining steps. To allow users to edit billing codes, touch the Allow users to edit billing codes feature. 4. Touch the Default Billing Code text box to open the keyboard. 5. Enter the billing code and then touch the OK button. 6. Touch the Minimum Length text box to open the keypad. 7. Type the minimum number of digits you want in the billing code, and then touch the OK button. 8. Touch the Save button. Install the driver Install the MFP Send Fax driver by using the Add a Printer wizard in Windows: NOTE: If you are using the software CD supplied with the MFP, you can install the Send Fax driver by clicking the Install button or the Advanced Install Options button in the CD Browser. Download send fax driver software from the following URL: www.hp.com/support/ljanalogfaxaccessory500 Install the driver in Windows XP 1. In Windows Explorer, double-click the downloaded MFP Send Fax driver executable file to extract the driver files. 2. Click Start, click Settings, and then click Printers and Faxes. 3. In the Printer Tasks pane in the Printers and Faxes window, click Add a printer. 4. In the Add Printer Wizard welcome dialog box, click Next. 6 Chapter 1 Set up ENWW
-
 1
1 -
2
-
3
-
4
-
5
-
6
-
 7
7 -
 8
8 -
 9
9 -
 10
10 -
 11
11 -
 12
12 -
 13
13 -
 14
14 -
 15
15 -
 16
16 -
 17
17 -
18
-
19
-
20
-
21
-
22
-
23
-
24
-
25
-
26
-
27
-
28
-
29
-
30
-
31
-
32
-
33
-
34
-
35
-
36
-
37
-
38
-
39
-
40
-
41
-
42
-
43
-
44
-
45
-
46
-
47
-
48
-
49
-
50
-
51
-
52
-
53
-
54
-
55
-
56
-
57
-
58
-
59
-
60
-
61
-
62
-
63
-
64
-
65
-
66
-
67
-
68
-
69
-
70
-
71
-
72
-
73
-
74
-
75
-
76
-
77
-
78
-
79
-
80
-
81
-
82
-
83
-
84
-
85
-
86
 |
 |