HP LaserJet M9040/M9050 HP LaserJet M9040/M9050 MFP - User Guide - Page 197
Install DDR memory DIMMs 3 of 8
 |
View all HP LaserJet M9040/M9050 manuals
Add to My Manuals
Save this manual to your list of manuals |
Page 197 highlights
3. Turn the MFP off. Disconnect the power cord and any cables. Figure 11-24 Install DDR memory DIMMs (2 of 8) 4. Loosen the two captive thumb screws on the back of the MFP. Figure 11-25 Install DDR memory DIMMs (3 of 8) 5. Grasp the screws and pull the formatter board out of the MFP. Place it on a flat, non-conductive surface. Figure 11-26 Install DDR memory DIMMs (4 of 8) 6. Remove the DIMM from the antistatic package. Hold the DIMM with fingers against the side edges and thumbs against the back edge. Align the notches on the DIMM with the DIMM slot. (Check that the locks on each side of the DIMM slot are open, or outward.) Figure 11-27 Install DDR memory DIMMs (5 of 8) ENWW Manage memory 183
-
 1
1 -
2
-
3
-
4
-
5
-
6
-
7
-
8
-
9
-
10
-
11
-
12
-
13
-
14
-
15
-
16
-
17
-
18
-
19
-
20
-
21
-
22
-
23
-
24
-
25
-
26
-
27
-
28
-
29
-
30
-
31
-
32
-
33
-
34
-
35
-
36
-
37
-
38
-
39
-
40
-
41
-
42
-
43
-
44
-
45
-
46
-
47
-
48
-
49
-
50
-
51
-
52
-
53
-
54
-
55
-
56
-
57
-
58
-
59
-
60
-
61
-
62
-
63
-
64
-
65
-
66
-
67
-
68
-
69
-
70
-
71
-
72
-
73
-
74
-
75
-
76
-
77
-
78
-
79
-
80
-
81
-
82
-
83
-
84
-
85
-
86
-
87
-
88
-
89
-
90
-
91
-
92
-
93
-
94
-
95
-
96
-
97
-
98
-
99
-
100
-
101
-
102
-
103
-
104
-
105
-
106
-
107
-
108
-
109
-
110
-
111
-
112
-
113
-
114
-
115
-
116
-
117
-
118
-
119
-
120
-
121
-
122
-
123
-
124
-
125
-
126
-
127
-
128
-
129
-
130
-
131
-
132
-
133
-
134
-
135
-
136
-
137
-
138
-
139
-
140
-
141
-
142
-
143
-
144
-
145
-
146
-
147
-
148
-
149
-
150
-
151
-
152
-
153
-
154
-
155
-
156
-
157
-
158
-
159
-
160
-
161
-
162
-
163
-
164
-
165
-
166
-
167
-
168
-
169
-
170
-
171
-
172
-
173
-
174
-
175
-
176
-
177
-
178
-
179
-
180
-
181
-
182
-
183
-
184
-
185
-
186
-
187
-
188
-
189
-
190
-
191
-
 192
192 -
 193
193 -
 194
194 -
 195
195 -
 196
196 -
 197
197 -
 198
198 -
 199
199 -
 200
200 -
 201
201 -
 202
202 -
203
-
204
-
205
-
206
-
207
-
208
-
209
-
210
-
211
-
212
-
213
-
214
-
215
-
216
-
217
-
218
-
219
-
220
-
221
-
222
-
223
-
224
-
225
-
226
-
227
-
228
-
229
-
230
-
231
-
232
-
233
-
234
-
235
-
236
-
237
-
238
-
239
-
240
-
241
-
242
-
243
-
244
-
245
-
246
-
247
-
248
-
249
-
250
-
251
-
252
-
253
-
254
-
255
-
256
-
257
-
258
-
259
-
260
-
261
-
262
-
263
-
264
-
265
-
266
-
267
-
268
-
269
-
270
-
271
-
272
-
273
-
274
-
275
-
276
-
277
-
278
-
279
-
280
-
281
-
282
-
283
-
284
-
285
-
286
-
287
-
288
 |
 |
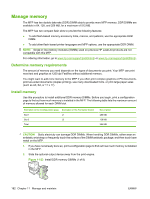
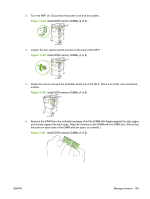
3.
Turn the MFP off. Disconnect the power cord and any cables.
Figure 11-24
Install DDR memory DIMMs (2 of 8)
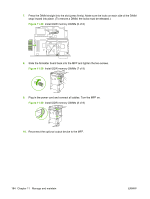
4.
Loosen the two captive thumb screws on the back of the MFP.
Figure 11-25
Install DDR memory DIMMs (3 of 8)
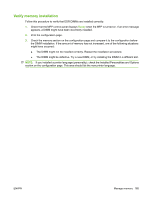
5.
Grasp the screws and pull the formatter board out of the MFP. Place it on a flat, non-conductive
surface.
Figure 11-26
Install DDR memory DIMMs (4 of 8)
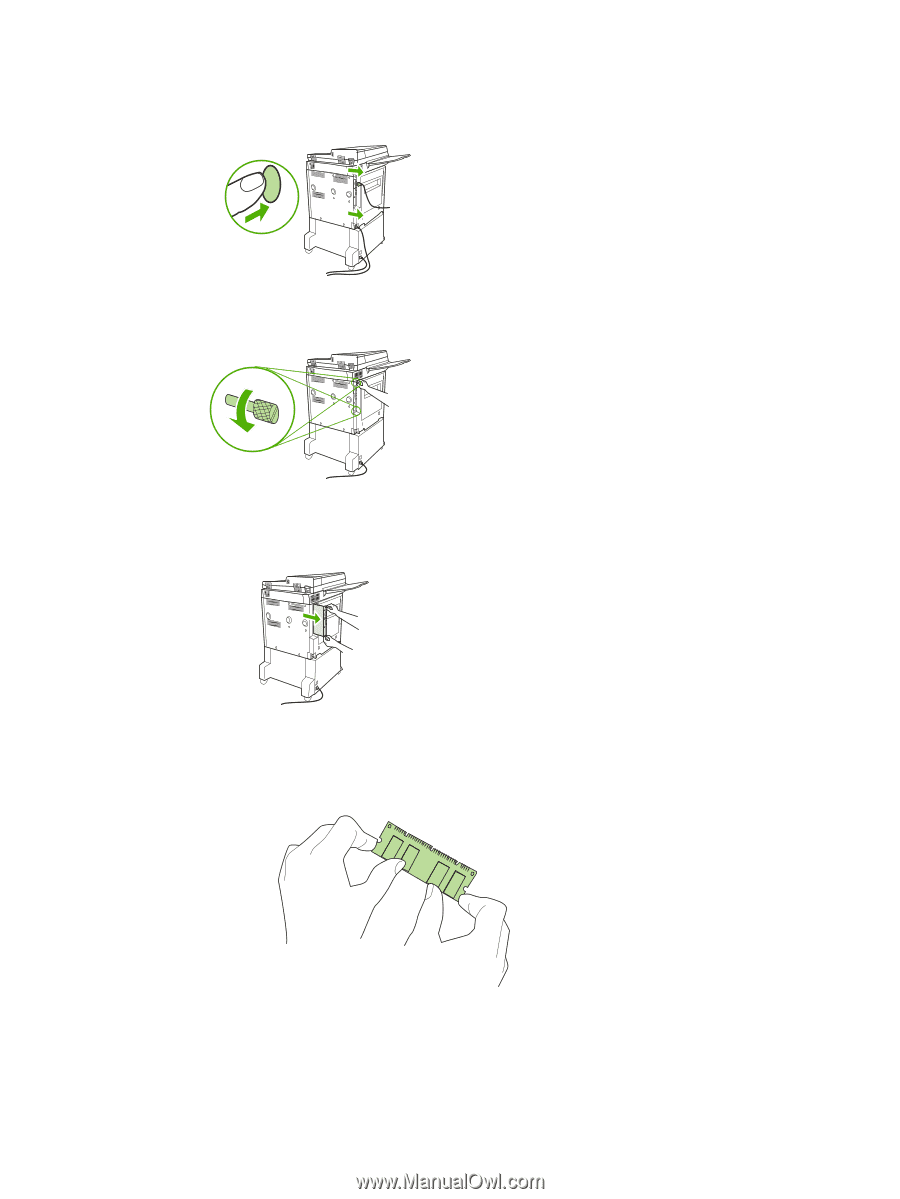
6.
Remove the DIMM from the antistatic package. Hold the DIMM with fingers against the side edges
and thumbs against the back edge. Align the notches on the DIMM with the DIMM slot. (Check that
the locks on each side of the DIMM slot are open, or outward.)
Figure 11-27
Install DDR memory DIMMs (5 of 8)
ENWW
Manage memory
183