HP Microportable Projector MP1800 MP1800 Microportable Projector - Page 30
Explaining Functions in the Analog On-Screen Menu, Position, Save and Return, Cancel, and Return
 |
View all HP Microportable Projector MP1800 manuals
Add to My Manuals
Save this manual to your list of manuals |
Page 30 highlights
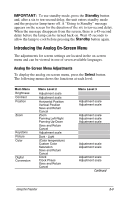
4. To make a selection from the level 2 menu, press the Minus (-) button to scroll down the level 2 menu, or press the Plus (+) button to reverse the scroll direction. 5. Highlight the selection and press the Select button to confirm the selection. The level 3 menu displays. 6. Level 3 for Position functions display the adjustment scales. Use the Minus button to decrease and the Plus button to increase the screen Horizontal and Vertical positions. ✎ Some menu functions display adjustment scales in the level 2 menu, while others display adjustment scales in the level 3 menu. 7. After making the adjustment, select Save and Return. To void any changes made, select Cancel instead of Save and Return. 8. To exit from the on-screen menu, select Exit from the Main menu. If the display is a second or third-level menu, select Save and Return or Cancel, then select Exit from the Main menu. Explaining Functions in the Analog On-Screen Menu I Brightness and Contrast-Adjusts the displayed image brightness and contrast ranges from 0 to 100. ✎ An example of a standard setting is to set the contrast level to 67 and the brightness level to 50. I Position-Fine-tunes the horizontal and vertical positions of the display. I Zoom-Magnifies an image up to a factor of 32 on the projection screen (zooms in to a specific area on the screen, and pans left, right, up, and down). I Keystone-Adjusts image distortion at the top and bottom widths of the screen caused by tilting the projector. I Picture-Adjusts the gamma value or degree of contrast of darkness or light for the projected image. 2-6 Using the Projector
-
 1
1 -
2
-
3
-
4
-
5
-
6
-
7
-
8
-
9
-
10
-
11
-
12
-
13
-
14
-
15
-
16
-
17
-
18
-
19
-
20
-
21
-
22
-
23
-
24
-
 25
25 -
 26
26 -
 27
27 -
 28
28 -
 29
29 -
 30
30 -
 31
31 -
 32
32 -
 33
33 -
 34
34 -
 35
35 -
36
-
37
-
38
-
39
-
40
-
41
-
42
-
43
-
44
-
45
-
46
-
47
-
48
-
49
-
50
-
51
-
52
-
53
-
54
-
55
-
56
-
57
-
58
-
59
-
60
-
61
-
62
-
63
-
64
-
65
-
66
-
67
-
68
 |
 |