HP Mini 110-4100ca HP Mini 200 - Maintenance and Service Guide - Page 71
of the display bezel until the bezel disengages from the display enclosure., the left and right sides
 |
View all HP Mini 110-4100ca manuals
Add to My Manuals
Save this manual to your list of manuals |
Page 71 highlights
3. Remove the display assembly (2). NOTE: Steps 4 through 9 apply only to Compaq Mini CQ10 and HP Mini 110 computer models. 4. If it is necessary to replace the display bezel or any of the display assembly subcomponents: a. Flex the inside edges of the top edge (1), the left and right sides (2), and the bottom edge (3) of the display bezel until the bezel disengages from the display enclosure. b. Remove the display bezel (4). The display bezel is available using spare part number 658503-001. Component replacement procedures 63
-
 1
1 -
2
-
3
-
4
-
5
-
6
-
7
-
8
-
9
-
10
-
11
-
12
-
13
-
14
-
15
-
16
-
17
-
18
-
19
-
20
-
21
-
22
-
23
-
24
-
25
-
26
-
27
-
28
-
29
-
30
-
31
-
32
-
33
-
34
-
35
-
36
-
37
-
38
-
39
-
40
-
41
-
42
-
43
-
44
-
45
-
46
-
47
-
48
-
49
-
50
-
51
-
52
-
53
-
54
-
55
-
56
-
57
-
58
-
59
-
60
-
61
-
62
-
63
-
64
-
65
-
 66
66 -
 67
67 -
 68
68 -
 69
69 -
 70
70 -
 71
71 -
 72
72 -
 73
73 -
 74
74 -
 75
75 -
 76
76 -
77
-
78
-
79
-
80
-
81
-
82
-
83
-
84
-
85
-
86
-
87
-
88
-
89
-
90
-
91
-
92
-
93
-
94
-
95
 |
 |

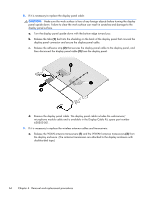
3.
Remove the display assembly
(2)
.
NOTE:
Steps 4 through 9 apply only to Compaq Mini CQ10 and HP Mini 110 computer
models.
4.
If it is necessary to replace the display bezel or any of the display assembly subcomponents:
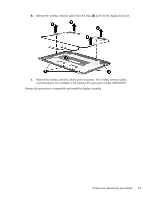
a.
Flex the inside edges of the top edge
(1)
, the left and right sides
(2)
, and the
bottom edge
(3)
of the display bezel until the bezel disengages from the display enclosure.
b.
Remove the display bezel
(4)
. The display bezel is available using spare part number
658503-001.
Component replacement procedures
63