HP Mini 110-4100ca HP Mini 200 - Maintenance and Service Guide - Page 73
display panel., that secure the display hinges to
 |
View all HP Mini 110-4100ca manuals
Add to My Manuals
Save this manual to your list of manuals |
Page 73 highlights
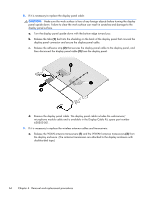
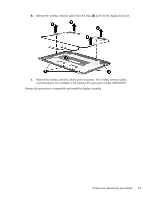
b. Lift the top edge of the display panel (2) and swing it up and forward until it rests at an angle. c. Remove the display panel. The display panel is available using spare part number 658511-001. 7. If it is necessary to replace the display hinges: a. Remove the four Phillips PM2.0×3.7 screws (1) that secure the display hinges to the display panel. b. Remove the display hinges (2). The display hinges include the display hinges and brackets and are available using spare part number 650711-001. Component replacement procedures 65
-
 1
1 -
2
-
3
-
4
-
5
-
6
-
7
-
8
-
9
-
10
-
11
-
12
-
13
-
14
-
15
-
16
-
17
-
18
-
19
-
20
-
21
-
22
-
23
-
24
-
25
-
26
-
27
-
28
-
29
-
30
-
31
-
32
-
33
-
34
-
35
-
36
-
37
-
38
-
39
-
40
-
41
-
42
-
43
-
44
-
45
-
46
-
47
-
48
-
49
-
50
-
51
-
52
-
53
-
54
-
55
-
56
-
57
-
58
-
59
-
60
-
61
-
62
-
63
-
64
-
65
-
66
-
67
-
 68
68 -
 69
69 -
 70
70 -
 71
71 -
 72
72 -
 73
73 -
 74
74 -
 75
75 -
 76
76 -
 77
77 -
 78
78 -
79
-
80
-
81
-
82
-
83
-
84
-
85
-
86
-
87
-
88
-
89
-
90
-
91
-
92
-
93
-
94
-
95
 |
 |

b.
Lift the top edge of the display panel
(2)
and swing it up and forward until it rests at
an angle.
c.
Remove the display panel. The display panel is available using spare part number
658511-001.
7.
If it is necessary to replace the display hinges:
a.
Remove the four Phillips PM2.0×3.7 screws
(1)
that secure the display hinges to the
display panel.
b.
Remove the display hinges
(2)
. The display hinges include the display hinges and brackets
and are available using spare part number 650711-001.
Component replacement procedures
65