HP Notebook 100 Compaq Armada 100S and Notebook 100 Series Maintenance and Ser - Page 92
Removing the PC Card Door
 |
View all HP Notebook 100 manuals
Add to My Manuals
Save this manual to your list of manuals |
Page 92 highlights
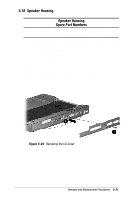
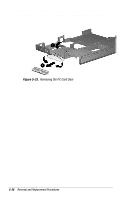
If necessary, remove the PC Card door by partially opening the door –, flexing the middle of the door away from the computer —, and removing the door (Figure 5-33). Figure 5-33. Removing the PC Card Door 5-36 Removal and Replacement Procedures
-
 1
1 -
2
-
3
-
4
-
5
-
6
-
7
-
8
-
9
-
10
-
11
-
12
-
13
-
14
-
15
-
16
-
17
-
18
-
19
-
20
-
21
-
22
-
23
-
24
-
25
-
26
-
27
-
28
-
29
-
30
-
31
-
32
-
33
-
34
-
35
-
36
-
37
-
38
-
39
-
40
-
41
-
42
-
43
-
44
-
45
-
46
-
47
-
48
-
49
-
50
-
51
-
52
-
53
-
54
-
55
-
56
-
57
-
58
-
59
-
60
-
61
-
62
-
63
-
64
-
65
-
66
-
67
-
68
-
69
-
70
-
71
-
72
-
73
-
74
-
75
-
76
-
77
-
78
-
79
-
80
-
81
-
82
-
83
-
84
-
85
-
86
-
 87
87 -
 88
88 -
 89
89 -
 90
90 -
 91
91 -
 92
92 -
 93
93 -
 94
94 -
 95
95 -
 96
96 -
 97
97 -
98
-
99
-
100
-
101
-
102
-
103
-
104
-
105
-
106
-
107
-
108
-
109
-
110
 |
 |

5-36
Removal and Replacement Procedures
If necessary, remove the PC Card door by partially opening the door
,
flexing the middle of the door away from the computer
, and removing
the door (Figure 5-33).
Figure 5-33.
Removing the PC Card Door