HP OMEN 15-dh0000 Maintenance and Service Guide - Page 57
configuration, Heat sink
 |
View all HP OMEN 15-dh0000 manuals
Add to My Manuals
Save this manual to your list of manuals |
Page 57 highlights
5. Remove the heat sink/fan assembly (5). NOTE: Heat sink appearance may vary. IMPORTANT: Thermal material must be applied on site and therefore is not included in component spare part kits. When removing any part that also requires removal of the heat sink, be sure to order and apply thermal material. 6. Heat sink configuration 1 Apply thermal grease to the integrated processors on the system board (1). Use thermal pads on the remaining locations on the system board (2). Component replacement procedures 47
-
 1
1 -
2
-
3
-
4
-
5
-
6
-
7
-
8
-
9
-
10
-
11
-
12
-
13
-
14
-
15
-
16
-
17
-
18
-
19
-
20
-
21
-
22
-
23
-
24
-
25
-
26
-
27
-
28
-
29
-
30
-
31
-
32
-
33
-
34
-
35
-
36
-
37
-
38
-
39
-
40
-
41
-
42
-
43
-
44
-
45
-
46
-
47
-
48
-
49
-
50
-
51
-
 52
52 -
 53
53 -
 54
54 -
 55
55 -
 56
56 -
 57
57 -
 58
58 -
 59
59 -
 60
60 -
 61
61 -
 62
62 -
63
-
64
-
65
-
66
-
67
-
68
-
69
-
70
-
71
-
72
-
73
-
74
-
75
-
76
-
77
-
78
-
79
-
80
-
81
-
82
-
83
-
84
-
85
-
86
-
87
-
88
-
89
 |
 |

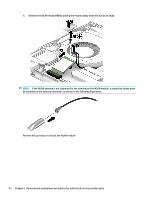
5.
Remove the heat sink/fan assembly
(5)
.
NOTE:
Heat sink appearance may vary.
IMPORTANT:
Thermal material must be applied on site and therefore is not included in component
spare part kits. When removing any part that also requires removal of the heat sink, be sure to order and
apply thermal material.
6.
Heat sink
configuration
1
Apply thermal grease to the integrated processors on the system board
(1)
. Use thermal pads on the
remaining locations on the system board
(2)
.
Component replacement procedures
47