HP OMEN 17-w000 Maintenance & Service Guide: Models with GeForce GTX 1050/ - Page 78
Display assembly, Battery see
 |
View all HP OMEN 17-w000 manuals
Add to My Manuals
Save this manual to your list of manuals |
Page 78 highlights
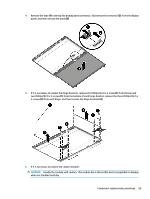
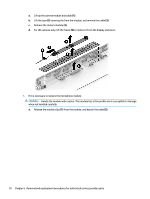
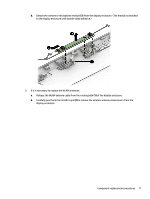
Display assembly Description Antenna, dual Back cover in Shadow Mesh, includes dual antenna Camera ● 3D camera (for products with Intel 6th generation processors only) ● HD camera (for all products) Display bezel ● For products with 3D camera ● For products with HD camera Display cable ● For products with non-touch FHD screen and HD camera ● For products with non-touch FHD screen, 3D camera, and Intel 6th generation processors ● For products with non-touch UHD screen and HD camera ● For products with non-touch UHD screen, 3D camera, and Intel 6th generation processors Frame for HD camera Hinge caps Hinge kit (includes left and right hinges) Microphone board (for 3D camera only) Raw panel 43.94 cm (17.3") ● Non-touch screen, FHD, AG, UWVA, 300 eDP, Flat4 GF ● Non-touch screen, UHD, AG, UWVA, 300 eDP, 1.3 PSR, Flat GF Spare part number 857443-001 862968-001 781624-005 846006-003 857451-001 857450-001 857456-001 857458-001 857459-001 857461-001 857475-001 862955-001 857464-001 857471-001 798926-009 853322-003 IMPORTANT: Make special note of each screw and screw lock size and location during removal and replacement. Before removing the display assembly, follow these steps: 1. Shut down the computer. 2. Disconnect the power from the computer by first unplugging the power cord from the AC outlet and then unplugging the AC adapter from the computer. 3. Disconnect all external devices connected to the computer. 4. Remove the following components: a. Battery (see Battery on page 34) b. Optical drive (see Optical drive on page 35) c. Base enclosure (see Base enclosure on page 37) d. Hard drive (see Hard drive on page 39) 66 Chapter 6 Removal and replacement procedures for authorized service provider parts
-
 1
1 -
2
-
3
-
4
-
5
-
6
-
7
-
8
-
9
-
10
-
11
-
12
-
13
-
14
-
15
-
16
-
17
-
18
-
19
-
20
-
21
-
22
-
23
-
24
-
25
-
26
-
27
-
28
-
29
-
30
-
31
-
32
-
33
-
34
-
35
-
36
-
37
-
38
-
39
-
40
-
41
-
42
-
43
-
44
-
45
-
46
-
47
-
48
-
49
-
50
-
51
-
52
-
53
-
54
-
55
-
56
-
57
-
58
-
59
-
60
-
61
-
62
-
63
-
64
-
65
-
66
-
67
-
68
-
69
-
70
-
71
-
72
-
 73
73 -
 74
74 -
 75
75 -
 76
76 -
 77
77 -
 78
78 -
 79
79 -
 80
80 -
 81
81 -
 82
82 -
 83
83 -
84
-
85
-
86
-
87
-
88
-
89
-
90
-
91
-
92
-
93
-
94
-
95
-
96
-
97
-
98
-
99
-
100
-
101
-
102
-
103
-
104
 |
 |
