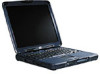
HP OmniBook xe3-gd HP Pavilion Notebook - Startup Guide - Page 62
To install the hard disk drive again - replace hard drive
 |
View all HP OmniBook xe3-gd manuals
Add to My Manuals
Save this manual to your list of manuals |
Page 62 highlights
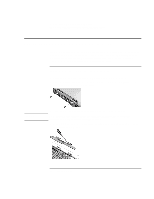
Solving Problems with Your Computer Removing and Reinstalling the Hard Disk Drive To install the hard disk drive again If you have removed the hard disk drive when you shipped the computer for service or for some other reason, here's how to install it again: 1. Unplug the AC adapter and remove the battery. 2. Close the display, and from the rear of the computer remove the two Phillips screws from the back of the plastic hinge covers. 3. Lean the display backward as far as possible, so that it is out of the way. 4. Carefully pry up the plastic cover above the keyboard at the hinges, using a flathead screwdriver, and remove it. 5. Unscrew the four Phillips screws at the top of the keyboard. (They remain attached to the keyboard.) 6. Slide the keyboard backward to detach it, then tilt it forward and turn it upside down. (Keep the keyboard cable attached.) 7. Important. Move the wires to the left of the drive location out of the way. 8. Tilt up the rear of the hard disk drive you want to install and-rocking it carefully side to side-push the drive forward into the connector. 9. Fasten the hard disk drive with the four attached Phillips screws in the sides of the case. 10. Tilt the keyboard back, slide the flanges on the front edge forward into the slots, and fasten the keyboard with the four attached Phillips screws at the top. 11. Replace the plastic cover that is above the keyboard, front edge first. 12. Hold both hinge covers and snap the plastic cover in place. If necessary, push downward at each end of the cover to secure it. 13. Close the display and replace the two screws at the rear of the hinge covers. 14. Insert the battery, connect the AC adapter, and press the reset button. 15. If necessary, restore the original Windows software and operating system with the Recovery CD. 62 Startup Guide
-
 1
1 -
2
-
3
-
4
-
5
-
6
-
7
-
8
-
9
-
10
-
11
-
12
-
13
-
14
-
15
-
16
-
17
-
18
-
19
-
20
-
21
-
22
-
23
-
24
-
25
-
26
-
27
-
28
-
29
-
30
-
31
-
32
-
33
-
34
-
35
-
36
-
37
-
38
-
39
-
40
-
41
-
42
-
43
-
44
-
45
-
46
-
47
-
48
-
49
-
50
-
51
-
52
-
53
-
54
-
55
-
56
-
 57
57 -
 58
58 -
 59
59 -
 60
60 -
 61
61 -
 62
62 -
 63
63 -
 64
64 -
 65
65 -
 66
66 -
 67
67 -
68
-
69
-
70
-
71
-
72
-
73
-
74
 |
 |