HP Pavilion a100 HP Pavilion Desktop PCs - (English) Quick Start Guide UK SPR - Page 60
Using a Microphone
 |
View all HP Pavilion a100 manuals
Add to My Manuals
Save this manual to your list of manuals |
Page 60 highlights
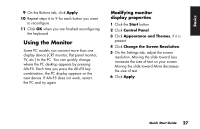
Using a Microphone Your PC comes with one microphone connector in the back of the PC. Some models have another microphone connector in the front of the PC. Only one microphone connector works at a time, and the back connector is ready to use. For PCs with the multi-channel audio speakers option, the microphone connector in the front of the PC, if present, is ready to use; see "To use the microphone with multi-channel audio" on page 30. To connect a microphone to the front of your PC, select the working microphone: Note: If you connect your microphone to the back of your PC, you do not need to perform this procedure. 1 Double-click the Volume icon on the taskbar. The Volume Control settings window opens. Note: If you do not see this Volume icon, click Start, Control Panel, Sounds, Speech, and Audio Devices, if it is present, and then double-click Sounds and Audio Devices to open the Sounds and Audio Devices Properties window. On Volume tab, place a check in the Place volume icon in the taskbar check box. Click Apply, and then click OK. The Volume icon appears in the taskbar. 2 In the Volume Control window, select Options and click Properties. 3 In Adjust volume for, click Recording. 4 In Show the following volume controls, place a check in the Microphone check box. 5 Click OK. 6 Click the Advanced button in the Microphone column. If you do not see the Advanced button, select Options from the Recording Control window, and then click Advanced Controls. 32 HP Pavilion home PC
-
 1
1 -
2
-
3
-
4
-
5
-
6
-
7
-
8
-
9
-
10
-
11
-
12
-
13
-
14
-
15
-
16
-
17
-
18
-
19
-
20
-
21
-
22
-
23
-
24
-
25
-
26
-
27
-
28
-
29
-
30
-
31
-
32
-
33
-
34
-
35
-
36
-
37
-
38
-
39
-
40
-
41
-
42
-
43
-
44
-
45
-
46
-
47
-
48
-
49
-
50
-
51
-
52
-
53
-
54
-
 55
55 -
 56
56 -
 57
57 -
 58
58 -
 59
59 -
 60
60 -
 61
61 -
 62
62 -
 63
63 -
 64
64 -
 65
65 -
66
-
67
-
68
-
69
-
70
-
71
-
72
-
73
-
74
-
75
-
76
-
77
-
78
-
79
-
80
-
81
-
82
-
83
-
84
-
85
-
86
-
87
-
88
-
89
-
90
-
91
-
92
-
93
-
94
-
95
-
96
-
97
-
98
-
99
-
100
-
101
-
102
-
103
-
104
-
105
-
106
-
107
-
108
-
109
-
110
-
111
-
112
-
113
-
114
-
115
-
116
-
117
-
118
-
119
-
120
-
121
-
122
-
123
-
124
-
125
-
126
-
127
-
128
-
129
-
130
-
131
-
132
-
133
-
134
-
135
-
136
-
137
-
138
 |
 |
