HP Pavilion g7 HP Pavilion g7 Notebook PC - Maintenance and Service Guide - Page 56
from the hard drive, remove and replace the components.
 |
View all HP Pavilion g7 manuals
Add to My Manuals
Save this manual to your list of manuals |
Page 56 highlights
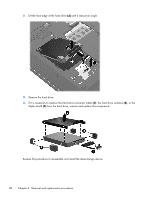
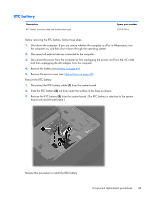
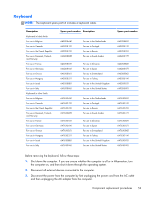
2. Lift the front edge of the hard drive (2) until it rests at an angle. 3. Remove the hard drive. 4. If it is necessary to replace the hard drive connector cable (1), the hard drive isolators (2), or the Mylar shield (3) from the hard drive, remove and replace the components. Reverse this procedure to reassemble and install the mass storage device. 48 Chapter 4 Removal and replacement procedures
-
 1
1 -
2
-
3
-
4
-
5
-
6
-
7
-
8
-
9
-
10
-
11
-
12
-
13
-
14
-
15
-
16
-
17
-
18
-
19
-
20
-
21
-
22
-
23
-
24
-
25
-
26
-
27
-
28
-
29
-
30
-
31
-
32
-
33
-
34
-
35
-
36
-
37
-
38
-
39
-
40
-
41
-
42
-
43
-
44
-
45
-
46
-
47
-
48
-
49
-
50
-
 51
51 -
 52
52 -
 53
53 -
 54
54 -
 55
55 -
 56
56 -
 57
57 -
 58
58 -
 59
59 -
 60
60 -
 61
61 -
62
-
63
-
64
-
65
-
66
-
67
-
68
-
69
-
70
-
71
-
72
-
73
-
74
-
75
-
76
-
77
-
78
-
79
-
80
-
81
-
82
-
83
-
84
-
85
-
86
-
87
-
88
-
89
-
90
-
91
-
92
-
93
-
94
-
95
-
96
-
97
-
98
-
99
-
100
-
101
-
102
-
103
-
104
-
105
-
106
-
107
-
108
-
109
-
110
-
111
-
112
-
113
-
114
-
115
-
116
-
117
-
118
-
119
-
120
-
121
-
122
-
123
-
124
-
125
-
126
-
127
-
128
-
129
-
130
 |
 |

2.
Lift the front edge of the hard drive
(2)
until it rests at an angle.
3.
Remove the hard drive.
4.
If it is necessary to replace the hard drive connector cable
(1)
, the hard drive isolators
(2)
, or the
Mylar shield
(3)
from the hard drive, remove and replace the components.
Reverse this procedure to reassemble and install the mass storage device.
48
Chapter 4
Removal and replacement procedures