HP Presario CQ43-300 Compaq Presario CQ43 Notebook PC Maintenance and Service - Page 60
of the keyboard until the keyboard disengages from the computer.
 |
View all HP Presario CQ43-300 manuals
Add to My Manuals
Save this manual to your list of manuals |
Page 60 highlights
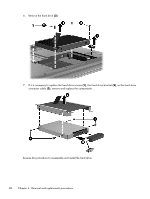
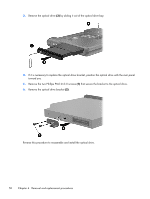
Remove the keyboard: 1. Remove the Phillips PM2.5×5.0 screw that secures the keyboard to the computer. 2. Rest and secure the computer on its left side. 3. Partially open the computer. 4. Insert a screw driver or similar thin tool into the keyboard release hole, and then press on the back of the keyboard until the keyboard disengages from the computer. 5. Turn the computer right-side up with the front toward you. 52 Chapter 4 Removal and replacement procedures
-
 1
1 -
2
-
3
-
4
-
5
-
6
-
7
-
8
-
9
-
10
-
11
-
12
-
13
-
14
-
15
-
16
-
17
-
18
-
19
-
20
-
21
-
22
-
23
-
24
-
25
-
26
-
27
-
28
-
29
-
30
-
31
-
32
-
33
-
34
-
35
-
36
-
37
-
38
-
39
-
40
-
41
-
42
-
43
-
44
-
45
-
46
-
47
-
48
-
49
-
50
-
51
-
52
-
53
-
54
-
 55
55 -
 56
56 -
 57
57 -
 58
58 -
 59
59 -
 60
60 -
 61
61 -
 62
62 -
 63
63 -
 64
64 -
 65
65 -
66
-
67
-
68
-
69
-
70
-
71
-
72
-
73
-
74
-
75
-
76
-
77
-
78
-
79
-
80
-
81
-
82
-
83
-
84
-
85
-
86
-
87
-
88
-
89
-
90
-
91
-
92
-
93
-
94
-
95
-
96
-
97
-
98
-
99
-
100
-
101
-
102
-
103
-
104
-
105
-
106
-
107
-
108
-
109
-
110
-
111
-
112
-
113
-
114
-
115
-
116
-
117
-
118
-
119
-
120
-
121
 |
 |
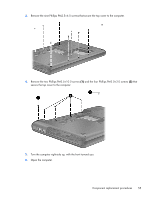
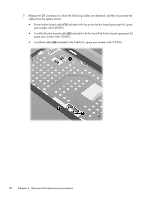
Remove the keyboard:
1.
Remove the Phillips PM2.5×5.0 screw that secures the keyboard to the computer.
2.
Rest and secure the computer on its left side.
3.
Partially open the computer.
4.
Insert a screw driver or similar thin tool into the keyboard release hole, and then press on the back
of the keyboard until the keyboard disengages from the computer.
5.
Turn the computer right-side up with the front toward you.
52
Chapter 4
Removal and replacement procedures