HP Presario CQ43-300 Compaq Presario CQ43 Notebook PC Maintenance and Service - Page 78
down in front of the display enclosure., Removal and replacement procedures
 |
View all HP Presario CQ43-300 manuals
Add to My Manuals
Save this manual to your list of manuals |
Page 78 highlights
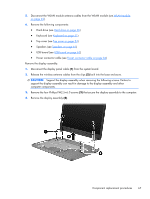
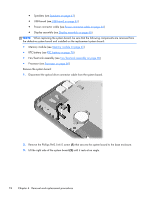
8. If it is necessary to replace the display panel: a. Remove the two Phillips PM2.5×4.0 screws (1) and four Phillips PM2.5×5.0 screws (2) that secure the display panel to the display enclosure. b. Lift the top edge of the display panel, and then swing it up and forward until it rests upside down in front of the display enclosure. 70 Chapter 4 Removal and replacement procedures
-
 1
1 -
2
-
3
-
4
-
5
-
6
-
7
-
8
-
9
-
10
-
11
-
12
-
13
-
14
-
15
-
16
-
17
-
18
-
19
-
20
-
21
-
22
-
23
-
24
-
25
-
26
-
27
-
28
-
29
-
30
-
31
-
32
-
33
-
34
-
35
-
36
-
37
-
38
-
39
-
40
-
41
-
42
-
43
-
44
-
45
-
46
-
47
-
48
-
49
-
50
-
51
-
52
-
53
-
54
-
55
-
56
-
57
-
58
-
59
-
60
-
61
-
62
-
63
-
64
-
65
-
66
-
67
-
68
-
69
-
70
-
71
-
72
-
 73
73 -
 74
74 -
 75
75 -
 76
76 -
 77
77 -
 78
78 -
 79
79 -
 80
80 -
 81
81 -
 82
82 -
 83
83 -
84
-
85
-
86
-
87
-
88
-
89
-
90
-
91
-
92
-
93
-
94
-
95
-
96
-
97
-
98
-
99
-
100
-
101
-
102
-
103
-
104
-
105
-
106
-
107
-
108
-
109
-
110
-
111
-
112
-
113
-
114
-
115
-
116
-
117
-
118
-
119
-
120
-
121
 |
 |

8.
If it is necessary to replace the display panel:
a.
Remove the two Phillips PM2.5×4.0 screws
(1)
and four Phillips PM2.5×5.0 screws
(2)
that
secure the display panel to the display enclosure.
b.
Lift the top edge of the display panel, and then swing it up and forward until it rests upside
down in front of the display enclosure.
70
Chapter 4
Removal and replacement procedures