HP Q5736A User Guide - Page 11
Printer menu, Control panel, To navigate the printer menu, Cancel, The printer menu structure
 |
View all HP Q5736A manuals
Add to My Manuals
Save this manual to your list of manuals |
Page 11 highlights
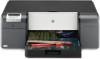
Chapter 1 Control panel 1 Printer screen: Use this screen to view menus and messages. 2 Menu: Press to view the printer menu. 3 Previous: Press to navigate to a previous menu option. 4 OK: Press to select a menu option or respond to a prompt on the printer screen. 5 Next: Press to navigate to the next menu option. 6 Cancel: Press to exit a menu option or to stop the current print job. 7 Attention light: Flashes red if an error requiring user action occurs. An error message is also displayed on the printer screen. Appears solid amber if there is an unrecoverable error. For more information, see Troubleshooting. 8 Ink level dots: These dots show you the position of each colored ink cartridge in the ink cartridge stalls below. When the printer is idle, the printer screen displays a bar graph to indicate the ink level of each cartridge in the order of the colored dots. Printer menu Press Menu to open the printer menu. To navigate the printer menu ● Press or to scroll through the menus or options displayed on the printer screen. ● Any menu with a triangle next to it has submenus or options. Press OK to display the submenus or options. ● Press Cancel to exit the current menu. The printer menu structure The following options are available from the printer menu. ● Print test page: Select this option to print a test page containing information about the printer such as the condition of the ink cartridges, the printer serial number, and the firmware version. See Print a test page. ● Print sample page: Select this option to print a sample photo. See Print a sample page. 8 HP Photosmart Pro B9100 series printer
-
 1
1 -
2
-
3
-
4
-
5
-
 6
6 -
 7
7 -
 8
8 -
 9
9 -
 10
10 -
 11
11 -
 12
12 -
 13
13 -
 14
14 -
 15
15 -
 16
16 -
17
-
18
-
19
-
20
-
21
-
22
-
23
-
24
-
25
-
26
-
27
-
28
-
29
-
30
-
31
-
32
-
33
-
34
-
35
-
36
-
37
-
38
-
39
-
40
-
41
-
42
-
43
-
44
-
45
-
46
-
47
-
48
-
49
-
50
-
51
-
52
-
53
-
54
-
55
-
56
-
57
-
58
-
59
-
60
-
61
-
62
-
63
-
64
-
65
-
66
-
67
-
68
-
69
-
70
-
71
-
72
-
73
-
74
-
75
 |
 |
