HP Q5736A User Guide - Page 19
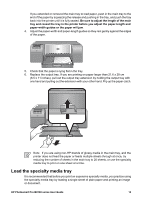
with the side to be printed facing up, specialty media tray.
 |
View all HP Q5736A manuals
Add to My Manuals
Save this manual to your list of manuals |
Page 19 highlights
Chapter 2 2. Pull out the output tray extension by holding the output tray with one hand and pulling out the extension with your other hand. Flip up the paper catch at the end of the output tray extension to prevent paper from falling onto the floor. 3. Load one sheet of canvas media with the side to be printed facing up on the specialty media tray. a. Open the top door to check that the media feeds under the rollers smoothly. 16 HP Photosmart Pro B9100 series printer
-
 1
1 -
2
-
3
-
4
-
5
-
6
-
7
-
8
-
9
-
10
-
11
-
12
-
13
-
 14
14 -
 15
15 -
 16
16 -
 17
17 -
 18
18 -
 19
19 -
 20
20 -
 21
21 -
 22
22 -
 23
23 -
 24
24 -
25
-
26
-
27
-
28
-
29
-
30
-
31
-
32
-
33
-
34
-
35
-
36
-
37
-
38
-
39
-
40
-
41
-
42
-
43
-
44
-
45
-
46
-
47
-
48
-
49
-
50
-
51
-
52
-
53
-
54
-
55
-
56
-
57
-
58
-
59
-
60
-
61
-
62
-
63
-
64
-
65
-
66
-
67
-
68
-
69
-
70
-
71
-
72
-
73
-
74
-
75
 |
 |

2.
Pull out the output tray extension by holding the output tray with one hand and pulling
out the extension with your other hand. Flip up the paper catch at the end of the
output tray extension to prevent paper from falling onto the floor.
3.
Load one sheet of canvas media
with the side to be printed facing up
on the
specialty media tray.
a.
Open the top door to check that the media feeds under the rollers smoothly.
Chapter 2
16
HP Photosmart Pro B9100 series printer