HP Q5736A User Guide - Page 15
Load the main tray, Rigid Media
 |
View all HP Q5736A manuals
Add to My Manuals
Save this manual to your list of manuals |
Page 15 highlights
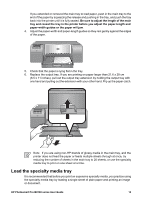
Chapter 2 (continued) Media Examples: Canvas; Photo Rag; Watercolor paper Main tray Rigid Media Examples: Photo board Not supported Any media thicker than Not supported 1.5 mm Specialty media tray Recommended Not supported Note You do not need to remove media from the main tray before you use the specialty media tray. Load the main tray To load the main tray 1. Remove the output tray completely by grasping the sides of the tray with both hands and sliding it out towards you. The main tray is now accessible. 2. Move the paper-width and paper-length guides to make room for the paper. 3. Place a stack of paper in the main tray, in portrait orientation and with the side to be printed facing down. Align the paper against the right side of the tray and against the paper stops at the back of the tray. Check that the stack of paper is no higher than the top of the paper-width guide. Tip For easier access or for loading larger sizes of media, extend the main tray by squeezing the main tray release and pulling the tray towards you. You can remove the tray from the printer if necessary, by grasping the sides of the tray with both hands and pulling it towards you. 12 HP Photosmart Pro B9100 series printer
-
 1
1 -
2
-
3
-
4
-
5
-
6
-
7
-
8
-
9
-
 10
10 -
 11
11 -
 12
12 -
 13
13 -
 14
14 -
 15
15 -
 16
16 -
 17
17 -
 18
18 -
 19
19 -
 20
20 -
21
-
22
-
23
-
24
-
25
-
26
-
27
-
28
-
29
-
30
-
31
-
32
-
33
-
34
-
35
-
36
-
37
-
38
-
39
-
40
-
41
-
42
-
43
-
44
-
45
-
46
-
47
-
48
-
49
-
50
-
51
-
52
-
53
-
54
-
55
-
56
-
57
-
58
-
59
-
60
-
61
-
62
-
63
-
64
-
65
-
66
-
67
-
68
-
69
-
70
-
71
-
72
-
73
-
74
-
75
 |
 |
