HP Q5736A User Guide - Page 9
Paper trays, HP Photosmart Pro B9100 series printer
 |
View all HP Q5736A manuals
Add to My Manuals
Save this manual to your list of manuals |
Page 9 highlights
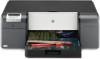
Chapter 1 Paper trays 1 Main tray: Place a stack of photo paper, plain paper, or other non-rigid media in this tray for printing. Load the media in portrait orientation and with the side to be printed facing down. Squeeze the main tray release to lengthen or shorten the main tray, depending on the size of paper you are loading. 2 Output tray: Print jobs come out here. For easier access to the main tray, remove this tray by pulling it out towards you. 3 Specialty media tray (open): Insert a single sheet of rigid or thick media, such as card stock, in this tray. Load the media with the side to be printed facing up. 4 Main tray release: Squeeze this release and pull it towards you to extend or retract the main tray extension, or to remove the tray from the printer. 5 Paper catch: Flip up to keep print jobs from falling off the output tray extension. 6 Output tray extension: Pull it towards you to extend the output tray to catch the printed paper as it is ejected from the printer. 6 HP Photosmart Pro B9100 series printer
-
 1
1 -
2
-
3
-
 4
4 -
 5
5 -
 6
6 -
 7
7 -
 8
8 -
 9
9 -
 10
10 -
 11
11 -
 12
12 -
 13
13 -
 14
14 -
15
-
16
-
17
-
18
-
19
-
20
-
21
-
22
-
23
-
24
-
25
-
26
-
27
-
28
-
29
-
30
-
31
-
32
-
33
-
34
-
35
-
36
-
37
-
38
-
39
-
40
-
41
-
42
-
43
-
44
-
45
-
46
-
47
-
48
-
49
-
50
-
51
-
52
-
53
-
54
-
55
-
56
-
57
-
58
-
59
-
60
-
61
-
62
-
63
-
64
-
65
-
66
-
67
-
68
-
69
-
70
-
71
-
72
-
73
-
74
-
75
 |
 |
