HP Q5736A User Guide - Page 18
raised edge, To load canvas in the specialty media tray, on the printer.
 |
View all HP Q5736A manuals
Add to My Manuals
Save this manual to your list of manuals |
Page 18 highlights
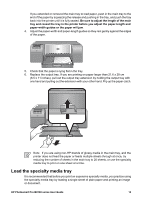
Align the right edge of the media against the raised edge of the tray and not against the side of the printer. Misaligned media can result in skewing or other printing problems, including paper jams. Tip If the media is curled, you can open the top door to check that the media feeds under the rollers smoothly. Be sure to close the top door again. 5. Press OK on the printer. To load canvas in the specialty media tray 1. Lower the specialty media tray. Wait while the printer raises the printhead assembly in preparation for printing. HP Photosmart Pro B9100 series User Guide 15
-
 1
1 -
2
-
3
-
4
-
5
-
6
-
7
-
8
-
9
-
10
-
11
-
12
-
 13
13 -
 14
14 -
 15
15 -
 16
16 -
 17
17 -
 18
18 -
 19
19 -
 20
20 -
 21
21 -
 22
22 -
 23
23 -
24
-
25
-
26
-
27
-
28
-
29
-
30
-
31
-
32
-
33
-
34
-
35
-
36
-
37
-
38
-
39
-
40
-
41
-
42
-
43
-
44
-
45
-
46
-
47
-
48
-
49
-
50
-
51
-
52
-
53
-
54
-
55
-
56
-
57
-
58
-
59
-
60
-
61
-
62
-
63
-
64
-
65
-
66
-
67
-
68
-
69
-
70
-
71
-
72
-
73
-
74
-
75
 |
 |

Align the right edge of the media against the
raised edge
of the
tray
and not against
the side of the printer. Misaligned media can result in skewing or other printing
problems, including paper jams.
Tip
If the media is curled, you can open the top door to check that the media
feeds under the rollers smoothly. Be sure to close the top door again.
5.
Press
OK
on the printer.
To load canvas in the specialty media tray
1.
Lower the specialty media tray.
Wait while the printer raises the printhead assembly in preparation for printing.
HP Photosmart Pro B9100 series User Guide
15