HP R1500 HP UPS R3000 User Guide - Page 30
Available voltage settings, Initiating a self-test
 |
View all HP R1500 manuals
Add to My Manuals
Save this manual to your list of manuals |
Page 30 highlights
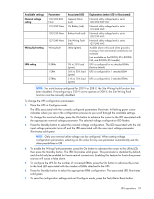
NOTE: Configure mode times out after 2 minutes of inactivity. If the Test/Alarm Reset button has not been pressed, any new selections are not saved. For the location of buttons, see "UPS front panel controls (on page 7)." For the location of LEDs, see "UPS front panel LED indicators (on page 8)." Available voltage settings NOTE: An asterisk (*) indicates the default setting. UPS model R3000 NA R3000j JPN R3000h NA, R3000h JPN R3000 INT Available settings utility voltage (VAC) 100 110 120* 127 100* 110 120 127 200/208* 220 230 240 200/208 220 230* 240 Associated LED ("UPS front panel LED indicators" on page 8) General Alarm On Battery Battery Fault Site Wiring Fault General Alarm On Battery Battery Fault Site Wiring Fault General Alarm On Battery Battery Fault Site Wiring Fault General Alarm On Battery Battery Fault Site Wiring Fault Initiating a self-test To initiate a self-test, press and hold the Test/Alarm Reset button ("UPS front panel controls" on page 7) for three seconds. Because a portion of the self-test requires battery power, the self-test cannot be initiated if the batteries are less than 90 percent charged. If the UPS detects a problem, the appropriate LED ("UPS front panel LED indicators" on page 8) illuminates and an audible alarm may sound. For information on what to do if the self-test detects a problem, see "Troubleshooting (on page 41)." UPS operations 30
-
 1
1 -
2
-
3
-
4
-
5
-
6
-
7
-
8
-
9
-
10
-
11
-
12
-
13
-
14
-
15
-
16
-
17
-
18
-
19
-
20
-
21
-
22
-
23
-
24
-
 25
25 -
 26
26 -
 27
27 -
 28
28 -
 29
29 -
 30
30 -
 31
31 -
 32
32 -
 33
33 -
 34
34 -
 35
35 -
36
-
37
-
38
-
39
-
40
-
41
-
42
-
43
-
44
-
45
-
46
-
47
-
48
-
49
-
50
-
51
-
52
-
53
-
54
-
55
-
56
-
57
-
58
-
59
-
60
-
61
-
62
-
63
-
64
-
65
 |
 |
