HP R837 User Guide - Page 18
Using the Picture Capture and Video Record menus, Picture Capture, Panorama, Shutter, Instant Review
 |
UPC - 808736803915
View all HP R837 manuals
Add to My Manuals
Save this manual to your list of manuals |
Page 18 highlights
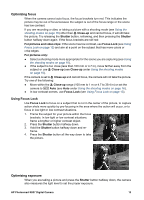
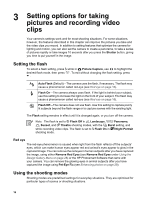
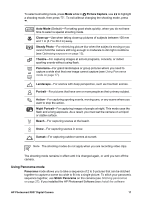
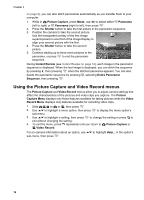
Chapter 3 on page 9), you can also stitch panoramas automatically as you transfer them to your computer. 1. While in Picture Capture, press Mode, use to select either Panorama (left to right) or Panorama (right to left), then press . 2. Press the Shutter button to take the first picture in the panoramic sequence. 3. Position the camera to take the second picture. Use the transparent overlay of the first image superimposed on one third of the Image Display to align your second picture with the first. 4. Press the Shutter button to take the second picture. 5. Continue adding up to three more pictures to the panorama, or press to end the panoramic sequence. During Instant Review (see Instant Review on page 12), each image in the panoramic sequence is displayed. When the last image is displayed, you can stitch the sequence by pressing , then pressing when the stitched panorama appears. You can also delete the panoramic sequence by pressing , selecting Entire Panoramic Sequence, then pressing . Using the Picture Capture and Video Record menus The Picture Capture and Video Record menus allow you to adjust camera settings that affect the characteristics of the pictures and video clips you capture. The Picture Capture Menu displays only those features available for taking pictures while the Video Record Menu displays only features available for recording video clips. 1. Slide to or , then press . 2. Use to highlight a menu option, then press to display the menu option's sub-menu. 3. Use to highlight a setting, then press to change the setting or press to exit without changing the setting. 4. To exit the menu, press repeatedly until you return to Picture Capture or Video Record. For on-camera information about an option, use sub-menu, then press . to highlight Help... in the option's 18
-
 1
1 -
2
-
3
-
4
-
5
-
6
-
7
-
8
-
9
-
10
-
11
-
12
-
 13
13 -
 14
14 -
 15
15 -
 16
16 -
 17
17 -
 18
18 -
 19
19 -
 20
20 -
 21
21 -
 22
22 -
 23
23 -
24
-
25
-
26
-
27
-
28
-
29
-
30
-
31
-
32
-
33
-
34
-
35
-
36
-
37
-
38
-
39
-
40
-
41
-
42
-
43
-
44
-
45
-
46
-
47
-
48
-
49
-
50
-
51
-
52
-
53
-
54
-
55
-
56
 |
 |
