HP R837 User Guide - Page 30
Modifying colors, Adding borders, Touch Up, Design Gallery Menu, Creative, Enhance Photos
 |
UPC - 808736803915
View all HP R837 manuals
Add to My Manuals
Save this manual to your list of manuals |
Page 30 highlights
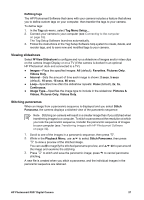
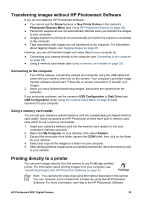
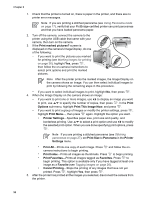
Chapter 5 - Touch Up-Allows you to touch up superficial blemishes in an image. • A yellow selection box displays in the center of the image. • Use to position the selection box over the blemish to be corrected. • Press to correct the selected blemish. • Repeat these steps, if necessary, to correct additional blemishes. • Once all corrections are made, press again to save the changes, create a new file, and return to the Design Gallery Menu. Press to exit the Creative sub-menu without saving and return to the Enhance Photos submenu - Brightness/Contrast-Allows you to adjust brightness, saturation, and contrast. 3. Slimming and Brightness/Contrast: Press to select the enhancement and display the Creative sub-menu. Follow the on-camera instructions to adjust the enhancement. 4. Slimming and Brightness/Contrast: Press to save a copy of the image with the specified enhancement and return to the Design Gallery Menu. Press to exit the Creative sub-menu without saving and return to the Enhance Photos submenu. Modifying colors Tip If you plan to apply artistic effects, modify colors, or enhance photos, do so before adding a border. Modify Color allows you to apply color schemes to the displayed image. To modify colors: 1. Use 2. Use to select Modify Color, then press . to select a color scheme and preview the effect it has on the image. - Black & White-Converts color images to black and white. - Sepia-Converts image to a brownish tone to look old-fashioned. - B&W Tints-Applies color tones on a black and white version of an image. - Color Tints-Adds an extra color layer to create a mood or feeling. 3. Press to select the color scheme and display the Creative sub-menu. Follow the on-camera instructions to adjust the color. 4. Press to save a copy of the image with the specified color scheme and return to the Design Gallery Menu. Press to exit the Creative sub-menu without saving and return to the Modify Color sub-menu. Adding borders Tip If you need to crop an image, do so before adding borders, applying artistic effects, or enhancing photos. If you plan to apply artistic effects, modify colors, or enhance photos, do so before adding a border. 30
-
 1
1 -
2
-
3
-
4
-
5
-
6
-
7
-
8
-
9
-
10
-
11
-
12
-
13
-
14
-
15
-
16
-
17
-
18
-
19
-
20
-
21
-
22
-
23
-
24
-
 25
25 -
 26
26 -
 27
27 -
 28
28 -
 29
29 -
 30
30 -
 31
31 -
 32
32 -
 33
33 -
 34
34 -
 35
35 -
36
-
37
-
38
-
39
-
40
-
41
-
42
-
43
-
44
-
45
-
46
-
47
-
48
-
49
-
50
-
51
-
52
-
53
-
54
-
55
-
56
 |
 |
