HP RP36000/3 HP 3 Phase UPS User Guide - Page 88
UPS battery replacement procedure, When hot-swapping batteries
 |
View all HP RP36000/3 manuals
Add to My Manuals
Save this manual to your list of manuals |
Page 88 highlights
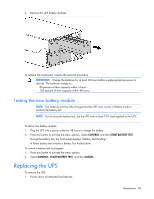
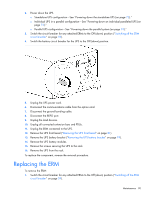
• Keep the area around the UPS clean and dust-free. If the environment is very dusty, clean the outside of the UPS regularly with a vacuum cleaner. • Maintain the ambient temperature at 25°C (77°F). • If storing a UPS for an extended period, recharge the batteries every 6 months: CAUTION: Because of the short shelf life of the batteries, avoid storing a battery spare as a backup. Do not maintain an inventory of spare batteries on site unless a procedure to keep these batteries charged while in storage is implemented. a. Connect the UPS to utility power. b. Allow the UPS to remain in Standby mode. c. Allow the UPS to charge the batteries for at least 24 hours. d. Update the battery recharge date label. UPS battery replacement procedure This component is hot-swappable and can be replaced without powering down the UPS. 1. (optional) To replace the component with the UPS powered down, do one of the following: o Standalone UPS configuration-See "Powering down the standalone UPS (on page 72)." o Individual UPS in a parallel configuration-See "Powering down an individual paralleled UPS (on page 72)." o Parallel UPS configuration-See "Powering down the parallel system (on page 73)." CAUTION: When hot-swapping batteries, the load is not protected in the event of a utility power failure, unless at least one ERM is installed. 2. Remove the UPS front bezel ("Removing the UPS front bezel" on page 81). NOTE: Disconnecting the control panel from the electronics module automatically transfers the UPS to Auto-Bypass mode. However, HP recommends transferring the UPS to Auto-Bypass mode manually BEFORE disconnecting the control panel to provide extra protection to the electronics module. 3. Remove the UPS battery bracket ("Removing the UPS battery bracket" on page 19). Maintenance 88
-
 1
1 -
2
-
3
-
4
-
5
-
6
-
7
-
8
-
9
-
10
-
11
-
12
-
13
-
14
-
15
-
16
-
17
-
18
-
19
-
20
-
21
-
22
-
23
-
24
-
25
-
26
-
27
-
28
-
29
-
30
-
31
-
32
-
33
-
34
-
35
-
36
-
37
-
38
-
39
-
40
-
41
-
42
-
43
-
44
-
45
-
46
-
47
-
48
-
49
-
50
-
51
-
52
-
53
-
54
-
55
-
56
-
57
-
58
-
59
-
60
-
61
-
62
-
63
-
64
-
65
-
66
-
67
-
68
-
69
-
70
-
71
-
72
-
73
-
74
-
75
-
76
-
77
-
78
-
79
-
80
-
81
-
82
-
 83
83 -
 84
84 -
 85
85 -
 86
86 -
 87
87 -
 88
88 -
 89
89 -
 90
90 -
 91
91 -
 92
92 -
 93
93 -
94
-
95
-
96
-
97
-
98
-
99
-
100
-
101
-
102
-
103
-
104
-
105
-
106
-
107
-
108
-
109
-
110
-
111
-
112
-
113
-
114
-
115
 |
 |