HP Spectre 13-3018ca HP Spectre 13 Ultrabook - Maintenance and Service Guide - Page 62
Remove the 47 Phillips PM1.0×2.0 screws, that secure the keyboard to the top cover.
 |
View all HP Spectre 13-3018ca manuals
Add to My Manuals
Save this manual to your list of manuals |
Page 62 highlights
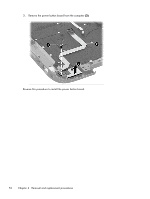
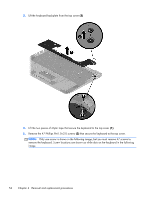
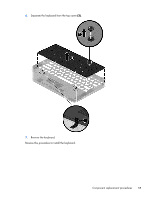
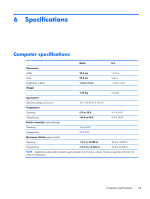
3. Lift the keyboard backplate from the top cover (3) 4. Lift the two pieces of Mylar tape that secure the keyboard to the top cover (1). 5. Remove the 47 Phillips PM1.0×2.0 screws (2) that secure the keyboard to the top cover. NOTE: Only one screw is shown in the following image, but you must remove 47 screws to remove the keyboard. Screw locations are shown as while dots on the keyboard in the following image. 54 Chapter 4 Removal and replacement procedures
-
 1
1 -
2
-
3
-
4
-
5
-
6
-
7
-
8
-
9
-
10
-
11
-
12
-
13
-
14
-
15
-
16
-
17
-
18
-
19
-
20
-
21
-
22
-
23
-
24
-
25
-
26
-
27
-
28
-
29
-
30
-
31
-
32
-
33
-
34
-
35
-
36
-
37
-
38
-
39
-
40
-
41
-
42
-
43
-
44
-
45
-
46
-
47
-
48
-
49
-
50
-
51
-
52
-
53
-
54
-
55
-
56
-
 57
57 -
 58
58 -
 59
59 -
 60
60 -
 61
61 -
 62
62 -
 63
63 -
 64
64 -
 65
65 -
 66
66 -
 67
67 -
68
-
69
-
70
-
71
-
72
-
73
-
74
-
75
-
76
-
77
-
78
-
79
-
80
 |
 |

3.
Lift the keyboard backplate from the top cover
(3)
4.
Lift the two pieces of Mylar tape that secure the keyboard to the top cover
(1)
.
5.
Remove the 47 Phillips PM1.0×2.0 screws
(2)
that secure the keyboard to the top cover.
NOTE:
Only one screw is shown in the following image, but you must remove 47 screws to
remove the keyboard. Screw locations are shown as while dots on the keyboard in the following
image.
54
Chapter 4
Removal and replacement procedures