HP T1120ps HP Designjet T1120 Printer Series User's Guide: English - Page 127
Check the printhead status, Remove a printhead
 |
UPC - 884420611936
View all HP T1120ps manuals
Add to My Manuals
Save this manual to your list of manuals |
Page 127 highlights
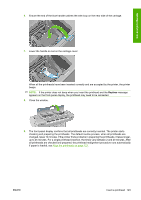
Ink and printheads Check the printhead status The printer automatically checks and services the printheads after each print. Follow the steps below to get more information on your printheads. 1. Press the Menu key to return to the main menu and select the Ink menu icon information. , then Printhead 2. Select the printhead on which you want information. 3. The front panel displays: ● Colors ● Product name ● Product number ● Serial number ● Status, see Front-panel error messages on page 181 ● Volume of ink it has used ● Warranty status You can also get most of this information without leaving your computer by using the HP Printer Utility. For an explanation of the printhead status messages, see Printhead status messages on page 174. If the warranty status is See warranty note, this indicates that non-HP ink is being used. See the HP Legal Information document provided with your printer for details of the warranty implications. Remove a printhead CAUTION: Make sure the printer wheels are locked (the brake lever is pressed down) to prevent the printer from moving. 118 Chapter 11 Handling ink cartridges and printheads ENWW
-
 1
1 -
2
-
3
-
4
-
5
-
6
-
7
-
8
-
9
-
10
-
11
-
12
-
13
-
14
-
15
-
16
-
17
-
18
-
19
-
20
-
21
-
22
-
23
-
24
-
25
-
26
-
27
-
28
-
29
-
30
-
31
-
32
-
33
-
34
-
35
-
36
-
37
-
38
-
39
-
40
-
41
-
42
-
43
-
44
-
45
-
46
-
47
-
48
-
49
-
50
-
51
-
52
-
53
-
54
-
55
-
56
-
57
-
58
-
59
-
60
-
61
-
62
-
63
-
64
-
65
-
66
-
67
-
68
-
69
-
70
-
71
-
72
-
73
-
74
-
75
-
76
-
77
-
78
-
79
-
80
-
81
-
82
-
83
-
84
-
85
-
86
-
87
-
88
-
89
-
90
-
91
-
92
-
93
-
94
-
95
-
96
-
97
-
98
-
99
-
100
-
101
-
102
-
103
-
104
-
105
-
106
-
107
-
108
-
109
-
110
-
111
-
112
-
113
-
114
-
115
-
116
-
117
-
118
-
119
-
120
-
121
-
 122
122 -
 123
123 -
 124
124 -
 125
125 -
 126
126 -
 127
127 -
 128
128 -
 129
129 -
 130
130 -
 131
131 -
 132
132 -
133
-
134
-
135
-
136
-
137
-
138
-
139
-
140
-
141
-
142
-
143
-
144
-
145
-
146
-
147
-
148
-
149
-
150
-
151
-
152
-
153
-
154
-
155
-
156
-
157
-
158
-
159
-
160
-
161
-
162
-
163
-
164
-
165
-
166
-
167
-
168
-
169
-
170
-
171
-
172
-
173
-
174
-
175
-
176
-
177
-
178
-
179
-
180
-
181
-
182
-
183
-
184
-
185
-
186
-
187
-
188
-
189
-
190
-
191
-
192
-
193
-
194
-
195
-
196
-
197
-
198
-
199
-
200
-
201
-
202
-
203
-
204
-
205
-
206
-
207
 |
 |
