HP T1120ps HP Designjet T1120 Printer Series User's Guide: English - Page 137
forth within its housing to check that it moves freely., Remove the old cutter.
 |
UPC - 884420611936
View all HP T1120ps manuals
Add to My Manuals
Save this manual to your list of manuals |
Page 137 highlights
7. Unscrew and remove the cutter stop using the TORX PLUS screwdriver provided with the new cutter. The screw is captive and will not fall out. Maintaining the printer 8. Remove the old cutter. 9. Take the new cutter from the maintenance kit and move the plunger at the top slowly back and forth within its housing to check that it moves freely. 128 Chapter 12 Maintaining the printer ENWW
-
 1
1 -
2
-
3
-
4
-
5
-
6
-
7
-
8
-
9
-
10
-
11
-
12
-
13
-
14
-
15
-
16
-
17
-
18
-
19
-
20
-
21
-
22
-
23
-
24
-
25
-
26
-
27
-
28
-
29
-
30
-
31
-
32
-
33
-
34
-
35
-
36
-
37
-
38
-
39
-
40
-
41
-
42
-
43
-
44
-
45
-
46
-
47
-
48
-
49
-
50
-
51
-
52
-
53
-
54
-
55
-
56
-
57
-
58
-
59
-
60
-
61
-
62
-
63
-
64
-
65
-
66
-
67
-
68
-
69
-
70
-
71
-
72
-
73
-
74
-
75
-
76
-
77
-
78
-
79
-
80
-
81
-
82
-
83
-
84
-
85
-
86
-
87
-
88
-
89
-
90
-
91
-
92
-
93
-
94
-
95
-
96
-
97
-
98
-
99
-
100
-
101
-
102
-
103
-
104
-
105
-
106
-
107
-
108
-
109
-
110
-
111
-
112
-
113
-
114
-
115
-
116
-
117
-
118
-
119
-
120
-
121
-
122
-
123
-
124
-
125
-
126
-
127
-
128
-
129
-
130
-
131
-
 132
132 -
 133
133 -
 134
134 -
 135
135 -
 136
136 -
 137
137 -
 138
138 -
 139
139 -
 140
140 -
 141
141 -
 142
142 -
143
-
144
-
145
-
146
-
147
-
148
-
149
-
150
-
151
-
152
-
153
-
154
-
155
-
156
-
157
-
158
-
159
-
160
-
161
-
162
-
163
-
164
-
165
-
166
-
167
-
168
-
169
-
170
-
171
-
172
-
173
-
174
-
175
-
176
-
177
-
178
-
179
-
180
-
181
-
182
-
183
-
184
-
185
-
186
-
187
-
188
-
189
-
190
-
191
-
192
-
193
-
194
-
195
-
196
-
197
-
198
-
199
-
200
-
201
-
202
-
203
-
204
-
205
-
206
-
207
 |
 |

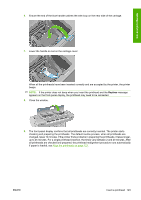
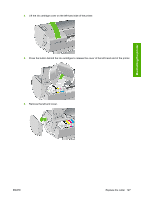
7.
Unscrew and remove the cutter stop using the TORX PLUS screwdriver provided with the new
cutter. The screw is captive and will not fall out.
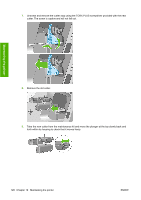
8.
Remove the old cutter.
9.
Take the new cutter from the maintenance kit and move the plunger at the top slowly back and
forth within its housing to check that it moves freely.
128
Chapter 12
Maintaining the printer
ENWW
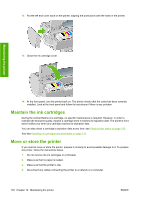
Maintaining the printer