HP T1120ps HP Designjet T1120 Printer Series User's Guide: English - Page 167
The paper is not flat, The print is scuffed or scratched
 |
UPC - 884420611936
View all HP T1120ps manuals
Add to My Manuals
Save this manual to your list of manuals |
Page 167 highlights
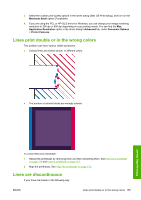
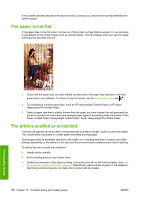
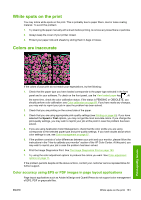
If the problem persists despite all the above actions, contact your customer service representative for further support. The paper is not flat If the paper does not lie flat when it comes out of the printer, but has shallow waves in it, you are likely to see defects in the printed image, such as vertical stripes. This can happen when you use thin paper that becomes saturated with ink. 1. Check that the paper type you have loaded corresponds to the paper type selected in the front panel and in your software. To check on the front panel, use the View loaded paper key . 2. Try changing to a thicker paper type, such as HP Heavyweight Coated Paper or HP Super Heavyweight Plus Matte Paper. 3. Select a paper type that is slightly thinner than the paper you have loaded; this will persuade the printer to use less ink. Here are some example paper types in ascending order of thickness: Plain Paper, Coated Paper, Heavyweight Coated Paper, Super Heavyweight Plus Matte Paper. The print is scuffed or scratched The black ink pigment can be scuffed or scratched when touched by a finger, a pen or some other object. This is particularly noticeable on coated paper and matte proofing paper. Glossy paper may be extremely sensitive to the basket or to anything else that it contacts soon after printing, depending on the amount of ink used and the environmental conditions at the time of printing. To reduce the risk of scuffs and scratches: ● Handle prints carefully. ● Avoid stacking prints on top of each other. ● Disable the automatic cutter before printing, so that the print will not fall into the basket. See Turn the automatic cutter on and off on page 53. Alternatively, leave a sheet of paper in the basket so that freshly printed sheets do not make direct contact with the basket. 158 Chapter 15 Troubleshooting print-quality issues ENWW Print-quality issues
-
 1
1 -
2
-
3
-
4
-
5
-
6
-
7
-
8
-
9
-
10
-
11
-
12
-
13
-
14
-
15
-
16
-
17
-
18
-
19
-
20
-
21
-
22
-
23
-
24
-
25
-
26
-
27
-
28
-
29
-
30
-
31
-
32
-
33
-
34
-
35
-
36
-
37
-
38
-
39
-
40
-
41
-
42
-
43
-
44
-
45
-
46
-
47
-
48
-
49
-
50
-
51
-
52
-
53
-
54
-
55
-
56
-
57
-
58
-
59
-
60
-
61
-
62
-
63
-
64
-
65
-
66
-
67
-
68
-
69
-
70
-
71
-
72
-
73
-
74
-
75
-
76
-
77
-
78
-
79
-
80
-
81
-
82
-
83
-
84
-
85
-
86
-
87
-
88
-
89
-
90
-
91
-
92
-
93
-
94
-
95
-
96
-
97
-
98
-
99
-
100
-
101
-
102
-
103
-
104
-
105
-
106
-
107
-
108
-
109
-
110
-
111
-
112
-
113
-
114
-
115
-
116
-
117
-
118
-
119
-
120
-
121
-
122
-
123
-
124
-
125
-
126
-
127
-
128
-
129
-
130
-
131
-
132
-
133
-
134
-
135
-
136
-
137
-
138
-
139
-
140
-
141
-
142
-
143
-
144
-
145
-
146
-
147
-
148
-
149
-
150
-
151
-
152
-
153
-
154
-
155
-
156
-
157
-
158
-
159
-
160
-
161
-
 162
162 -
 163
163 -
 164
164 -
 165
165 -
 166
166 -
 167
167 -
 168
168 -
 169
169 -
 170
170 -
 171
171 -
 172
172 -
173
-
174
-
175
-
176
-
177
-
178
-
179
-
180
-
181
-
182
-
183
-
184
-
185
-
186
-
187
-
188
-
189
-
190
-
191
-
192
-
193
-
194
-
195
-
196
-
197
-
198
-
199
-
200
-
201
-
202
-
203
-
204
-
205
-
206
-
207
 |
 |
