HP T1120ps HP Designjet T1120 Printer Series User's Guide: English - Page 174
Corrective action, when this is necessary
 |
UPC - 884420611936
View all HP T1120ps manuals
Add to My Manuals
Save this manual to your list of manuals |
Page 174 highlights
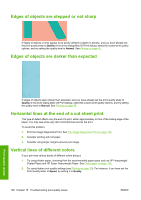
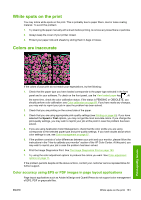
And here is an example of the same printhead in a bad state: Print-quality issues Corrective action 1. Clean any faulty printheads (see Clean the printheads on page 169). Then reprint the Image Diagnostics Print to see whether the problem has been solved. 2. If the problem remains, clean the printheads again, and reprint the Image Diagnostics Print to see whether the problem has been solved. 3. If the problem remains, consider cleaning your printheads manually (see Clean the printheads on page 169). You could also try reprinting your current print job, in case it now prints satisfactorily. 4. If the problem remains, try cleaning the printhead drop detector. The printer normally notifies you when this is necessary, but it may be worth trying even if the printer has not suggested it. See Clean the printhead drop detector on page 169. 5. If the problem still remains, replace any persistently faulty printheads (see Handling ink cartridges and printheads on page 113), or contact HP Support (see Contact HP Support on page 186). ENWW The Image Diagnostics Print 165
-
 1
1 -
2
-
3
-
4
-
5
-
6
-
7
-
8
-
9
-
10
-
11
-
12
-
13
-
14
-
15
-
16
-
17
-
18
-
19
-
20
-
21
-
22
-
23
-
24
-
25
-
26
-
27
-
28
-
29
-
30
-
31
-
32
-
33
-
34
-
35
-
36
-
37
-
38
-
39
-
40
-
41
-
42
-
43
-
44
-
45
-
46
-
47
-
48
-
49
-
50
-
51
-
52
-
53
-
54
-
55
-
56
-
57
-
58
-
59
-
60
-
61
-
62
-
63
-
64
-
65
-
66
-
67
-
68
-
69
-
70
-
71
-
72
-
73
-
74
-
75
-
76
-
77
-
78
-
79
-
80
-
81
-
82
-
83
-
84
-
85
-
86
-
87
-
88
-
89
-
90
-
91
-
92
-
93
-
94
-
95
-
96
-
97
-
98
-
99
-
100
-
101
-
102
-
103
-
104
-
105
-
106
-
107
-
108
-
109
-
110
-
111
-
112
-
113
-
114
-
115
-
116
-
117
-
118
-
119
-
120
-
121
-
122
-
123
-
124
-
125
-
126
-
127
-
128
-
129
-
130
-
131
-
132
-
133
-
134
-
135
-
136
-
137
-
138
-
139
-
140
-
141
-
142
-
143
-
144
-
145
-
146
-
147
-
148
-
149
-
150
-
151
-
152
-
153
-
154
-
155
-
156
-
157
-
158
-
159
-
160
-
161
-
162
-
163
-
164
-
165
-
166
-
167
-
168
-
 169
169 -
 170
170 -
 171
171 -
 172
172 -
 173
173 -
 174
174 -
 175
175 -
 176
176 -
 177
177 -
 178
178 -
 179
179 -
180
-
181
-
182
-
183
-
184
-
185
-
186
-
187
-
188
-
189
-
190
-
191
-
192
-
193
-
194
-
195
-
196
-
197
-
198
-
199
-
200
-
201
-
202
-
203
-
204
-
205
-
206
-
207
 |
 |
