HP XP20000/XP24000 HP StorageWorks XP Disk Array Configuration Guide (T5278-96 - Page 65
Configuring disk array devices, Initializing and labeling the devices, Mounting the devices
 |
View all HP XP20000/XP24000 manuals
Add to My Manuals
Save this manual to your list of manuals |
Page 65 highlights
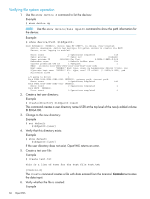
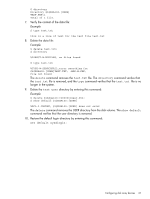
2. Check the list of peripherals on the host to verify the host recognizes all disk array devices. If any devices are missing: • If host mode option 33 is enabled, check the UUID values in the XP Remote Web Console LUN mapping • If host mode option 33 is not enabled, check the CU:LDEV mapping • To ensure the created OpenVMS device number is correct, check the values do not conflict with other device numbers or LUNs already created on the SAN • LUN/CU:LDEV and FCA WWN mappings on the host port • Run the $ mcr sys$etc:fibre_scan command and capture the output to scan for the devices that OpenVMS discovers during a scan of the Fibre Channel storage devices. 3. Record the disk numbers and other device information. You will need the disk numbers when you format, partition, and mount the disks. Configuring disk array devices Configure the disk array devices in the same way you would configure any new disk on the host server. Creating scripts to configure all devices at once could save you considerable time. Initializing and labeling the devices Use the initialize command to format each disk array volume and write an identifying label on it: Example $ init $1$dga100 testxp Mounting the devices Use the mount command to mount and identify each disk array volume: Example $ mount $1$dga100 testxp Configuring disk array devices 65
-
 1
1 -
2
-
3
-
4
-
5
-
6
-
7
-
8
-
9
-
10
-
11
-
12
-
13
-
14
-
15
-
16
-
17
-
18
-
19
-
20
-
21
-
22
-
23
-
24
-
25
-
26
-
27
-
28
-
29
-
30
-
31
-
32
-
33
-
34
-
35
-
36
-
37
-
38
-
39
-
40
-
41
-
42
-
43
-
44
-
45
-
46
-
47
-
48
-
49
-
50
-
51
-
52
-
53
-
54
-
55
-
56
-
57
-
58
-
59
-
 60
60 -
 61
61 -
 62
62 -
 63
63 -
 64
64 -
 65
65 -
 66
66 -
 67
67 -
 68
68 -
 69
69 -
 70
70 -
71
-
72
-
73
-
74
-
75
-
76
-
77
-
78
-
79
-
80
-
81
-
82
-
83
-
84
-
85
-
86
-
87
-
88
-
89
-
90
-
91
-
92
-
93
-
94
-
95
-
96
-
97
-
98
-
99
-
100
-
101
-
102
-
103
-
104
-
105
-
106
-
107
-
108
-
109
-
110
-
111
-
112
-
113
-
114
-
115
-
116
-
117
-
118
-
119
-
120
-
121
-
122
-
123
-
124
-
125
-
126
-
127
-
128
-
129
-
130
-
131
-
132
-
133
-
134
-
135
-
136
-
137
-
138
-
139
-
140
-
141
-
142
-
143
-
144
-
145
-
146
-
147
-
148
-
149
-
150
-
151
-
152
-
153
-
154
-
155
-
156
-
157
-
158
-
159
-
160
-
161
-
162
-
163
-
164
-
165
-
166
-
167
-
168
-
169
-
170
-
171
-
172
-
173
-
174
-
175
-
176
-
177
-
178
-
179
-
180
-
181
-
182
-
183
 |
 |
