HP XP20000/XP24000 HP StorageWorks XP Disk Array Configuration Guide (T5278-96 - Page 73
Configuring VMware ESX Server, Connecting the disk array, VMware ESX Server 2.5x
 |
View all HP XP20000/XP24000 manuals
Add to My Manuals
Save this manual to your list of manuals |
Page 73 highlights
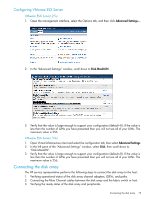
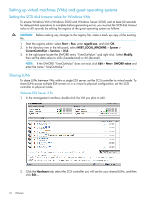
Configuring VMware ESX Server VMware ESX Server 2.5x 1. Open the management interface, select the Options tab, and then click Advanced Settings.... 2. In the "Advanced Settings" window, scroll down to Disk.MaskLUN. 3. Verify that the value is large enough to support your configuration (default=8). If the value is less than the number of LUNs you have presented then you will not see all of your LUNs. The maximum value is 256. VMware ESX Server 3.0x 1. Open Virtual Infrastructure client and select the configuration tab, then select Advanced Settings. 2. In the left pane of the "Advanced Settings" window, select Disk, then scroll down to "Disk.MaxLUN". 3. Verify that the value is large enough to support your configuration (default=8). If the value is less than the number of LUNs you have presented then you will not see all of your LUNs. The maximum value is 256. Connecting the disk array The HP service representative performs the following steps to connect the disk array to the host: 1. Verifying operational status of the disk array channel adapters, LDEVs, and paths. 2. Connecting the Fibre Channel cables between the disk array and the fabric switch or host. 3. Verifying the ready status of the disk array and peripherals. Connecting the disk array 73
-
 1
1 -
2
-
3
-
4
-
5
-
6
-
7
-
8
-
9
-
10
-
11
-
12
-
13
-
14
-
15
-
16
-
17
-
18
-
19
-
20
-
21
-
22
-
23
-
24
-
25
-
26
-
27
-
28
-
29
-
30
-
31
-
32
-
33
-
34
-
35
-
36
-
37
-
38
-
39
-
40
-
41
-
42
-
43
-
44
-
45
-
46
-
47
-
48
-
49
-
50
-
51
-
52
-
53
-
54
-
55
-
56
-
57
-
58
-
59
-
60
-
61
-
62
-
63
-
64
-
65
-
66
-
67
-
 68
68 -
 69
69 -
 70
70 -
 71
71 -
 72
72 -
 73
73 -
 74
74 -
 75
75 -
 76
76 -
 77
77 -
 78
78 -
79
-
80
-
81
-
82
-
83
-
84
-
85
-
86
-
87
-
88
-
89
-
90
-
91
-
92
-
93
-
94
-
95
-
96
-
97
-
98
-
99
-
100
-
101
-
102
-
103
-
104
-
105
-
106
-
107
-
108
-
109
-
110
-
111
-
112
-
113
-
114
-
115
-
116
-
117
-
118
-
119
-
120
-
121
-
122
-
123
-
124
-
125
-
126
-
127
-
128
-
129
-
130
-
131
-
132
-
133
-
134
-
135
-
136
-
137
-
138
-
139
-
140
-
141
-
142
-
143
-
144
-
145
-
146
-
147
-
148
-
149
-
150
-
151
-
152
-
153
-
154
-
155
-
156
-
157
-
158
-
159
-
160
-
161
-
162
-
163
-
164
-
165
-
166
-
167
-
168
-
169
-
170
-
171
-
172
-
173
-
174
-
175
-
176
-
177
-
178
-
179
-
180
-
181
-
182
-
183
 |
 |
