HP Xw460c HP ProLiant xw460c Workstation Blade: Maintenance and Service Guide
HP Xw460c - ProLiant - Blade Workstation Manual
 |
View all HP Xw460c manuals
Add to My Manuals
Save this manual to your list of manuals |
HP Xw460c manual content summary:
- HP Xw460c | HP ProLiant xw460c Workstation Blade: Maintenance and Service Guide - Page 1
HP Confidential HP ProLiant xw460c Workstation Blade Maintenance and Service Guide Part Number 509695-001 September 2008 - HP Xw460c | HP ProLiant xw460c Workstation Blade: Maintenance and Service Guide - Page 2
© Copyright 2008 Hewlett-Packard Development Company, L.P. The information contained herein is subject to change without notice. The only warranties for HP products and services are set forth in the express warranty statements accompanying such products and services. Nothing herein should - HP Xw460c | HP ProLiant xw460c Workstation Blade: Maintenance and Service Guide - Page 3
...24 Heatsink...25 Processor ...27 System board ...32 System battery ...37 Installing the HP Graphics Expansion Blade 39 Access panel - HP Graphics Expansion Blade 39 PCIe card cage ...40 Graphics board ...42 PCIe riser board ...44 Thermal sensor cable ...45 Power board...46 Mezzanine connector - HP Xw460c | HP ProLiant xw460c Workstation Blade: Maintenance and Service Guide - Page 4
55 System board components...56 Mezzanine connector definitions ...57 FBDIMM slot numbering ...57 System maintenance switch...57 Hard drive backplane components ...58 HP c-Class Blade SUV Cable...59 Specifications ...60 Environmental specifications ...60 Workstation blade specifications...60 - HP Xw460c | HP ProLiant xw460c Workstation Blade: Maintenance and Service Guide - Page 5
designated for your product. NOTE: Some HP parts are not designed for customer self repair. In order to satisfy the customer warranty, HP requires that an authorized service provider replace the part. These parts are identified as "No" in the Illustrated Parts Catalog. Based on availability and - HP Xw460c | HP ProLiant xw460c Workstation Blade: Maintenance and Service Guide - Page 6
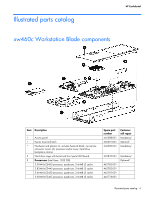
xw460c Workstation Blade components Item Description 1 Access panel * Ejector level and latch * Hardware and plastics kit, includes heatsink blank, mezzanine connector covers (2), processor socket cover, hard drive backplane retainer 2 Hard drive cage with bezel and front panel LED/board - HP Xw460c | HP ProLiant xw460c Workstation Blade: Maintenance and Service Guide - Page 7
* 128-MB battery backed write cache enabler 7 Hard drive backplane 8 System board * Smart Array E200i Controller cache module, 64-MB, battery- backed write cache component * Mezzanine card Mezzanine kits (include PCIe graphics card, mezzanine card, heatsink and screw) * Quadro FX560 MXM - HP Xw460c | HP ProLiant xw460c Workstation Blade: Maintenance and Service Guide - Page 8
Graphics Expansion Blade components HP Confidential Illustrated parts catalog 8 - HP Xw460c | HP ProLiant xw460c Workstation Blade: Maintenance and Service Guide - Page 9
HP Confidential Item Description Boards 1 PCIe riser card 2 Mezzanine PCIe card 2 Mezzanine PCIe card, 2X 3 Power board Miscellaneous 4 PCIe retainer clip Cables 5 Cable, PCIe/SAS - short 6 Cable, PCIe/SAS - long 7 Cable, power 8 Cable, thermal sensor Spare part number 501866- - HP Xw460c | HP ProLiant xw460c Workstation Blade: Maintenance and Service Guide - Page 10
HP Insight Diagnostics software ("HP Insight Diagnostics" on page 50) Safety considerations Before performing service procedures, review all the safety information. Preventing electrostatic discharge To prevent damaging the system workstation blade access panel and then install the workstation blade - HP Xw460c | HP ProLiant xw460c Workstation Blade: Maintenance and Service Guide - Page 11
power supplies or systems, indicate that the equipment is supplied by multiple sources of power. WARNING: To reduce the risk of injury from electric shock, remove all power cords to completely disconnect power from the system. Workstation blade preparation To service any internal workstation blade - HP Xw460c | HP ProLiant xw460c Workstation Blade: Maintenance and Service Guide - Page 12
HP Confidential Power down the workstation blade Before powering down the workstation blade for any upgrade or maintenance procedures, perform a backup of critical workstation data and programs. Depending on the Onboard Administrator configuration, use one of the following methods to power down the - HP Xw460c | HP ProLiant xw460c Workstation Blade: Maintenance and Service Guide - Page 13
3. Remove the workstation blade. HP Confidential 4. Place the workstation blade on a flat, level work surface. WARNING: To reduce the risk of personal injury from hot surfaces, allow the drives and the internal system components to cool before touching them. CAUTION: To prevent damage to - HP Xw460c | HP ProLiant xw460c Workstation Blade: Maintenance and Service Guide - Page 14
HP Confidential Hard drive blank CAUTION: To prevent improper cooling and thermal damage, do not operate the workstation blade or the enclosure unless all hard drive and device bays are populated with either a component or a blank. Remove the component as indicated. To replace the - HP Xw460c | HP ProLiant xw460c Workstation Blade: Maintenance and Service Guide - Page 15
3. Remove the hard drive. To replace the component: 1. Prepare the hard drive. HP Confidential Removal and replacement procedures 15 - HP Xw460c | HP ProLiant xw460c Workstation Blade: Maintenance and Service Guide - Page 16
2. Install the hard drive. HP Confidential FBDIMM CAUTION: Use only HP FBDIMMs. FBDIMMs from other sources may adversely affect data integrity. To remove the component: 1. Power down the workstation blade (on page 12). 2. Remove the workstation blade (on page 12). 3. Remove the access panel (" - HP Xw460c | HP ProLiant xw460c Workstation Blade: Maintenance and Service Guide - Page 17
HP Confidential Hard drive backplane Some models of this workstation blade do not include a hard drive backplane. To remove the component: 1. Power down the workstation blade (on page 12). 2. Remove the workstation blade (on page 12). 3. Remove the access panel ("Access panel" on page 13). 4. Remove - HP Xw460c | HP ProLiant xw460c Workstation Blade: Maintenance and Service Guide - Page 18
hard drive backplane retainer to seat the board. 2. Install the hard drives ("Hard drive" on page 14). 3. Install the hard drive blanks ("Hard drive blank" on page 14). 4. Install the access panel ("Access panel" on page 13). 5. Install the workstation blade. Hard drive backplane retainer To remove - HP Xw460c | HP ProLiant xw460c Workstation Blade: Maintenance and Service Guide - Page 19
7. Remove the hard drive backplane retainer. HP Confidential To replace the component: 1. Install the hard drive " on page 13). 6. Install the workstation blade. Front panel/hard drive cage assembly To remove the component: 1. Power down the workstation blade (on page 12). Removal and replacement - HP Xw460c | HP ProLiant xw460c Workstation Blade: Maintenance and Service Guide - Page 20
cards enable network connectivity and provide Fibre Channel support. For mezzanine card locations, see the system board components (on page 56). To remove the component: 1. Power down the workstation blade (on page 12). 2. Remove the workstation blade (on page 12). 3. Remove the access panel - HP Xw460c | HP ProLiant xw460c Workstation Blade: Maintenance and Service Guide - Page 21
Install the access panel ("Access panel" on page 13). 3. Install the workstation blade. HP Smart Array E200i Controller cache module To remove the component: 1. Power down the workstation blade (on page 12). 2. Remove the workstation blade (on page 12). 3. Remove the access panel ("Access panel" on - HP Xw460c | HP ProLiant xw460c Workstation Blade: Maintenance and Service Guide - Page 22
To replace the component, reverse the removal procedure. HP Smart Array E200i Controller battery pack To remove the component: 1. Power down the workstation blade (on page 12). 2. Remove the workstation blade (on page 12). 3. Remove the access panel ("Access panel" on page 13). 4. Remove - HP Xw460c | HP ProLiant xw460c Workstation Blade: Maintenance and Service Guide - Page 23
the Smart Array E200i Controller battery pack. HP Confidential To replace the component, reverse the removal procedure. Workstation blade handle To remove the component: 1. Power down the workstation blade (on page 12). 2. Remove the workstation blade (on page 12). 3. Remove the access panel - HP Xw460c | HP ProLiant xw460c Workstation Blade: Maintenance and Service Guide - Page 24
8. Remove the workstation blade handle. HP Confidential To replace the component, reverse the removal procedure. Release button To remove the component: 1. Power down the workstation blade (on page 12). 2. Remove the workstation blade (on page 12). 3. Remove the access panel ("Access panel" on - HP Xw460c | HP ProLiant xw460c Workstation Blade: Maintenance and Service Guide - Page 25
. HP Confidential To replace the component, reverse the removal procedure. Heatsink WARNING: To reduce the risk of personal injury from hot surfaces, allow the drives and the internal system components to cool before touching them. To remove the component: 1. Power down the workstation blade (on - HP Xw460c | HP ProLiant xw460c Workstation Blade: Maintenance and Service Guide - Page 26
8. Remove the heatsink. HP Confidential To replace the component: 1. Clean the old thermal grease from the processor with the alcohol swab. Allow the alcohol to evaporate before continuing. 2. Remove the thermal interface protective cover from the heatsink. CAUTION: Heatsink retaining screws - HP Xw460c | HP ProLiant xw460c Workstation Blade: Maintenance and Service Guide - Page 27
3. Install the heatsink. HP Confidential 4. Install the front panel/hard drive cage assembly (" on page 13). 9. Install the workstation blade. Processor WARNING: To reduce the risk of personal injury from hot surfaces, allow the drives and the internal system components to cool before touching them - HP Xw460c | HP ProLiant xw460c Workstation Blade: Maintenance and Service Guide - Page 28
HP Confidential 5. Remove all hard drive blanks ("Hard drive blank" on page 14). 6. Remove processor retaining latch and the processor socket retaining bracket. 10. Using your fingers, remove the failed processor. To replace the component: IMPORTANT: Be sure the processor remains inside the processor - HP Xw460c | HP ProLiant xw460c Workstation Blade: Maintenance and Service Guide - Page 29
and install the spare processor. CAUTION: The processor is designed to fit one way into the socket. Use the alignment guides on the processor and socket to properly align the processor with the socket. Refer to the workstation blade hood label for specific instructions. Removal and replacement - HP Xw460c | HP ProLiant xw460c Workstation Blade: Maintenance and Service Guide - Page 30
HP Confidential 3. Press down firmly until the processor installation tool clicks and separates from the processor, and then remove the processor installation tool. 4. Close the processor retaining latch and the processor socket retaining bracket. 5. Clean the old thermal grease from the heatsink - HP Xw460c | HP ProLiant xw460c Workstation Blade: Maintenance and Service Guide - Page 31
HP Confidential 6. Apply all the grease to the top of the processor in one of the following patterns to ensure even distribution: CAUTION: Heatsink retaining screws 14). 12. Install the access panel ("Access panel" on page 13). 13. Install the workstation blade. Removal and replacement procedures 31 - HP Xw460c | HP ProLiant xw460c Workstation Blade: Maintenance and Service Guide - Page 32
HP Confidential System board To remove the component: 1. Power down the workstation blade (on page 12). 2. Remove the workstation blade (on page Open the processor retaining latch and the processor socket retaining bracket. CAUTION: To avoid damage to the processor: • Handle the processor only by - HP Xw460c | HP ProLiant xw460c Workstation Blade: Maintenance and Service Guide - Page 33
12. Using your fingers, remove the processor from the failed system board. HP Confidential CAUTION: To avoid damage to the system board: • Do not touch the processor socket contacts. • Always install the processor socket cover after removing the processor from the socket. • Do not tilt or slide - HP Xw460c | HP ProLiant xw460c Workstation Blade: Maintenance and Service Guide - Page 34
1. Install the spare system board. HP Confidential 2. Prepare the processor socket on the spare system board: a. Open the processor retaining latch and the processor socket retaining bracket. Removal and replacement procedures 34 - HP Xw460c | HP ProLiant xw460c Workstation Blade: Maintenance and Service Guide - Page 35
one way into the socket. Use the alignment guides on the processor and socket to properly align the processor with the socket. Refer to the workstation blade hood label for specific instructions. CAUTION: Always install the processor parallel to the system board to avoid damage to the pins. Removal - HP Xw460c | HP ProLiant xw460c Workstation Blade: Maintenance and Service Guide - Page 36
the grease to the top of the processor in one of the following patterns to ensure even distribution: 8. Install the heatsink ("Heatsink" on page 25). IMPORTANT: Install all components with the same configuration that was used on the failed system board. 9. Install all components removed from the - HP Xw460c | HP ProLiant xw460c Workstation Blade: Maintenance and Service Guide - Page 37
HP Confidential After you replace the system board, you must re-enter the workstation serial number and the product ID. 1. During the workstation startup sequence, press the F9 key to access RBSU. 2. Select the System Options menu. 3. Select Serial Number. The following warning is displayed: WARNING - HP Xw460c | HP ProLiant xw460c Workstation Blade: Maintenance and Service Guide - Page 38
Remove the system board. HP Confidential 19. Identify the battery location ("System board components" on page 56). 20. Remove the battery. IMPORTANT: Replacing the system board battery resets the system ROM to its default configuration. After replacing the battery, reconfigure the system through - HP Xw460c | HP ProLiant xw460c Workstation Blade: Maintenance and Service Guide - Page 39
Installing the HP Graphics Expansion Blade You can install an HP Graphics Expansion Blade to an xw460c to enhance the blade's graphics capabilities. The expansion blade connects to the xw460c blade's mezzanine ports (1 and 2). Access panel - HP Graphics Expansion Blade To remove the access - HP Xw460c | HP ProLiant xw460c Workstation Blade: Maintenance and Service Guide - Page 40
/SAS cables from the PCIe riser board, noting their location for reinstallation. 3. Disconnect the power cables from the graphics board. 4. Remove the two Torx-15 screws that secure the PCIe card cage on both sides at the front of the expansion blade enclosure (1). Removal and replacement procedures - HP Xw460c | HP ProLiant xw460c Workstation Blade: Maintenance and Service Guide - Page 41
to the riser board in the following order: o Connect the first long PCIe/SAS cable (J3) to the first riser connector (number1). o Connect the second long PCIe/SAS cable (J4) to the second riser connector (number 2). o Connect the first short PCIe/SAS cable (J3) to the thirds riser connector (number - HP Xw460c | HP ProLiant xw460c Workstation Blade: Maintenance and Service Guide - Page 42
HP Confidential Graphics board To remove the graphics board: 1. Remove the access panel ("Access panel" on page 39). 2. retainer clip off of the card cage (3). 5. Pull the graphics board out of the slot on the PCIe riser board and remove it from the card cage. Removal and replacement procedures 42 - HP Xw460c | HP ProLiant xw460c Workstation Blade: Maintenance and Service Guide - Page 43
HP Confidential When replacing the graphics board, be sure to align the connectors on the graphics board (1) with the lower slot on the PCIe riser board (2), and then press the board into the slot until fully seated. Pull out on the sides of the PCIe retainer clip and place it onto the PCIe card - HP Xw460c | HP ProLiant xw460c Workstation Blade: Maintenance and Service Guide - Page 44
HP Confidential PCIe riser board To remove the PCIe riser board: 1. Remove the access panel ("Access panel" on page 39). 2. Remove the PCIe card cage ("PCIe card cage" on page 40). 3. Remove the graphics board ("Graphics board" on page 44). 4. Remove the three Torx-15 screws that secure the riser - HP Xw460c | HP ProLiant xw460c Workstation Blade: Maintenance and Service Guide - Page 45
3. Disconnect the thermal sensor cable from the power board (1). HP Confidential 4. Remove the thermal sensor cable from the clips (2) and the tape on the expansion blade enclosure. 5. Remove the thermal sensor cable from the expansion blade enclosure (3). When replacing the thermal sensor cable - HP Xw460c | HP ProLiant xw460c Workstation Blade: Maintenance and Service Guide - Page 46
on page 40). 3. Disconnect the power cable from the power board and remove the cable (1). 4. Disconnect the thermal sensor cable from the power board (2). 5. Remove the four Torx-15 screws that secure the power board to the expansion blade enclosure (3). 6. Lift the power board out of the expansion - HP Xw460c | HP ProLiant xw460c Workstation Blade: Maintenance and Service Guide - Page 47
HP Confidential Mezzanine connector board To remove the mezzanine connector board: NOTE: There are two mezzanine connector boards in the workstation blade. The replacement procedure is the same for each board. 1. Remove the access panel ("Access panel" on page 39). 2. Remove the PCIe card cage (" - HP Xw460c | HP ProLiant xw460c Workstation Blade: Maintenance and Service Guide - Page 48
HP Confidential 5. Loosen the two spring-loaded captive Torx-15 screws that secure the mezzanine connector board to the workstation blade system board. 6. Pull up on both ends of the mezzanine connector board to disconnect it from the system board. To replace the mezzanine connector board: 1. Align - HP Xw460c | HP ProLiant xw460c Workstation Blade: Maintenance and Service Guide - Page 49
HP Confidential 4. Ensure that the plastic air baffle on the expansion blade enclosure is pushed toward the front of the enclosure. 5. Connect the two long PCIe/SAS cables to the lower mezzanine connector board. 6. Connect the two short PCIe/SAS cables to the upper mezzanine connector board. Removal - HP Xw460c | HP ProLiant xw460c Workstation Blade: Maintenance and Service Guide - Page 50
on ProLiant servers and workstation blades. This guide includes problem-specific flowcharts to help you navigate complex troubleshooting processes. To view the guide, select a language: • English (http://www.hp.com/support/ProLiant_TSG_en) • French (http://www.hp.com/support/ProLiant_TSG_fr - HP Xw460c | HP ProLiant xw460c Workstation Blade: Maintenance and Service Guide - Page 51
operating system-specific IML viewers o For NetWare: IML Viewer o For Windows®: IML Viewer o For Linux: IML Viewer Application • From within the iLO 2 user interface • From within HP Insight Diagnostics (on page 50) For more information, refer to the Management CD in the HP ProLiant Essentials - HP Xw460c | HP ProLiant xw460c Workstation Blade: Maintenance and Service Guide - Page 52
tool to help manage your systems and devices, a feature of HP support. ISEE provides continuous hardware event monitoring and automated notification to identify and prevent potential critical problems. Through remote diagnostic scripts and vital system configuration information collected about your - HP Xw460c | HP ProLiant xw460c Workstation Blade: Maintenance and Service Guide - Page 53
On/Standby button 3 SUV connector* 4 Hard drive bay 2 5 Workstation blade handle 6 Release button 7 Serial label pull tab * The SUV connector and the HP c-Class Blade SUV cable are for some workstation blade configuration and diagnostic procedures. Server component identification 53 - HP Xw460c | HP ProLiant xw460c Workstation Blade: Maintenance and Service Guide - Page 54
LEDs HP System power LED Green = Network linked Green flashing = Network activity Off = No link or activity Green = On Amber = Standby (auxiliary power available) Off = Off * Actual NIC numbers depend on several factors, including the operating system installed on the workstation blade - HP Xw460c | HP ProLiant xw460c Workstation Blade: Maintenance and Service Guide - Page 55
SAS and SATA hard drive LEDs HP Confidential Item Description 1 Fault/UID LED (amber/blue) 2 Online LED (green) SAS and SATA hard drive LED combinations Online/activity Fault/UID LED LED (green) ( - HP Xw460c | HP ProLiant xw460c Workstation Blade: Maintenance and Service Guide - Page 56
amber Off Amber, flashing regularly (1 Hz) Off Off Interpretation HP Confidential The drive is active, but a predictive failure alert not configured as part of an array. System board components Item 1 2 3 4 5 6 7 8 9 10 11 Description System board thumbscrew Processor socket 2 Processor - HP Xw460c | HP ProLiant xw460c Workstation Blade: Maintenance and Service Guide - Page 57
the HP ProLiant xw460c Workstation Blade Installation Instructions that ship with the workstation blade. Mezzanine connector definitions Item PCIe Mezzanine connector 1 Mezzanine connector 2 x4, Type I mezzanine card only x8, Type 1 or II mezzanine card A PCIe x4 mezzanine connector supports - HP Xw460c | HP ProLiant xw460c Workstation Blade: Maintenance and Service Guide - Page 58
Password disabled Off 6* Reset configuration Off 7 Reserved Off 8 Reserved Off *To access redundant ROM, set S1, S5, and S6 to ON. Hard drive backplane components Some models of this workstation blade do not include a hard drive backplane. HP Confidential Item 1 2 3 Description Hard - HP Xw460c | HP ProLiant xw460c Workstation Blade: Maintenance and Service Guide - Page 59
HP c-Class Blade SUV Cable HP Confidential Item 1 2 3 4 Connector Workstation blade Video USB Serial Description For connecting to the SUV connector on the workstation blade front panel For connecting a video monitor For connecting up to two USB devices For trained personnel to connect a null - HP Xw460c | HP ProLiant xw460c Workstation Blade: Maintenance and Service Guide - Page 60
Specifications HP Confidential Environmental specifications Specification Temperature range* Operating Shipping Storage Maximum based on a maximum temperature of 45°C (113°F). Altitude maximum for storage corresponds to a pressure minimum of 70 KPa. Workstation blade specifications Specification - HP Xw460c | HP ProLiant xw460c Workstation Blade: Maintenance and Service Guide - Page 61
FC Fibre Channel HBA host bus adapter I/O input/output iLO 2 Integrated Lights-Out 2 IML Integrated Management Log LED light-emitting diode NIC network interface controller HP Confidential Acronyms and abbreviations 61 - HP Xw460c | HP ProLiant xw460c Workstation Blade: Maintenance and Service Guide - Page 62
interconnect express RBSU ROM-Based Setup Utility ROM read-only memory SAS serial attached SCSI SATA serial ATA SFF small form-factor SIM Systems Insight Manager SUV serial, USB, video UID unit identification UPS uninterruptible power system USB universal serial bus HP Confidential Acronyms and - HP Xw460c | HP ProLiant xw460c Workstation Blade: Maintenance and Service Guide - Page 63
graphics expansion blade graphics board 46 graphics expansion blade mezzanine connector board 56 graphics expansion blade PCIe card cage 44 graphics expansion blade PCIe riser board 49 graphics expansion blade power board 54 graphics expansion blade 29 HP c-Class Blade SUV Cable 8, 64, 71 HP Insight - HP Xw460c | HP ProLiant xw460c Workstation Blade: Maintenance and Service Guide - Page 64
specifications, workstation blade 72 static electricity 14 SUV connector 64, 71 system battery 8, 41 system board 8, 36, 68 system board thumbscrews 68 system maintenance switch 68, 69 25, 26 T thermal sensor cable, graphics expansion blade 51 tools 14, 60 Torx screwdriver 14 troubleshooting
-
 1
1 -
 2
2 -
 3
3 -
 4
4 -
 5
5 -
 6
6 -
 7
7 -
8
-
9
-
10
-
11
-
12
-
13
-
14
-
15
-
16
-
17
-
18
-
19
-
20
-
21
-
22
-
23
-
24
-
25
-
26
-
27
-
28
-
29
-
30
-
31
-
32
-
33
-
34
-
35
-
36
-
37
-
38
-
39
-
40
-
41
-
42
-
43
-
44
-
45
-
46
-
47
-
48
-
49
-
50
-
51
-
52
-
53
-
54
-
55
-
56
-
57
-
58
-
59
-
60
-
61
-
62
-
63
-
64
 |
 |

HP Confidential
HP ProLiant xw460c Workstation Blade
Maintenance and Service Guide
Part Number 509695-001
September 2008