HP ep9012 HP ep9010 Series Instant Cinema Digital Projector - User's Guide - Page 14
Accessories, Setting up the projector, Planning your layout
 |
View all HP ep9012 manuals
Add to My Manuals
Save this manual to your list of manuals |
Page 14 highlights
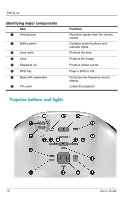
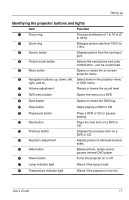
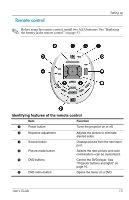
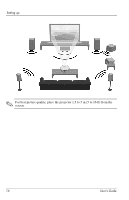
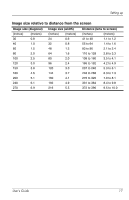
Setting up Identifying features of the remote control (Continued) Item Function 7 Menu button Opens or closes the on-screen projector menu. 8 Navigation buttons: up, down, left, Select items in the projector menu right, and ok or DVD menu. 9 Volume adjustment Raises or lowers the sound level. : Mute button Turns sound on or off. ; Hide button Blanks picture, mutes sound, pauses internal DVD player. < Infrared lens Sends signal from the remote control to the projector. Accessories Enjoy more from your home theater with HP projector accessories. You can purchase accessories at http://www.hp.com or through your projector dealer. ■ HP mobile screens with built-in handles-designed to be easy to carry and set up anywhere you need them. ■ HP power cables-allow you to connect in any region. ■ HP cables-allow you to connect all audio-video equipment. ■ HP replacement lamp-brings your projector up to factory-fresh brightness. Setting up the projector Planning your layout Consider the following suggestions when planning your room layout: ■ Select the projector and screen positions and the screen size according to your room layout and the distance chart below. The zoom control on the projector gives you some flexibility. ■ Be sure the projector is centered on the screen and perpendicular to it. Otherwise, the picture might look lopsided. 14 User's Guide
-
 1
1 -
2
-
3
-
4
-
5
-
6
-
7
-
8
-
 9
9 -
 10
10 -
 11
11 -
 12
12 -
 13
13 -
 14
14 -
 15
15 -
 16
16 -
 17
17 -
 18
18 -
 19
19 -
20
-
21
-
22
-
23
-
24
-
25
-
26
-
27
-
28
-
29
-
30
-
31
-
32
-
33
-
34
-
35
-
36
-
37
-
38
-
39
-
40
-
41
-
42
-
43
-
44
-
45
-
46
-
47
-
48
-
49
-
50
-
51
-
52
-
53
-
54
-
55
-
56
-
57
-
58
-
59
-
60
-
61
-
62
-
63
-
64
-
65
-
66
-
67
-
68
-
69
-
70
-
71
-
72
-
73
-
74
-
75
-
76
-
77
-
78
-
79
-
80
-
81
-
82
-
83
-
84
-
85
 |
 |