HP ep9012 HP ep9010 Series Instant Cinema Digital Projector - User's Guide - Page 57
If the image is out of focus, If the image is too small or too large, If the image has slanted sides
 |
View all HP ep9012 manuals
Add to My Manuals
Save this manual to your list of manuals |
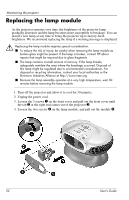
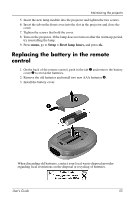
Page 57 highlights
Fixing problems If the image is out of focus: ❏ Be sure the lens cover is open. ❏ While displaying the on-screen menu, adjust the focus ring. (The image size should not change; if it does, you are adjusting the zoom, not the focus.) ❏ Ensure the projection screen is 1 to 10 m (3 to 33 ft) from the projector. ❏ Check the projection lens to see if it needs cleaning. ❏ For a computer connection, set the display resolution on the computer to 800×600 pixels. If the computer has multiple monitors, adjust the resolution of the monitor assigned to the projector. ❏ For a computer connected to the S-video port, the picture cannot be as high resolution as what you see on the computer display. If the image is too small or too large: ❏ Adjust the zoom ring on top of the projector. ❏ Move the projector closer to or farther from the screen. ❏ On the projector or remote control, press the picture mode button one or more times to see if one of the picture modes makes the image the correct size. ❏ Press menu, go to Picture > Customize picture mode > Stretch. Try the different settings. ❏ If the source device sends wide-screen output, press menu, go to Picture > Shape settings, and try setting Widescreen input to Yes. Otherwise, set it to No. If the image has slanted sides: ❏ As much as possible, reposition the projector so that it is centered on the screen and below the bottom of the screen. ❏ On the projector or remote control, press the keystone button until the sides are vertical. User's Guide 57
-
 1
1 -
2
-
3
-
4
-
5
-
6
-
7
-
8
-
9
-
10
-
11
-
12
-
13
-
14
-
15
-
16
-
17
-
18
-
19
-
20
-
21
-
22
-
23
-
24
-
25
-
26
-
27
-
28
-
29
-
30
-
31
-
32
-
33
-
34
-
35
-
36
-
37
-
38
-
39
-
40
-
41
-
42
-
43
-
44
-
45
-
46
-
47
-
48
-
49
-
50
-
51
-
 52
52 -
 53
53 -
 54
54 -
 55
55 -
 56
56 -
 57
57 -
 58
58 -
 59
59 -
 60
60 -
 61
61 -
 62
62 -
63
-
64
-
65
-
66
-
67
-
68
-
69
-
70
-
71
-
72
-
73
-
74
-
75
-
76
-
77
-
78
-
79
-
80
-
81
-
82
-
83
-
84
-
85
 |
 |
