HP nx9000 Reference Guide - Page 93
Configuring Your Notebook, To run the BIOS Setup utility
 |
View all HP nx9000 manuals
Add to My Manuals
Save this manual to your list of manuals |
Page 93 highlights
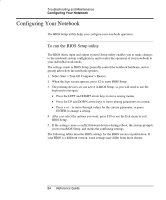
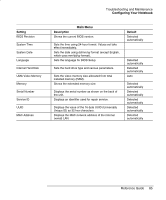
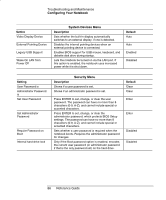
Troubleshooting and Maintenance Configuring Your Notebook Configuring Your Notebook The BIOS Setup utility helps you configure your notebook operation. To run the BIOS Setup utility The BIOS (basic input and output system) Setup utility enables you to make changes to the notebook system configuration, and to tailor the operation of your notebook to your individual work needs. The settings made in BIOS Setup generally control the notebook hardware, and so greatly affect how the notebook operates. 1. Select Start > Turn Off Computer > Restart. 2. When the logo screen appears, press F2 to enter BIOS Setup. 3. The pointing devices are not active in BIOS Setup, so you will need to use the keyboard to navigate: • Press the LEFT and RIGHT arrow keys to move among menus. • Press the UP and DOWN arrow keys to move among parameters in a menu. • Press + or - to move through values for the current parameter, or press ENTER to change a setting. 4. After you select the options you want, press F10 or use the Exit menu to exit BIOS Setup. 5. If the settings cause a conflict between devices during reboot, the system prompts you to run BIOS Setup, and marks the conflicting settings. The following tables describe BIOS settings for the BIOS version at publication. If your BIOS is a different version, some settings may differ from those shown. 84 Reference Guide
-
 1
1 -
2
-
3
-
4
-
5
-
6
-
7
-
8
-
9
-
10
-
11
-
12
-
13
-
14
-
15
-
16
-
17
-
18
-
19
-
20
-
21
-
22
-
23
-
24
-
25
-
26
-
27
-
28
-
29
-
30
-
31
-
32
-
33
-
34
-
35
-
36
-
37
-
38
-
39
-
40
-
41
-
42
-
43
-
44
-
45
-
46
-
47
-
48
-
49
-
50
-
51
-
52
-
53
-
54
-
55
-
56
-
57
-
58
-
59
-
60
-
61
-
62
-
63
-
64
-
65
-
66
-
67
-
68
-
69
-
70
-
71
-
72
-
73
-
74
-
75
-
76
-
77
-
78
-
79
-
80
-
81
-
82
-
83
-
84
-
85
-
86
-
87
-
 88
88 -
 89
89 -
 90
90 -
 91
91 -
 92
92 -
 93
93 -
 94
94 -
 95
95 -
 96
96 -
 97
97 -
 98
98 -
99
-
100
-
101
-
102
-
103
-
104
-
105
-
106
-
107
-
108
-
109
-
110
-
111
-
112
-
113
-
114
-
115
-
116
-
117
-
118
-
119
-
120
-
121
 |
 |