HP nx9000 Reference Guide - Page 96
To change video memory settings using BIOS Setup utility, Configuring Your Notebook, Boot Menu
 |
View all HP nx9000 manuals
Add to My Manuals
Save this manual to your list of manuals |
Page 96 highlights
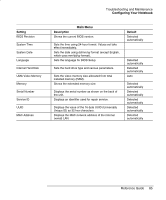
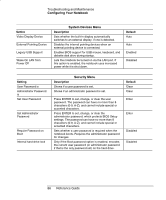
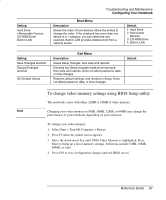
Setting Hard Drive +Removable Devices CD-ROM Drive Built-in LAN Troubleshooting and Maintenance Configuring Your Notebook Boot Menu Description Shows the order of boot devices. Move the entries to change the order. If the notebook has more than one device in a + category, you can select the one scanned. Built-in LAN provides diskless boot from a network server. Default 1. Hard Drive 2. Removable Devices 3. CD-ROM Drive 4. Built-in LAN Setting Save Changes and Exit Discard Changes and Exit Get Default Values Exit Menu Description Saves Setup changes, then exits and reboots. Discards any Setup changes made since last save, then exits and reboots. Does not affect password, date, or time changes. Restores default settings, and remains in Setup. Does not affect password, date, or time changes. Default To change video memory settings using BIOS Setup utility The notebook comes with either 32MB or 16MB of video memory. Note Changing your video memory to 8MB, 16MB, 32MB, or 64MB may change the performance of your notebook, depending on your selection. To change your video memory: 1. Select Start > Turn Off Computer > Restart. 2. Press F2 when the splash screen appears. 3. Move the down arrow key until UMA Video Memory is highlighted. Press Enter to bring up a list of memory settings. Selections include 8 MB, 16MB, 64MB, or Auto. 4. Press F10 to save configuration changes and exit BIOS screen. Reference Guide 87
-
 1
1 -
2
-
3
-
4
-
5
-
6
-
7
-
8
-
9
-
10
-
11
-
12
-
13
-
14
-
15
-
16
-
17
-
18
-
19
-
20
-
21
-
22
-
23
-
24
-
25
-
26
-
27
-
28
-
29
-
30
-
31
-
32
-
33
-
34
-
35
-
36
-
37
-
38
-
39
-
40
-
41
-
42
-
43
-
44
-
45
-
46
-
47
-
48
-
49
-
50
-
51
-
52
-
53
-
54
-
55
-
56
-
57
-
58
-
59
-
60
-
61
-
62
-
63
-
64
-
65
-
66
-
67
-
68
-
69
-
70
-
71
-
72
-
73
-
74
-
75
-
76
-
77
-
78
-
79
-
80
-
81
-
82
-
83
-
84
-
85
-
86
-
87
-
88
-
89
-
90
-
 91
91 -
 92
92 -
 93
93 -
 94
94 -
 95
95 -
 96
96 -
 97
97 -
 98
98 -
 99
99 -
 100
100 -
 101
101 -
102
-
103
-
104
-
105
-
106
-
107
-
108
-
109
-
110
-
111
-
112
-
113
-
114
-
115
-
116
-
117
-
118
-
119
-
120
-
121
 |
 |