Hitachi C12LSH Instruction Manual - Page 18
adjustment
 |
UPC - 717709010338
View all Hitachi C12LSH manuals
Add to My Manuals
Save this manual to your list of manuals |
Page 18 highlights
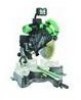
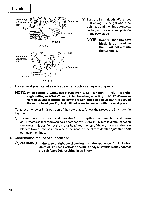
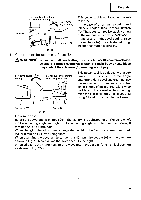
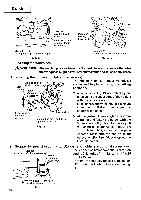
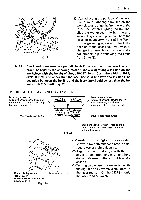
English 8 mm depthi l adjustment a bolt Hinge 8 mm depth z adjustment bolt C.1 0 Gear case Saw blade (1) Turn the 8 mm depth adjustment bolt, change the height where the bolt head and the hinge contacts, and adjust the lower limit position of the saw blade. -\\ Turntable Fig. 9-a Turn NOTE: Confirm that the saw blade is adjusted so that it will not cut into the turntable. Gear case Hinge Fig. 9-b 3. Lower limit position of saw blade when cutting a large workpiece NOTE: When cutting a workpiece exceeding 4-7/32" (107 mm) in height in rightangle cutting or 2-3/4"(70 mm) in left bevel angle cutting or 1-3/4" (45 mm) in right bevel angle cutting, adjust the lower limit position so that the base of the motor head (see Fig. 9-a) will not come in contact with the workpiece. To adjust the lower limit position of the saw blade, follow the procedure (1) shown in Fig. 9-a. 0 Lower the motor head, and turn the 8 mm depth adjustment bolt and make adjustments so that there can be a clearance of 5/64" to 1/8" (2 mm to 3 mm) between the lower limit position of the motor head and the top of the workpiece at the saw blade's lower limit position where the head of the 8 mm depth adjustment bolt contacts the hinge. 4. Confirmation for use of sub fence (A) & WARNING: In the case of right bevel cutting, turn the sub fence (A) clockwise. Unless it is turned clockwise,the main body or saw blade may contact the sub fence (A), resulting in an injury. 18
-
 1
1 -
2
-
3
-
4
-
5
-
6
-
7
-
8
-
9
-
10
-
11
-
12
-
 13
13 -
 14
14 -
 15
15 -
 16
16 -
 17
17 -
 18
18 -
 19
19 -
 20
20 -
 21
21 -
 22
22 -
 23
23 -
24
-
25
-
26
-
27
-
28
-
29
-
30
-
31
-
32
-
33
-
34
-
35
-
36
-
37
-
38
-
39
-
40
-
41
-
42
 |
 |