Hitachi C12LSH Instruction Manual - Page 31
Miter, scale, table, turntable, Lever, Loosen, Indicator, miter, scale, Angle, handle, Tighten,
 |
UPC - 717709010338
View all Hitachi C12LSH manuals
Add to My Manuals
Save this manual to your list of manuals |
Page 31 highlights
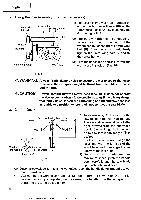
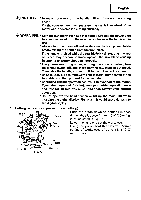
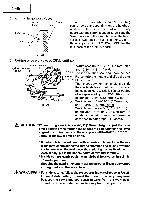
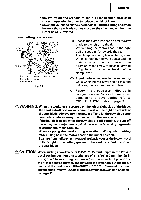
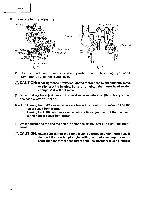
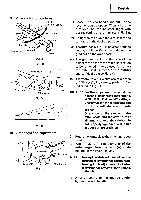
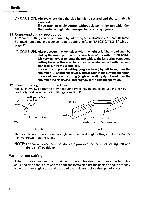
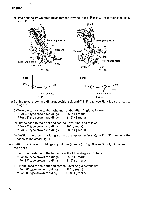
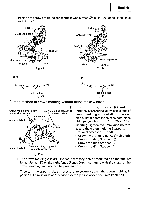
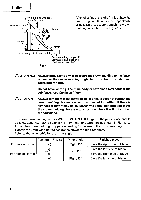
English 9. Miter cutting procedures Indicator (For miter scale) Side handle Tu table Turn the Miter scale turntable Tighten 411 Lever Lit Loosen (1) Loosen the side handle and pull up the lever for angle stoppers. Then, adjust the turntable until the indicator aligns with desired setting on the miter scale (Fig. 33). (2) Re-tighten the side handle to secure the turntable in the desired position. (3) The miter scale (Fig. 34) indicates both the cutting angle on the angle scale and the gradient on the grade scale. Pull up Fig. 33 Angle scale (4) The gradient, which is the ratio of the height to the base of the triangular section to be removed, may be used for setting the miter scale instead of the cutting angle, if desired (see Fig. 34). b0 0 Grade scale -ob 1"I A0 O 12/ 1O j 0 3/1 1225 Miter scale Fig. 34 M 10 Fig. 35 (5) Therefore, to cut a workpiece at a grade of 2/10, set the indicator to position ® as indicated in Fig. 34. NOTE: * Positive stops are provided at the right and left of the 0° center setting, at 15°, 22.5°, 31.6° and 45° settings. Check that the miter scale and the tip of the indicator are properly aligned. * Operation of the saw with the miter scale and indicator out of alignment, or with the side handle not properly tightened, will result in poor cutting precision. 10. Miter angle fine adjustment (1) Rotate the turntable to the miter angle you need. (2) When making fine adjustments of the miter angle, turn the knob (A) while pulling up the lever (Fig. 36). Knob (Al NOTE: Turning knob (A) clockwise, allows fine Turntable 0 0 0 0 Side handle adjustment of the turntable to the right. Turning knob (A) counterclockwise, Fig. 36 allows fine adjustment of the turntable to the left. (3) After adjusting to the desired angle, tighten the side handle. 31
-
 1
1 -
2
-
3
-
4
-
5
-
6
-
7
-
8
-
9
-
10
-
11
-
12
-
13
-
14
-
15
-
16
-
17
-
18
-
19
-
20
-
21
-
22
-
23
-
24
-
25
-
 26
26 -
 27
27 -
 28
28 -
 29
29 -
 30
30 -
 31
31 -
 32
32 -
 33
33 -
 34
34 -
 35
35 -
 36
36 -
37
-
38
-
39
-
40
-
41
-
42
 |
 |
