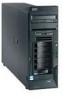
IBM 8488 Hardware Maintenance Manual - Page 59
contaminate
 |
UPC - 000435695277
View all IBM 8488 manuals
Add to My Manuals
Save this manual to your list of manuals |
Page 59 highlights
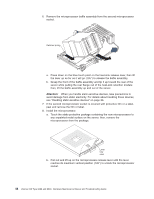
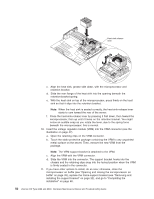
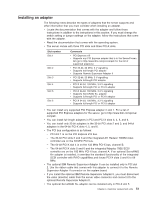
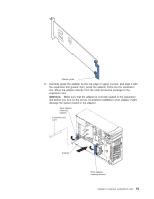
Attention: 1) Do not use excessive force when pressing the microprocessor into the socket. 2) Make sure that the microprocessor is oriented and aligned correctly with pin number 1 in the socket before you try to close the microprocessor-release lever. The following illustration shows the alignment marks for both microprocessors and sockets. Microprocessor 1 Microprocessor 2 Alignment marks Microprocessor socket 1 Retention bracket springs Heat-sink release levers Microprocessor socket 2 Microprocessorrelease levers c. Center the microprocessor over the microprocessor socket. Align the triangle on the corner of the microprocessor with the triangle on the corner of the socket and carefully press the microprocessor into the socket. d. Carefully close the microprocessor-release lever to secure the microprocessor in the socket. Attention: Do not set the heat sink down after you remove the plastic cover and do not touch the thermal grease on the bottom of the heat sink. Touching the thermal grease will contaminate it. If the thermal grease on the heat sink becomes contaminated, it must be cleaned and replaced by a service technician. Thermal grease Heat sink 9. Install the heat sink on the microprocessor. a. Make sure that the heat-sink-release lever is in the fully open position (135°). b. Orient the heat sink so that the thermal grease patch is nearer the rear of the server (directly above the microprocessor); then, remove the protective plastic cover from the bottom of the heat sink. Chapter 4. Customer replacement units 49
-
 1
1 -
2
-
3
-
4
-
5
-
6
-
7
-
8
-
9
-
10
-
11
-
12
-
13
-
14
-
15
-
16
-
17
-
18
-
19
-
20
-
21
-
22
-
23
-
24
-
25
-
26
-
27
-
28
-
29
-
30
-
31
-
32
-
33
-
34
-
35
-
36
-
37
-
38
-
39
-
40
-
41
-
42
-
43
-
44
-
45
-
46
-
47
-
48
-
49
-
50
-
51
-
52
-
53
-
 54
54 -
 55
55 -
 56
56 -
 57
57 -
 58
58 -
 59
59 -
 60
60 -
 61
61 -
 62
62 -
 63
63 -
 64
64 -
65
-
66
-
67
-
68
-
69
-
70
-
71
-
72
-
73
-
74
-
75
-
76
-
77
-
78
-
79
-
80
-
81
-
82
-
83
-
84
-
85
-
86
-
87
-
88
-
89
-
90
-
91
-
92
-
93
-
94
-
95
-
96
-
97
-
98
-
99
-
100
-
101
-
102
-
103
-
104
-
105
-
106
-
107
-
108
-
109
-
110
-
111
-
112
-
113
-
114
-
115
-
116
-
117
-
118
-
119
-
120
-
121
-
122
-
123
-
124
-
125
-
126
-
127
-
128
-
129
-
130
-
131
-
132
-
133
-
134
-
135
-
136
-
137
-
138
-
139
-
140
-
141
-
142
-
143
-
144
-
145
-
146
-
147
-
148
-
149
-
150
-
151
-
152
-
153
-
154
-
155
-
156
-
157
-
158
-
159
-
160
-
161
-
162
-
163
-
164
-
165
-
166
-
167
-
168
-
169
-
170
-
171
-
172
-
173
-
174
-
175
-
176
-
177
-
178
-
179
-
180
-
181
-
182
-
183
-
184
-
185
-
186
-
187
-
188
-
189
-
190
-
191
-
192
-
193
-
194
-
195
-
196
-
197
-
198
-
199
-
200
 |
 |
