IBM 8488 Hardware Maintenance Manual - Page 66
instructions
 |
UPC - 000435695277
View all IBM 8488 manuals
Add to My Manuals
Save this manual to your list of manuals |
Page 66 highlights
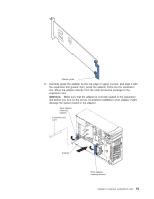
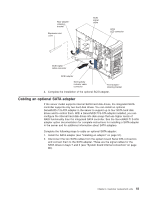
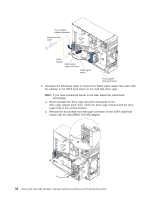
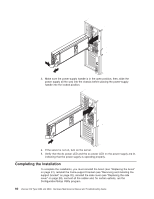
Rear adapterretaining bracket Expansion-slot cover SATA adapter SATA signal cable connector SATA signal cable Front adapterretaining bracket 3. Complete the followings steps to connect the SATA signal cables that come with the adapter to the SATA back panel on the hard disk drive cage. Note: If you have placed the server on its side, adjust the instructions accordingly. a. Reach beneath the drive cage and push downward on the drive-cage-release latch; then, rotate the drive cage outward until the drive cage locks in the vertical position. b. Remove the two screws from the large connector on the SATA cable that comes with the ServeRAID-7t S-ATA adapter. 56 xSeries 226 Type 8488 and 8648: Hardware Maintenance Manual and Troubleshooting Guide
-
 1
1 -
2
-
3
-
4
-
5
-
6
-
7
-
8
-
9
-
10
-
11
-
12
-
13
-
14
-
15
-
16
-
17
-
18
-
19
-
20
-
21
-
22
-
23
-
24
-
25
-
26
-
27
-
28
-
29
-
30
-
31
-
32
-
33
-
34
-
35
-
36
-
37
-
38
-
39
-
40
-
41
-
42
-
43
-
44
-
45
-
46
-
47
-
48
-
49
-
50
-
51
-
52
-
53
-
54
-
55
-
56
-
57
-
58
-
59
-
60
-
 61
61 -
 62
62 -
 63
63 -
 64
64 -
 65
65 -
 66
66 -
 67
67 -
 68
68 -
 69
69 -
 70
70 -
 71
71 -
72
-
73
-
74
-
75
-
76
-
77
-
78
-
79
-
80
-
81
-
82
-
83
-
84
-
85
-
86
-
87
-
88
-
89
-
90
-
91
-
92
-
93
-
94
-
95
-
96
-
97
-
98
-
99
-
100
-
101
-
102
-
103
-
104
-
105
-
106
-
107
-
108
-
109
-
110
-
111
-
112
-
113
-
114
-
115
-
116
-
117
-
118
-
119
-
120
-
121
-
122
-
123
-
124
-
125
-
126
-
127
-
128
-
129
-
130
-
131
-
132
-
133
-
134
-
135
-
136
-
137
-
138
-
139
-
140
-
141
-
142
-
143
-
144
-
145
-
146
-
147
-
148
-
149
-
150
-
151
-
152
-
153
-
154
-
155
-
156
-
157
-
158
-
159
-
160
-
161
-
162
-
163
-
164
-
165
-
166
-
167
-
168
-
169
-
170
-
171
-
172
-
173
-
174
-
175
-
176
-
177
-
178
-
179
-
180
-
181
-
182
-
183
-
184
-
185
-
186
-
187
-
188
-
189
-
190
-
191
-
192
-
193
-
194
-
195
-
196
-
197
-
198
-
199
-
200
 |
 |

SATA
adapter
SATA signal
cable connector
SATA signal
cable
Front adapter-
retaining bracket
Rear adapter-
retaining bracket
Expansion-slot
cover
3.
Complete
the
followings
steps
to
connect
the
SATA
signal
cables
that
come
with
the
adapter
to
the
SATA
back
panel
on
the
hard
disk
drive
cage.
Note:
If
you
have
placed
the
server
on
its
side,
adjust
the
instructions
accordingly.
a.
Reach
beneath
the
drive
cage
and
push
downward
on
the
drive-cage-release
latch;
then,
rotate
the
drive
cage
outward
until
the
drive
cage
locks
in
the
vertical
position.
b.
Remove
the
two
screws
from
the
large
connector
on
the
SATA
cable
that
comes
with
the
ServeRAID-7t
S-ATA
adapter.
56
xSeries
226
Type
8488
and
8648:
Hardware
Maintenance
Manual
and
Troubleshooting
Guide