IBM 866011U Hardware Maintenance Manual
IBM 866011U - Netfinity 5500 - 8660 Manual
 |
UPC - 087944414216
View all IBM 866011U manuals
Add to My Manuals
Save this manual to your list of manuals |
IBM 866011U manual content summary:
- IBM 866011U | Hardware Maintenance Manual - Page 1
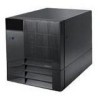
Netfinity Servers IBM Netfinity 5500 - Type 8660 Hardware Maintenance Manual June 1999 We Want Your Comments! (Please see page 389) S10L-9800-03 This Manual Supports The Following Models: 11U, 11X, 1RU, 1RX, 41U, 41X, 42U, 42X, 4RU, 4RX, 4SU, 4SX, 51U, 51X, 52U, 52X, 5RU, 5RX, 5SU, 5SX, 61U, 61X - IBM 866011U | Hardware Maintenance Manual - Page 2
- IBM 866011U | Hardware Maintenance Manual - Page 3
IBM Netfinity Servers IBM Netfinity 5500 - Type 8660 Hardware Maintenance Manual June 1999 We Want Your Comments! (Please see page 389) S10L-9800-03 IBM - IBM 866011U | Hardware Maintenance Manual - Page 4
this information and the product it supports, be sure to read the general information under "Notices" in the manual. Fourth Edition (June 1999) The was developed for products and services offered in the United States of America. IBM may not offer the products, services, or features discussed in this - IBM 866011U | Hardware Maintenance Manual - Page 5
5500 - Type 8660. Important This manual is intended for trained servicers who are familiar with IBM PC Server products. Important safety information instructions. Prenez connaissance de toutes les consignes de type Attention et Danger avant de procéder aux opérations décrites par les instructions. - IBM 866011U | Hardware Maintenance Manual - Page 6
address is: http://www.ibm.com/pc/files.html The IBM BBS can be reached at (919) 517-0001. IBM Online addresses: The HMM manuals online address is: http://www.ibm.com/pc/us/cdt/hmm.html The IBM Support Page is: http://www.ibm.com/support/ The IBM Home Page is: http://www.ibm.com iv Netfinity Server - IBM 866011U | Hardware Maintenance Manual - Page 7
this supplement iii Important safety information iii Online support iv Netfinity 5500 - Type 8660 1 General Checkout 7 Diagnostic tools 10 Features 15 Additional service information 17 Locations 141 Symptom-to-FRU index 264 Undetermined problems 291 Parts listing (Type 8660 293 Related - IBM 866011U | Hardware Maintenance Manual - Page 8
vi Netfinity Server HMM - IBM 866011U | Hardware Maintenance Manual - Page 9
Diagnostic programs 13 Viewing the test log 14 Features 15 Additional service information 17 Administration and Monitoring Utility Program . . 18 Before using ServerGuide 20 Installing the Server Utility Programs using Diskettes 20 IBM OS/2 Server Utility Programs . . . . 20 Microsoft Windows - IBM 866011U | Hardware Maintenance Manual - Page 10
for failover 62 Windows NT 63 IntraNetware 64 Netfinity System Management Processor . . . . 65 System requirements for the Advanced System Management Service with Netfinity Manager 66 Accessing the System Management Processor without Netfinity Manager 66 System Power menu selections . . . . . 68 - IBM 866011U | Hardware Maintenance Manual - Page 11
Cache control 98 PCI bus control 98 Memory settings 98 Advanced ISA settings 98 System Service Processor settings . . . . 98 Plug and Play 99 Error logs 99 POST error 102 Using the EZ-RAID configuration feature 102 Creating disk arrays manually . . . . . 104 Defining logical drives 105 - IBM 866011U | Hardware Maintenance Manual - Page 12
Viewing or changing the ServeRAID controller parameters 115 Changing device states 116 Changing the RAID parameters . . . . 118 Changing the write policy 120 Copying logical drives and disk arrays . . . 122 Copying logical drives 122 Copying an existing disk array . . . . . 123 Deleting Logical - IBM 866011U | Hardware Maintenance Manual - Page 13
Installation procedure 165 Input/Output ports and connectors . . . . . 166 Serial ports 166 Management port C 167 Parallel port 167 Video port 168 Keyboard and auxiliary-device ports . . 169 Ethernet port 170 Universal serial bus ports 171 Front bezel removal 172 Hot-plug PCI adapter - IBM 866011U | Hardware Maintenance Manual - Page 14
error codes 280 SCSI error codes 285 ServeRAID II controller error codes/messages . 286 System board LEDs 290 System board SCSI LEDs 290 Undetermined problems 291 Parts listing (Type 8660 293 System 294 Hard disk drives and cables 302 Keyboards 303 Power cords 305 6 Netfinity Server HMM - IBM 866011U | Hardware Maintenance Manual - Page 15
by the software, you can run the diagnostic programs to confirm that the hardware is working properly. When you run the diagnostic programs, a single problem might cause several error messages. When this occurs, work to correct the cause of the first error message. After the cause of the first error - IBM 866011U | Hardware Maintenance Manual - Page 16
FRU index" on page 264. 4. If the computer hangs and no error is displayed, go to "Undetermined problems" on page 291. 5. Power Supply problems, see "Symptom-to-FRU index" on page following responses: 1. No beep. 2. Readable instructions or the Main Menu. (Step 004 continues) 8 Netfinity Server HMM - IBM 866011U | Hardware Maintenance Manual - Page 17
page 13. If you receive an error, go to "Symptom-to-FRU index" on page 264. If the diagnostics completed successfully and you still suspect a problem, see "Undetermined problems" on page 291. Netfinity 5500 - Type 8660 9 - IBM 866011U | Hardware Maintenance Manual - Page 18
device), diskette drive, serial port, and parallel port. You can also use them to test some external devices. Also, if you cannot determine whether a problem is caused by the hardware or by the software, you can run the diagnostic programs to confirm that the hardware is working properly. Note: When - IBM 866011U | Hardware Maintenance Manual - Page 19
codes, see "Symptom-to-FRU index" on page 264. POST beep codes POST generates beep codes to indicate successful completion or the detection of a problem. One beep indicates the successful completion of POST. For a complete list of error codes, see "Symptom-to-FRU index" on page 264. Netfinity 5500 - IBM 866011U | Hardware Maintenance Manual - Page 20
a failing part. Troubleshooting and servicing of complex problems indicated by error messages should be performed by trained service personnel. Hardware error with an Option Diskette, follow the instructions that come with the option. Different instructions apply depending on whether the Option - IBM 866011U | Hardware Maintenance Manual - Page 21
IBM Netfinity 5500. If you want to test a non-IBM product, refer to the information that comes with that product. Note When you run the diagnostic programs, a single problem the problem persists, have the system serviced. 3. If the diagnostic tests do not find a problem but the problem persists - IBM 866011U | Hardware Maintenance Manual - Page 22
test you want to run from the list that appears; then, follow the instructions on the screen. When the tests have completed, you can view the Test out OK but the problem persists during normal server operations, a software error might be the cause. If you suspect a software problem, refer to the - IBM 866011U | Hardware Maintenance Manual - Page 23
44 MB Hard Disk Drives Up to six hot-swappable hard disk drives supported CD-ROM Drive Standard: 32X IDE Keyboard and Auxiliary Device (some models 5.25-inch removable-media bays (one used by CD-ROM drive) The IBM Netfinity NetBAY3 (tower model only) allows installation of options to provide extra - IBM 866011U | Hardware Maintenance Manual - Page 24
IBM ServeRAID II controller (two channels) on system board 10BASE-T/100BASE-TX Ethernet port (controller on system board) For redundant Ethernet capability, an optional network interface - IBM 866011U | Hardware Maintenance Manual - Page 25
information The following additional service information supports Netfinity 5500 - Type 8660 "Administration and Monitoring Utility Program" on page 18. "Configuring the Ethernet controller" on page 55. "Configuring options" on page 57. "Configuration - IBM 866011U | Hardware Maintenance Manual - Page 26
The TCP/IP networking protocol supports the client/server mode and allows connections to IBM OS/2, Microsoft Windows NT, Novell Program (if Win95 or WinNT Client) This section provides installation instructions for the following ServeRAID utility programs. The Administration and Monitoring utility - IBM 866011U | Hardware Maintenance Manual - Page 27
obtain updates to the installation instructions for the ServeRAID utility programs from the World Wide Web. See "Online support" on page iv. Before include: - A Windows NT or Windows 95 client running the IBM ServeRAID Administration and Monitoring utility program - A network adapter or controller - IBM 866011U | Hardware Maintenance Manual - Page 28
the Diskette Factory feature of ServerGuide. Refer to the ServerGuide package for instructions. IBM OS/2 Server Utility Programs: To install the IBM OS/2 server utility program using diskettes: 1. Insert the IBM ServeRAID Device Driver Diskette into the diskette drive. 2. Create an IPSRAID directory - IBM 866011U | Hardware Maintenance Manual - Page 29
Programs" on page 23. Microsoft Windows NT Server 4.x Utility Program: To install the Microsoft Windows NT 4.x server utility program : 1. Insert the IBM ServeRAID Device Driver Diskette into the diskette drive. 2. Create an IPSRAID directory on the hard disk. Type: md d:\ipsraid (where d: is the - IBM 866011U | Hardware Maintenance Manual - Page 30
Program: To install the Novell Netware 3.x/IntraNetware 1.0 server utility program, do one of the following: From a DOS prompt: 1. Insert the IBM ServeRAID Device Driver Diskette into the diskette drive. 2. Type: copy a:\remote\servers\netware\ipsadm.nlm d:\nwserver\ipsadm.nlm (where a: is the - IBM 866011U | Hardware Maintenance Manual - Page 31
program, type ipsadm & at the command prompt. If the program does not run, use the following instructions to manually install the SCO OpenServer 5.X utility program. 1. Insert the IBM ServeRAID SCO Open Server Boot-Time Loadable (BTLD) Diskette into a diskette drive. 2. Create a directory for the - IBM 866011U | Hardware Maintenance Manual - Page 32
the port number on which the server will check for client connections. The port number is a parameter used in TCP/IP to distinguish between different services on a single server. The default for the ServeRAID utilities is port number 1087. You can change the port number on the command line if - IBM 866011U | Hardware Maintenance Manual - Page 33
due to misconfiguration or inability to access the DNS. If problems occur, check the network configuration. Installing the Administration and the Administration and Monitoring Utility Programs using diskettes" for instructions. Installing the Administration and Monitoring Utility Program using - IBM 866011U | Hardware Maintenance Manual - Page 34
Diskette Factory feature of ServerGuide. Refer to the ServerGuide package for instructions. Also, if you are using OS/2, Novell NetWare/IntraNetware, or Monitoring utility program: Double-click on the IBM ServeRAID Administration icon. or Select IBM ServeRAID Administration from the start menu. The - IBM 866011U | Hardware Maintenance Manual - Page 35
The following illustration is an example of the screen that appears. IBM ServeRAID Administration and Monitor 1 Options Advanced Help 2 STOP 3 Channel 1 Channel 2 icon. 2. Menu Bar Displays the pull-down menus for all supported functions. 3. Tool Bar Displays the icons for the commonly used - IBM 866011U | Hardware Maintenance Manual - Page 36
to the client/server mode. You can use the Network Settings dialog box to select and connect to servers in the network that have an IBM ServeRAID controller installed. To select and connect to a server: 1. Click on the icon on the tool bar or select Network Settings from the Options pull - IBM 866011U | Hardware Maintenance Manual - Page 37
5. Click on Connect to initiate a connection with the remote system. General options: You can use the General Options screen to enable, disable, or reset the alarm; or to set the polling options. When you select General Options from the Options pull-down menu, a screen similar to the following - IBM 866011U | Hardware Maintenance Manual - Page 38
Synchronization started Synchronization completed Migration started Migration completed PFA event detected Dead drive detected ServeRAID controller not responding to commands Netfinity alert options: Netfinity alerts allow system administrators who are using the Netfinity Manager to configure the - IBM 866011U | Hardware Maintenance Manual - Page 39
controller not responding to commands By knowing what these types of messages are, the system administrator can then configure Netfinity Manager with instructions for monitoring the server configuration and specifying the appropriate action to take if an alert is issued. For example, the system - IBM 866011U | Hardware Maintenance Manual - Page 40
A screen similar to the following appears. Select Ready Drives Select 1 or more RDY (Ready) drives that will be used to create the new array Cancel OK 2. Select one or more Ready (RDY) drives for the new disk array. To select a RDY drive, click on the desired RDY button from the device area. A - IBM 866011U | Hardware Maintenance Manual - Page 41
Notes Notes: 1. The Requested Space default value is calculated as the maximum logical drive size available for the RAID level assigned. 2. The Requested Space must be between 2 MB and the maximum available. 3. The actual logical drive size that appears might be slightly different from what you type - IBM 866011U | Hardware Maintenance Manual - Page 42
from the pull-down list. 3. Click on OK to delete the disk array. Logical drive administration: This section contains instructions for creating a logical drive, initializing and synchronizing a logical drive, and accessing blocked logical drives using the ServeRAID Administration and Monitoring - IBM 866011U | Hardware Maintenance Manual - Page 43
Create Logical Drive Array Free ID Space MB) A 1762 A 1762 B 1906 Raid Level 0 Requested Space 881 OK Cancel 2. Select the disk array ID for which you want to create a logical drive. 3. Select the RAID level that you want to assign to the logical drive from the pull-down list. The RAID - IBM 866011U | Hardware Maintenance Manual - Page 44
need to synchronize RAID level 0 or 1 logical drives before storing data. Synchronizing logical drives: The purpose of synchronizing logical drives is to compute and write the parity data on the selected RAID level 5 logical drives. Synchronizing a RAID level 1 logical drive copies the data from - IBM 866011U | Hardware Maintenance Manual - Page 45
a weekly basis. Synchronizing a logical drive verifies that the data redundancy for the logical drive is correct. For RAID level 5, the parity bit is computed and then written to the parity drive. To synchronize a logical drive: 1. Select the logical drive that you want to synchronize from the Main - IBM 866011U | Hardware Maintenance Manual - Page 46
Unblocking logical drives: Whenever the ServeRAID controller performs a rebuild operation on an array, the data stored in any RAID level 1 and RAID level 5 logical drives in the array is reconstructed. However, the data stored in RAID level 0 logical drives in that array cannot be reconstructed. The - IBM 866011U | Hardware Maintenance Manual - Page 47
level. To use the Change RAID Level feature, all of the logical drives within the array must be the same RAID level. The ServeRAID controller supports changing RAID levels as follows: Change two RAID level 0 logical drives to RAID level 5 by adding one hard disk drive Change two RAID level 1 logical - IBM 866011U | Hardware Maintenance Manual - Page 48
RDY. Adding a physical drive: You can expand currently defined arrays to new sizes by adding one to three new hard disk drives. The ServeRAID controller supports adding new space to a disk array as follows: You can increase the free space in a disk array without adjusting the size of the logical - IBM 866011U | Hardware Maintenance Manual - Page 49
RAID level 5 logical drives (one 500 MB and one 1000 MB) and 2800 MB of free space. If you use the logical-drive migration procedure and add a 2150 MB hard disk drive to increase the amount of free space, the end result will be two RAID level 5 logical drives (one 500 MB and one 1000 MB) and 4950 MB - IBM 866011U | Hardware Maintenance Manual - Page 50
a list of the affected logical drives with their new sizes. 6. Click on OK. Physical device administration: This section contains instructions for setting physical device states and rebuilding drives using the ServeRAID Administration and Monitoring utility program. Setting Physical device states - IBM 866011U | Hardware Maintenance Manual - Page 51
SHS HSP DDD ONL RBL Drive Information Channel Bay SCSI ID Vendor Serial Number Size State Soft Event Hard Event Misc Event Parity Event PFA 1 2 1 IBM 003056669 1003 MB ONL 0 0 0 0 No Set Device State Rebuild Drive OK 2. Click on the radio button that indicates the desired state. Note If you - IBM 866011U | Hardware Maintenance Manual - Page 52
Rebuild Physical Drive Select OK to make the drive in channel 1 bay 5 the destination of the rebuild, or select another drive for the destination of the build Cancel OK 3. Select a RDY drive on which to store the reconstructed data, or click on OK to use the same bay if you have physically - IBM 866011U | Hardware Maintenance Manual - Page 53
ServeRAID controller administration: This section provides instructions for copying the drive configuration to the ServeRAID controller, copying the ServeRAID controller configuration to the drives, initializing the ServeRAID controller configuration, and scanning for - IBM 866011U | Hardware Maintenance Manual - Page 54
1. Click on the icon on the tool bar or select Adapter Configuration from the Advanced pull-down menu. A screen similar to the following appears. Adapter Configuration Adapter Configuration Options Copy Drive Configuration To Adapter Copy Adapter Configuration To Drives Initialize Adapter - IBM 866011U | Hardware Maintenance Manual - Page 55
Click on the icon on the tool bar or select Scan For New Drives from the Advanced pull-down menu. Netfinity 5500 - Type 8660 47 - IBM 866011U | Hardware Maintenance Manual - Page 56
the ServeRAID monitoring functions: This section contains instructions for using the ServeRAID Administration and Monitoring Block Version 97125 Boot Block Version 96340 Concurrent Commands 64 Maximum Devices Supported 45 Flash Program Count 2650 Defunct Disk Count 0 Rebuild Rate High - IBM 866011U | Hardware Maintenance Manual - Page 57
level of the microcode loaded in the boot block for the ServeRAID controller. The maximum numbers of concurrent commands supported. The maximum number of devices supported. The number of times that the ServeRAID controller microcode (Flash EEPROM) has been flashed or updated. The current number - IBM 866011U | Hardware Maintenance Manual - Page 58
1 Number of Logical Drives 6 Unattended Mode Off Code Block Version 97125 Boot Block Version 96340 Concurrent Commands 64 Maximum Devices Supported 45 Flash Program Count 2650 Defunct Disk Count 0 Rebuild Rate High Hot-Swap Rebuild Disabled Offline Logical Drive Count 0 Device - IBM 866011U | Hardware Maintenance Manual - Page 59
Parity Event The ServeRAID controller detects parity events while transferring data on the SCSI bus. A large number of parity events might indicate a problem with the SCSI cable, connectors, or terminators attached to the devices. Soft Event SCSI devices detect these events and reports them to the - IBM 866011U | Hardware Maintenance Manual - Page 60
Soft event log: You can view the Soft Event Log. View ServRAID Soft Event Log 06/27/97 14:10:26 ServeRAID Soft Event Log for Adapter 1 195 Error Log Entries follow: 0000: 10F15D00 10200002 168A3063 10F15D00 0004: 10010002 178410AC 012B000E 01014000 0008: 0020BB38 012B000E 01004000 00213AB7 0012: - IBM 866011U | Hardware Maintenance Manual - Page 61
SHS HSP DDD ONL RBL Drive Information Channel Bay SCSI ID Vendor Serial Number Size State Soft Event Hard Event Misc Event Parity Event PFA 1 2 1 IBM 003056669 1003 MB ONL 0 0 0 0 No Set Device State Rebuild Drive OK Netfinity 5500 - Type 8660 53 - IBM 866011U | Hardware Maintenance Manual - Page 62
Descriptions of the information that appears on this screen are as follows: Channel The channel to which the device is connected. Bay The bay number of the device on a channel (1 to 16). SCSI ID The SCSI ID (0 to 15). Vendor The drive manufacturer. Serial Number The drive manufacturer's - IBM 866011U | Hardware Maintenance Manual - Page 63
an Ethernet controller on the system board. The Ethernet controller provides 10BASE-T and 100BASE-TX support through the RJ-45 connector on the back of the server. When you connect the connections, you can install an Ethernet adapter, such as the IBM 10/100 PCI Ethernet Netfinity 5500 - Type 8660 55 - IBM 866011U | Hardware Maintenance Manual - Page 64
adapter. Review the network-adapter documentation for any additional configuration requirements and for troubleshooting information. 56 Netfinity Server HMM - IBM 866011U | Hardware Maintenance Manual - Page 65
board. See "Changing jumper positions" on page 151 and "System board jumpers" on page 257. 3. Set jumpers or switches on the device. See the instructions that came with the adapter. 4. Install the adapter in the server. See "Adapters" on page 142. 5. Install software programs. See the installation - IBM 866011U | Hardware Maintenance Manual - Page 66
and programs that you install. The server supports several types of adapters and SCSI devices. Industry Standard Architecture (ISA) Small Computer System Interface (SCSI) In instructions. Before installing a new device or program, read the documentation that comes with it. Reading the instructions - IBM 866011U | Hardware Maintenance Manual - Page 67
to assign the ISA legacy resources. See "Plug and Play" on page 99 for more information. 5. Install software programs. See the installation instructions that come with the software. 6. Resolve configuration conflicts. See "Resolving configuration conflicts" on page 73. Netfinity 5500 - Type 8660 59 - IBM 866011U | Hardware Maintenance Manual - Page 68
. Always run the Configuration/Setup Utility program if you add, remove, or relocate any hardware option, or if you receive an error message instructing you to do so. Review the following information that comes with the option before making changes. Also, record the current settings before making - IBM 866011U | Hardware Maintenance Manual - Page 69
to a PCI adapter. This is because the Netfinity 5500 does not support interrupt sharing among PCI and ISA adapters. If a situation occurs where you Interrupt 3). To configure ISA adapters, select Plug and Play and follow the instructions on the screen. See "Plug and Play" on page 99 and "Plug and - IBM 866011U | Hardware Maintenance Manual - Page 70
determines the maximum number of IBM Netfinity 10/100 Fault Tolerant useful when a network problem is caused by faulty adapter supported by OS/2, Windows NT, and IntraNetware. The setup required for each operating system follows. 1. Add the redundant NIC adapter according to the instructions - IBM 866011U | Hardware Maintenance Manual - Page 71
you copied PCNETOS2.EXE. 6. Restart the server. The failover function is now enabled. Windows NT 1. Add the redundant NIC adapter according to the instructions provided with the adapter and in "Adapters" on page 142. 2. Use ServerGuide to install the AMD PCNet Ethernet Family adapter device driver - IBM 866011U | Hardware Maintenance Manual - Page 72
IntraNetware 1. Add the redundant NIC adapter according to the instructions provided with the adapter and in "Adapters" on page 142. 2. Load the device driver by using the following command: LOAD d:\path\PCNTNW.LAN PRIMARY=x SECONDARY=y - IBM 866011U | Hardware Maintenance Manual - Page 73
ServerGuide for information on how to install the Netfinity Manager software. Then, refer to the online Netfinity documentation or the online Advanced System Management Service for Netfinity Manager User's Guide for information on using the system management processor. Netfinity 5500 - Type 8660 65 - IBM 866011U | Hardware Maintenance Manual - Page 74
with Netfinity Manager: The minimum system requirements for using the Advanced System Management service are: System management processor (built into the Netfinity 5500) Netfinity Manager or Client Services for Netfinity Manager, version 5.10.4 or later 2 MB of available hard disk drive space - IBM 866011U | Hardware Maintenance Manual - Page 75
use all caps, and the "0" in PASSW0RD is the numeral zero. A username and password that you define using the Advanced System Management service and Netfinity Manager Important If you update the system management processor microcode, the default username (USERID) and password (PASSW0RD) are reset. If - IBM 866011U | Hardware Maintenance Manual - Page 76
Menu Selection Service Processor Configuration System Services System Power Data Available for Viewing System management processor modem configuration, dial-out entries, dial-out alerts, dial-in logins, system status, thresholds, system statistics, - IBM 866011U | Hardware Maintenance Manual - Page 77
all caps, and the "0" in PASSW0RD, is the numeral zero. A username and password that you define using the Advanced System Management service and Netfinity Manager Important If you update the system management processor microcode, the default username (USERID) and password (PASSW0RD) are reset. If - IBM 866011U | Hardware Maintenance Manual - Page 78
all caps, and the "0" in PASSW0RD, is the numeral zero. A username and password that you define using the Advanced System Management service and Netfinity Manager Important If you update the system management processor microcode, the default username (USERID) and password (PASSW0RD) are reset. If - IBM 866011U | Hardware Maintenance Manual - Page 79
all caps, and the "0" in PASSW0RD, is the numeral zero. A username and password that you define using the Advanced System Management service and Netfinity Manager Important If you update the system management processor microcode, the default username (USERID) and password (PASSW0RD) are reset. If - IBM 866011U | Hardware Maintenance Manual - Page 80
3. Start (or restart) the server. If the remote server is currently powered off: a. Select 6 System Power from the main menu. b. Select 4 Power On from the System Power menu. If the server is currently powered on, you must restart the server. You can use selections from the System Power menu or the - IBM 866011U | Hardware Maintenance Manual - Page 81
Resolving configuration conflicts The Configuration/Setup utility program configures only the server hardware. It does not consider the requirements of the operating system or the application programs. For these reasons, memory-address configuration conflicts might occur. Changing the software - IBM 866011U | Hardware Maintenance Manual - Page 82
can use the IBM ServeRAID Configuration program to the operating system. Then, return to this manual for information about installing and using the ServeRAID specific operating system you are installing. 1. Follow the instructions provided in the ServerGuide package to install the operating system - IBM 866011U | Hardware Maintenance Manual - Page 83
Specifications The following list contains the specifications for the Netfinity 5500. Size (Tower Model) Depth: 700 mm (27.6 in.) Height with NetBAY3: 530 mm (20.9 in.) Height without NetBAY3: 356 mm (14 in.) Width: 483 mm (19 in.) Front clearance: 305 mm (12 in.) Rear clearance: 100 mm (4 in.) Side - IBM 866011U | Hardware Maintenance Manual - Page 84
- 6.4 bel for typical system configuration (3 hard disk drives installed) Sound pressure, idling - 45 dBA for open bay system (no hard disk drives installed) - 45 dBA for typical system configuration (3 hard disk drives installed) Sound pressure, operating - 45 dBA for open bay system (no hard disk - IBM 866011U | Hardware Maintenance Manual - Page 85
you must first make the ServeRAID diskettes. You can make the diskettes using the Diskette Factory feature of ServerGuide. Refer to the serverGuide documentation for instructions. You can also download the diskette images from the World Wide Web. See "Online support" on Netfinity 5500 - Type 8660 77 - IBM 866011U | Hardware Maintenance Manual - Page 86
page iv for information about pages IBM maintains on the World Wide Web. Once you have made configuration information for the ServeRAID controller and for the configured hard disk drives. When POST detects a problem, an error message appears on the screen. If this occurs, see "Symptom-to-FRU index" - IBM 866011U | Hardware Maintenance Manual - Page 87
Status LEDs The server has LEDs to help you identify problems with some server components (see, "Symptom-to-FRU index" on page 264). Status LEDs are located on the following components: Information panel For more information, - IBM 866011U | Hardware Maintenance Manual - Page 88
The power supply is on and operating correctly. There is a dc power problem. Possible causes: 1. The Power Control button on the front of the server supply has failed. Action: Replace the power supply. There is an ac power problem. Possible causes: 1. There is no ac power to the power supply. Actions: - IBM 866011U | Hardware Maintenance Manual - Page 89
into several logical drives. Each logical drive appears to the operating system as a single physical hard disk drive. The ServeRAID controller on the system board supports up to eight logical drives. If you have only one array, you can define it as a single logical drive, or you can divide it into - IBM 866011U | Hardware Maintenance Manual - Page 90
operating system requests data. The six basic RAID classifications are RAID level 0 through RAID level 5. The ServeRAID controller on the system board supports three, industry-recognized RAID levels: 0, 1, and 5. RAID level 0: RAID level 0 stripes the data across all the drives in the array. This - IBM 866011U | Hardware Maintenance Manual - Page 91
The Enhanced RAID level 1 stripes data and copies of the data across all the drives in the array. As with the standard RAID level 1, the data is mirrored, and the capacity of the logical drive is 50% of the physical capacity of the grouping of hard disk drives in the array. The following - IBM 866011U | Hardware Maintenance Manual - Page 92
The following illustration shows the Main Menu of the IBM ServeRAID Configuration program. IBM ServeRAID Adapter Disk Array Configuration Ver. X.XX Adapter more information. 4. Create/Delete/Copy Log Drive lets you manually create the disk arrays. You can select the drives that you want to - IBM 866011U | Hardware Maintenance Manual - Page 93
pop-up windows: The following illustration is a compilation of several configuration screens that appear when you use the IBM ServeRAID Configuration program. 1 2 3 IBM ServeRAID Adapter Disk Array Configuration Ver. X.XX Adapter Number: 1 Bus Number: 0 Host ID = Null Config Enter Size Create - IBM 866011U | Hardware Maintenance Manual - Page 94
, and write policy for each logical drive. (See "Logical drive states" on page 88 for more information.) 6 This area provides information and instructions about the actions you can perform on the current screen or pop-up window. Physical device states: Descriptions of the physical device states - IBM 866011U | Hardware Maintenance Manual - Page 95
and is part of an array. The device is a generic SCSI controller (for example, a hot-swap backplane that has onboard systems-management support). The drive is being rebuilt. (See "Understanding the drive rebuild process" on page 131 for more information.) The ServeRAID controller recognizes a ready - IBM 866011U | Hardware Maintenance Manual - Page 96
TAP A tape drive is installed. Logical drive states: Descriptions of the logical drive states, which appear in the Logical Drive list, are as follows: State Meaning CRM A logical drive undergoing a logical-drive migration (LDM) is in the critical state. CRS The ServeRAID controller uses this - IBM 866011U | Hardware Maintenance Manual - Page 97
Main Menu, a screen similar to the following appears. IBM ServeRAID Adapter Disk Array Mini-Configuration Ver. X.XX Advanced is currently using INT13 extensions. Attention: Only one controller can support INT13 extensions. Adapter and PCI Information displays the ServeRAID controller hardware - IBM 866011U | Hardware Maintenance Manual - Page 98
appears. IBM PC ServeRAID Adapter Disk Array MiniConfiguration Utility Ver. X.XX Boot CD-ROM Configuration BIOS Support for Bootable CD-ROM No Display Boot CD-ROM Menu No BIOS Support for Int13 Extensions No BIOS Support for reading Partition tables Yes BIOS Support for Service Processor - IBM 866011U | Hardware Maintenance Manual - Page 99
select settings that you want to change. The Configuration/Setup Utility main menu is similar to the following screen: IBM SurePath Setup - © IBM Corporation Configuration/Setup Utility • System Summary • System Information • Devices and I/O Ports • Date and Time • System Security • Start Options - IBM 866011U | Hardware Maintenance Manual - Page 100
System summary: Select this choice to display configuration information, including the type and speed of the microprocessor and amount of memory. Changes that you make to configuration settings appear on this summary screen. You cannot edit the fields. The System Summary choice appears on the full - IBM 866011U | Hardware Maintenance Manual - Page 101
the parallel port as bidirectional; that is, so that data can be both read from and written to a device. In bidirectional mode, the server supports Extended Capabilities Port (ECP) and Enhanced Parallel Port (EPP). To display or change the assignments for devices, serial ports, or the parallel port - IBM 866011U | Hardware Maintenance Manual - Page 102
full Configuration/Setup menu. To set, change, or delete a password: 1. Select System Security. 2. Select the password that you want to change. 3. Follow the instructions on the screen. After you set a power-on or administrator password, you must enter the password when you turn on the server. (The - IBM 866011U | Hardware Maintenance Manual - Page 103
Using the power-on password menu: When a power-on password is set, you must enter a password each time that you start the system. To set a power-on password: 1. Select Power-on Password from the System Security menu; then, press Enter. The Power-on Password menu appears. 2. Type the password in the - IBM 866011U | Hardware Maintenance Manual - Page 104
To allow the system to start in unattended mode when a power-on password is set: 1. Select Power-on Password from the System Security menu; then, press Enter. The Power-on Password screen appears. 2. Select Allow for unattended boot with password. Press the Left Arrow (←) key or Right Arrow (→) key - IBM 866011U | Hardware Maintenance Manual - Page 105
message displays above the choices on this menu, to alert you that the system might malfunction if these options are configured incorrectly. Follow the instructions on the screen carefully. Use the Left Arrow (←) or Right Arrow (→) key to scroll through each data field after you select one of the - IBM 866011U | Hardware Maintenance Manual - Page 106
reduced memory capacity. If this occurs, you must manually enable the row of memory after the problem is corrected. Choose Memory Settings from the Advanced Setup to select the I/O recovery timer settings. System Service Processor settings: Select this choice to change the system management processor IRQ. - IBM 866011U | Hardware Maintenance Manual - Page 107
Plug and Play: Before you can install Plug and Play adapters, you must configure ISA legacy adapters (if applicable) and assign the resources that are used by these adapters. When you install an ISA legacy adapter, you must allocate the system resources that the adapter will use. Select Plug and - IBM 866011U | Hardware Maintenance Manual - Page 108
Restore settings: After you make configuration changes, review them to be sure that they contain the correct information. If the information is incorrect, or if you do not want to save these changes, select Restore Settings to delete the changes and restore the previous settings. Load default - IBM 866011U | Hardware Maintenance Manual - Page 109
Help 2. ServeRAID Adapter 1 3. ServeRAID Adapter 2 4. Exit Multiple IBM ServeRAID Adapter found in the system. Select a choice using the Up only one ServeRAID controller installed in the server, the Main Menu appears. IBM ServeRAID Adapter Disk Array Configuration Ver. X.XX Adapter Number: 1 Bus - IBM 866011U | Hardware Maintenance Manual - Page 110
83. Creating disk arrays: The ServeRAID controller on the system board supports up to eight independent arrays. You must use the EZ-RAID configuration The Create/Delete/Copy Log Drive menu enables you to configure the arrays manually. You can use this menu to select the physical drives that you want - IBM 866011U | Hardware Maintenance Manual - Page 111
Physical RDY Drives Available 1 2 3 4-9 Logical Drive RAID Level 0 1 5 5 Hot-Spare Available No No No Yes For example, if the server contains six drives that are in the RDY state, the EZ-RAID configuration feature will use five drives to create one disk array and define it as one RAID level 5 - IBM 866011U | Hardware Maintenance Manual - Page 112
-array configuration" on page 126 for instructions. 8. You are now ready to for each array. To create a disk array manually: 1. Start the ServeRAID Configuration program (see " Enter. A screen similar to the following appears. IBM ServeRAID Adapter Disk Array Configuration Ver. X.XX Adapter Number - IBM 866011U | Hardware Maintenance Manual - Page 113
stripe-unit size is 8 K (the default setting) or 16 K (a manual setting), the maximum number of physical drives in an array is 16. When the stripe- must define at least one logical drive for each array. The ServeRAID controller supports up to eight logical drives. If you have only one array, you can - IBM 866011U | Hardware Maintenance Manual - Page 114
The Select RAID Level pop-up window appears. Notes 1. Typically, the first logical drive that you define will be the startup (boot) drive. 2. The ServeRAID Configuration program automatically assigns RAID level 0 to any logical drives defined in an array containing only one hard disk drive. When - IBM 866011U | Hardware Maintenance Manual - Page 115
The size of a logical drive is determined by several factors, but the size must be divisible by the number of data drives in the array. A logical drive in an array can be any size you choose within the size limitations of the array. Consider the following examples: Example 1. The array consists of - IBM 866011U | Hardware Maintenance Manual - Page 116
See "Backing up the disk-array configuration" on page 126 for instructions. If you have not already done so, use the information and all existing data is lost. The purpose of synchronizing logical drives is to compute and, if necessary, write the parity data on the selected RAID level 5 logical - IBM 866011U | Hardware Maintenance Manual - Page 117
, and all existing data is lost. If you did not initialize the logical drives when you defined them, you must use the following instructions to initialize the drives before storing data. To initialize logical drives: 1. Select Initialize/Synchronize Log Drive from the Main Menu; then, press Enter - IBM 866011U | Hardware Maintenance Manual - Page 118
See "Backing up the disk-array configuration" on page 126 for instructions. If you have not already done so, use the information provided in . Synchronizing logical drives: The purpose of synchronizing logical drives is to compute and, if necessary, write the parity data on the selected RAID level - IBM 866011U | Hardware Maintenance Manual - Page 119
process completes, back up the disk-array configuration information to diskette. See "Backing up the disk-array configuration" on page 126 for instructions. If you have not already done so, use the information provided in the ServerGuide package to install the operating system. Defining hot-spare - IBM 866011U | Hardware Maintenance Manual - Page 120
hot-swap rebuild." 7. Back up the disk-array configuration information to diskette. See "Backing up the disk-array configuration" on page 126 for instructions. Enabling or disabling hot-swap rebuild: The default setting for the hot-swap rebuild parameter is Disable. When you set the hot-swap rebuild - IBM 866011U | Hardware Maintenance Manual - Page 121
A screen similar to the following appears: IBM ServeRAID Adapter Disk Array Configuration Ver. X.XX Adapter Number: 1 Bus Number or changing the configuration: This section contains the following information and instructions for using the ServeRAID Configuration program to view or change the - IBM 866011U | Hardware Maintenance Manual - Page 122
ServeRAID Adapter Disk Array Configuration Ver. X.XX Adapter Number: 1 Bus Number: 0 Host ID = Null Config Drive information Vendor ID : IBM Model/Product: DFHSS2W 4141 Serial Number: 00019846 Capacity : 2150 MB Soft Event : 0 Hard Event : 0 Parity Event : 0 Misc Event : 0 Ch 1 Array Bay - IBM 866011U | Hardware Maintenance Manual - Page 123
Menu; then, press Enter. 3. Select Display/Change Adapter Params from the next menu; then, press Enter. A screen similar to the following appears. IBM ServeRAID Adapter Disk Array Configuration Ver. X.XX Adapter Number: 1 Bus Number: 0 Host ID = Null Config Display/Change Adapter Parameter 1. Help - IBM 866011U | Hardware Maintenance Manual - Page 124
Functions menu. 6. Back up the disk-array configuration information to diskette. See "Backing up the disk-array configuration" on page 126 for instructions. Changing device states: You can use the ServeRAID Configuration program to change the state of a physical hard disk drive attached to the - IBM 866011U | Hardware Maintenance Manual - Page 125
the Up Arrow (↑) or Down Arrow (↓) key to highlight the appropriate drive; then, press Enter. A screen similar to the following appears. IBM ServeRAID Adapter Disk Array Configuration Ver. X.XX Adapter Number: 1 Bus Number: 0 Host ID = Null Config Rebuild/Device Management 1. Help 2. Set Device - IBM 866011U | Hardware Maintenance Manual - Page 126
"Backing up the disk-array configuration" on page 126 for instructions. Changing the RAID parameters: You can use the ServeRAID Configuration menu; then, press Enter. A screen similar to the following appears. IBM ServeRAID Adapter Disk Array Configuration Ver. X.XX Adapter Number: 1 Bus Number - IBM 866011U | Hardware Maintenance Manual - Page 127
You can set the stripe-unit size to 8 K, 16 K, 32 K, or 64 K. - When the stripe-unit size is 8 K or 16 K, the maximum number of physical drives in an array is 16. - When the stripe-unit size is 32 K or 64 K, the maximum number of physical drives in an array is eight. Rebuild Priority: The default - IBM 866011U | Hardware Maintenance Manual - Page 128
Functions menu. 6. Back up the disk-array configuration information to diskette. See "Backing up the disk-array configuration" on page 126 for instructions. (The backup procedure also saves the RAID parameters to diskette.) Changing the write policy: When you configure a logical drive, the ServeRAID - IBM 866011U | Hardware Maintenance Manual - Page 129
menu; then, press Enter. 4. Select Change Write Policy from the next menu; then, press Enter. A screen similar to the following appears. IBM ServeRAID Adapter Disk Array Configuration Ver. X.XX Adapter Number: 1 Bus Number: 0 Host ID = Null Config Logical Drive Params Management 1. Help 2. Change - IBM 866011U | Hardware Maintenance Manual - Page 130
logical drive feature does not copy the RAID configuration information. If you want to copy an existing array for use in another system, use the instructions provided in "Copying an existing disk array" on page 123. Note If you have a RAID level 5 logical drive, make sure that the target drive is - IBM 866011U | Hardware Maintenance Manual - Page 131
copy the logical drive; then, press Enter. IBM ServeRAID Adapter Disk Array Configuration Ver. X.XX instructions. Copying an existing disk array: You can use the following instructions that is identical to Array A. (See "Creating disk arrays manually" on page 104.) 3. Copy all logical drives from the - IBM 866011U | Hardware Maintenance Manual - Page 132
to the target system. (See "Restoring the disk-array configuration" on page 127.) Deleting Logical drives and disk arrays: This section contains instructions for deleting logical drives and disk arrays. In all cases, when you delete an array or its associated logical drives, all the data and - IBM 866011U | Hardware Maintenance Manual - Page 133
; then, set the state for the new drive to RDY. (See "Internal drive installation" on page 197 and "Changing device states" on page 116 for instructions.) 6. Select Exit or press Esc to return to the Main Menu. 7. Back up the disk-array configuration information to diskette. See "Backing up the disk - IBM 866011U | Hardware Maintenance Manual - Page 134
Enter. 4. Select Backup IPS ServeRAID Config from the next menu; then, press Enter. (The disk-array configuration is also known as the IBM ServeRAID (IPS) configuration.) 5. Insert the blank Disk-Array Configuration Backup diskette into the diskette drive. 6. A pop-up window appears with a default - IBM 866011U | Hardware Maintenance Manual - Page 135
program (see "Starting the ServeRAID Configuration program" on page 77). 2. Select Advanced Functions from the Main Menu; then, press Enter. 3. Select IBM RAID Subsystem Diagnostic from the next menu; then, press Enter. 4. Select the diagnostic test that you want to run; then, press Enter - IBM 866011U | Hardware Maintenance Manual - Page 136
Advanced Functions from the Main Menu; then, press Enter. 3. Select IBM RAID Subsystem Diagnostic from the next menu; then, press Enter. You this occurs, select the drive and format it again. 5. Follow the instructions that appear on the screen. When a message similar to Formatting Complete appears - IBM 866011U | Hardware Maintenance Manual - Page 137
After you correct a disk-array problem, you might want to clear the Device Event Log so that you can quickly identify any subsequent errors. To clear the Device Event Log: 1. Start - IBM 866011U | Hardware Maintenance Manual - Page 138
Removing the wrong hard disk drive might cause loss of all data in the array. . a. To physically replace the defective hard disk drive, follow the instructions in "Internal drive installation" on page 197 and "Installing a drive in a hot-swap bay" on page 203; then, follow the - IBM 866011U | Hardware Maintenance Manual - Page 139
Monitoring utility program, review the guidelines and information in this section; then, see "Physical device administration" on page 42 for instructions. Automatic rebuild process: The ServeRAID controller will rebuild a defunct drive automatically when all of the following conditions exist: The - IBM 866011U | Hardware Maintenance Manual - Page 140
If the state of the logical drive is critical (CRT), you must rebuild the defunct hard disk drive promptly. The replacement hard disk drive must be the same size or larger than the failed drive. If the hard disk drive being rebuilt is part of a RAID level 0 logical drive, the RAID level 0 drive is - IBM 866011U | Hardware Maintenance Manual - Page 141
press Enter. 3. Select Init/View/Synchronize Config from the next menu; then, press Enter. A screen similar to the following appears. IBM ServeRAID Adapter Disk Array Configuration Ver. X.XX Adapter Number: 1 Bus Number: 0 Host ID = Null Config Init/View/MMSaayiinnnchMMreeonnnuuize Config 1. Help - IBM 866011U | Hardware Maintenance Manual - Page 142
for a description of this choice. 4. Use the Up Arrow (↑) or Down Arrow (↓) key to highlight your choice from the menu; then, press Enter. 5. Follow the instructions that appear on the screen. 134 Netfinity Server HMM - IBM 866011U | Hardware Maintenance Manual - Page 143
must initialize the configuration immediately. See "Initializing, viewing, or synchronizing the ServeRAID II controller configuration" on page 133 for instructions. Descriptions of the choices available from the Configuration Synchronization menu are as follows: EEPROM as Source copies configuration - IBM 866011U | Hardware Maintenance Manual - Page 144
Specific HDD as Source retrieves the configuration information from the hard disk drive that you select. The updated configuration information is then copied to NVRAM, to the EEPROM, and to the configured hard disk drives. 136 Netfinity Server HMM - IBM 866011U | Hardware Maintenance Manual - Page 145
. If this occurs, see "Symptom-to-FRU index" on page 264 and correct the problem; then, return here and continue with step 2. 2. Press Ctrl+I immediately when a screen similar to the following Mini-Configuration screen appears. IBM ServeRAID Adapter Disk Array Mini-Configuration Utility Ver. X.XX - IBM 866011U | Hardware Maintenance Manual - Page 146
the Mini-Configuration program appears, similar to the following screen. IBM ServeRAID Controller Disk Array Mini-Configuration Ver. X.XX Main Menu highlight your choice; then, press Enter. 5. Follow the instructions that appear on the screen. 6. Select Exit to leave the Main Menu. 138 - IBM 866011U | Hardware Maintenance Manual - Page 147
Viewing the ServeRAID II controller status: When you select View Adapter Status from the Main Menu, a screen similar to the following appears. IBM ServeRAID Adapter Disk Array Mini-Configuration Utility Ver. X.XX Status for Adapter: 1 Hdwr: ISPR-EF10h BCS-OFh ESC-00h Unattended: Off ReadAhead: - IBM 866011U | Hardware Maintenance Manual - Page 148
, RAID level, current state, stripe unit size, write policy, read-ahead status, and the date that the logical drive was created. IBM ServeRAID Adapter Disk Array Mini-Configuration Ver. X.XX Adapter 1 Logical Drive Configuration Logical Drive 0 1 2 3 4 5 6 7 Size RAID Current Stripe Wrt Read Date - IBM 866011U | Hardware Maintenance Manual - Page 149
Locations The following information supports the Netfinity 5500 Type 8660 server. "Adapters" on page 142. "Battery replacement" on page 147. "Before you begin" on page 150. "Changing jumper positions" on - IBM 866011U | Hardware Maintenance Manual - Page 150
replace an existing PCI adapter with the same type of adapter without turning the server power off and restarting the system, if these features are supported by the operating system. These slots are called hot-pluggable PCI slots. They are also referred to as hot-plug PCI slots. The expansion slots - IBM 866011U | Hardware Maintenance Manual - Page 151
. An adapter can be installed when the Power LED for the PCI slot is off. Refer to the operating system documentation to determine if it supports hot-plug PCI adapters, and, if so, how to disable the hot-plug PCI slot. Attention LEDs: Each hot-plug PCI slot has an Attention - IBM 866011U | Hardware Maintenance Manual - Page 152
adapter in the slot. Refer to the operating system documentation for instructions. Normal operation; no intervention is required. The adapter requires enables you to install a variety of PCI adapters that currently do not support sharing of PCI interrupts. PCI slots 5 and 6 are on the primary - IBM 866011U | Hardware Maintenance Manual - Page 153
. Legacy adapters: If an adapter that you install is not Plug and Play compatible, the Configuration/Setup utility program can help you to manually configure the adapter. Adapters that are not Plug and Play compatible are known as legacy devices. Configuration/Setup Utility program: Within the - IBM 866011U | Hardware Maintenance Manual - Page 154
on the adapter. 2. If you have a resource conflict, set the resources that are used by the ISA legacy adapter to [ISA Legacy]. This will manually configure the ISA legacy adapter to that specific server resource. Once Plug and Play detects that a resource is not available, it will skip that resource - IBM 866011U | Hardware Maintenance Manual - Page 155
light will not blink until after the first completion of the POST. IBM has designed this product with your safety in mind. The lithium battery battery, you must adhere to the following instructions. Caution When replacing the battery, use only IBM Part Number 33F8354 or an equivalent type battery - IBM 866011U | Hardware Maintenance Manual - Page 156
Before you begin, be sure you have: Read "Safety information" on page 308 Followed any special handling and installation instructions supplied with the replacement battery. Note After you replace the battery, you must reconfigure the server and reset the system date and time. To replace - IBM 866011U | Hardware Maintenance Manual - Page 157
from the hot-plug PCI slots.) 8. Insert the plastic dividers into the divider guides beside PCI slots 1 and 2. 9. Reinstall the top cover and complete the reconfigure the server, follow the instructions given in "Configuration/Setup Utility program" on page 60 (all models). Netfinity 5500 - Type - IBM 866011U | Hardware Maintenance Manual - Page 158
2 MB, 3.5-inch diskettes available. Back up all important data before you make changes to disk drives. Have a small, flat-blade screwdriver available. For a list of supported options for the Netfinity 5500, refer to http://www.ibm.com/pc/us/compat/ on the World Wide Web. 150 Netfinity Server HMM - IBM 866011U | Hardware Maintenance Manual - Page 159
Changing jumper positions Jumpers located on the system board and the processor board help you to customize the way the server operates. The system board, processor board, and SCSI backplane contain two-pin and three-pin jumper blocks. In some cases, groups of jumpers might combine to define a - IBM 866011U | Hardware Maintenance Manual - Page 160
To change a jumper's position for a two-pin jumper block: 1. Turn off the server; then, disconnect the server power cords. 2. Remove the server cover (see "Preparing to install options" on page 220). 3. Do one of the following: Lift the jumper straight off the pin block. Align the holes in the - IBM 866011U | Hardware Maintenance Manual - Page 161
Three-pin jumper blocks: With the three-pin jumper blocks, each jumper covers two of the three pins on a pin block. You can position the jumper to fit over the center pin and either of the other two pins. The following illustration identifies pins 1, 2, and 3 on a three-pin jumper block. 32 1 To - IBM 866011U | Hardware Maintenance Manual - Page 162
that you disconnected in "Preparing to install options" on page 220, and, for certain options, run the Configuration utility program. Follow the instructions in this section. Attention For correct cooling and airflow, install the top cover before turning on the server. Operating the server for - IBM 866011U | Hardware Maintenance Manual - Page 163
Installing the top cover: To install the server top cover: 1. Before installing a cover, check that all cables, adapters, and other components are installed and seated correctly and that you have not left loose tools or parts inside the server. 2. Lower the cover 2 with the rear edge of the cover - IBM 866011U | Hardware Maintenance Manual - Page 164
Installing the trim bezels and server door: Refer to the following illustration while you perform the steps in this procedure. To install the media-bay trim bezel: 1. Insert the two tabs on the top of the media-bay trim bezel 3 in the matching holes on the server chassis. 2. Push the bottom of the - IBM 866011U | Hardware Maintenance Manual - Page 165
Some options have device drivers that you need to install. Refer to the documentation that comes with the option for information about installing any required device drivers. If you have installed a new microprocessor, you might want to upgrade the operating system. Refer to the serverGuide package. - IBM 866011U | Hardware Maintenance Manual - Page 166
server to deter tampering with the internal components. This same lock also locks the top cover in place. Power Control Button: Press this button to manually turn the server on or off. Caution The Power Control button on the front of the server does not turn off the electrical current supplied - IBM 866011U | Hardware Maintenance Manual - Page 167
Control button on the front of the server. Pressing the Power Control button starts a graceful shutdown of the operating system, if this feature is supported by the operating system, and places the server in standby mode. Note After turning off the server, wait at least 5 seconds before pressing the - IBM 866011U | Hardware Maintenance Manual - Page 168
When the light flashes rapidly (three flashes per second), the controller is identifying the drive. Hard Disk Activity Light: When the green light for a hard disk drive is flashing, the drive is being accessed. 160 Netfinity Server HMM - IBM 866011U | Hardware Maintenance Manual - Page 169
the CD. Loading a CD: To load a CD into a CD-ROM drive: 1. Press the Eject/Load button. The tray slides out of the drive. (Do not manually force the tray open.) 2. Place the CD in the tray with the label facing up. 3. Close the tray by pressing the Eject/Load button, or - IBM 866011U | Hardware Maintenance Manual - Page 170
by gently pushing the tray forward. When the tray is closed, the CD-ROM drive In-Use light on the front of the drive will activate to indicate that the drive is in use. 4. To eject the CD, press the Eject/Load button. When the tray slides out, carefully remove the CD. 5. Close the tray by pressing - IBM 866011U | Hardware Maintenance Manual - Page 171
DASD backplane removal Before you begin: Read "Safety information" on page 308. To remove the DASD backplane, do the following: 1. Remove the top cover (see "Top cover removal" on page 262). 2. To access the cable(s) attached to the DASD backplane, slide the shuttle to the rear of the system, see " - IBM 866011U | Hardware Maintenance Manual - Page 172
The following illustration shows the LEDs on the diagnostics panel inside the server. See "Symptom-to-FRU index" on page 264 for information on identifying problems using these LEDs. SMI NMI PCI1 PCI2 PCI3 MEM FAN1 FAN2 FAN3 FAN4 TEMP VRM CPU DASD1 DASD2 PS1 PS2 Speaker To replace the - IBM 866011U | Hardware Maintenance Manual - Page 173
IBM marketing representative. Refer to the information provided with the adapter to determine the number of internal and external connectors, channels, and SCSI devices that the adapter supports See "SCSI IDs" on page 199 and to the instructions that come with the SCSI devices for more information - IBM 866011U | Hardware Maintenance Manual - Page 174
ports are used to communicate with printers, plotters, external modems, scanners, and auxiliary terminals. These ports also enable you to transfer data between computers. Serial ports can transfer data asynchronously, which means that they can transmit any number of characters at any time, with no - IBM 866011U | Hardware Maintenance Manual - Page 175
, and transfers data one byte at a time. The parallel port has a 25-pin, female D-shell connector on the back of the server. It support three standard IEEE 1284 modes of operation: Standard Parallel Port (SPP), Enhanced Parallel Port (EPP), and Extended Capacity Port (ECP). (See "Input/Output - IBM 866011U | Hardware Maintenance Manual - Page 176
Table 3. Parallel Port Pin-Number Assignments Pin I/O SPP/ECP Signal EPP Signal 1 O −STROBE 2 I/O Data 0 3 I/O Data 1 4 I/O Data 2 5 I/O Data 3 6 I/O Data 4 7 I/O Data 5 8 I/O Data 6 9 I/O Data 7 10 I −ACK 11 I BUSY 12 I PE (paper end) 13 I SLCT (select) - IBM 866011U | Hardware Maintenance Manual - Page 177
(Vsync) 15 DDC SDL Keyboard and auxiliary-device ports: The system board has one keyboard port and one auxiliary-device port that supports a mouse or other pointing device. (See "Input/Output connectors and expansion slots" on page 194 for the locations of the connectors.) 6 5 4 3 2 1 The - IBM 866011U | Hardware Maintenance Manual - Page 178
Ethernet port: The system board in the Netfinity 5500 contains an Ethernet controller. The controller has an external RJ-45 connector on the rear of the server that is used with a category 3, 4, or 5 unshielded twisted-pair (UTP) cable. The connector enables an Ethernet network to attach to the - IBM 866011U | Hardware Maintenance Manual - Page 179
Universal serial bus ports: The system board in the Netfinity 5500 contains two universal serial bus (USB) ports. Each USB port has an external connector on the rear on the server for attaching devices that previously used serial, parallel, keyboard, mouse, and game ports. USB is an emerging serial - IBM 866011U | Hardware Maintenance Manual - Page 180
Front bezel removal Before you begin: Read "Safety information" on page 308. To remove the front bezel, do the following: 1. Remove the top cover, see "Top cover removal" on page 262. 2. Remove the information panel cover, see "Information panel cover removal" on page 191. 3. Remove the door and - IBM 866011U | Hardware Maintenance Manual - Page 181
to remove a hot-plug adapter, reverse the steps. If the operating system supports hot-replace PCI adapters, you can replace a failing hot-plug PCI adapter off power to the server. If the operating system and adapter also support the hot-add feature, you can install a new adapter without turning off - IBM 866011U | Hardware Maintenance Manual - Page 182
1 Tab 2 Adapter retention latch 3 Expansion-slot cover 4 Attention light 5 Power light 6 Plastic divider 174 Netfinity Server HMM - IBM 866011U | Hardware Maintenance Manual - Page 183
1 Tab 2 Adapter retention latch 7 Adapter 8 Adapter retention latch To install a hot-plug PCI adapter: 1. Remove the top cover (see "Top cover removal" on page 262). 2. Determine which expansion slot you will use for the adapter. Note Only PCI slots 1-4 can be used for hot-plug PCI adapters. 3. - IBM 866011U | Hardware Maintenance Manual - Page 184
characteristics of the system and ensures proper cooling of system components. 5. Refer to the documentation that comes with the adapter for any cabling instructions. It might be easier for you to route any cables before you install the adapter. 6. Remove the adapter from the static-protective - IBM 866011U | Hardware Maintenance Manual - Page 185
hot-plug PCI slot.) Make sure that the Power light 5 for the hot-plug PCI slot is on. 11. If you have other options to install or remove, do so now; otherwise, go to "Completing the installation" on page 154. Installing a non-hot-plug adapter This section gives the procedure for installing a non-hot - IBM 866011U | Hardware Maintenance Manual - Page 186
remove the top cover (see "Top cover removal" on page 262). 2. Determine which expansion slot you will use for the adapter. Note Check the instructions that come with the adapter for any requirements or restrictions. 3. Remove the expansion-slot cover 2 : If you are installing an adapter in PCI slot - IBM 866011U | Hardware Maintenance Manual - Page 187
for operation of the adapter retention latch on the end of the slot near the rear of the server. b. Lower the tab on the adapter guide over the tab on the top corner of the adapter. Rotate the adapter retention latch clockwise until it snaps into place. If you are installing - IBM 866011U | Hardware Maintenance Manual - Page 188
several types of network adapters. If you are having trouble with the installation or operation of a network adapter or network operating system, ensure that the network-adapter device driver supports dual processors. Refer to the network-adapter documentation for additional information about - IBM 866011U | Hardware Maintenance Manual - Page 189
label attached. Hazardous voltage, current, and energy levels are present inside the power supplies, power backplane, and ac box. There are no serviceable parts inside the power supplies, power backplane, or ac box. Refer to the following illustration while performing the steps in this procedure - IBM 866011U | Hardware Maintenance Manual - Page 190
9 9 1 Power cord connector for power supply 2 2 Screws 3 Filler panel 4 Power supply 5 Handle 6 Power switch on power supply 7 AC Power light 8 DC Power light 9 Holes for shipping screws 1 Power-cord strain-relief bracket 182 Netfinity Server HMM - IBM 866011U | Hardware Maintenance Manual - Page 191
the following label attached. Hazardous voltage, current, and energy levels are present inside the power supplies, power backplane, and ac box. There are no serviceable parts inside the power supplies, power backplane, or ac box. Note It is not necessary to turn the Power switch on the power supply - IBM 866011U | Hardware Maintenance Manual - Page 192
7. Make sure the Power switch 6 on the power supply is in the On position. 8. Verify that the dc Power light 8 and ac Power light 7 on the power supply are lit, indicating that the power supply is operating correctly. 184 Netfinity Server HMM - IBM 866011U | Hardware Maintenance Manual - Page 193
following label attached. Hazardous voltage, current, and energy levels are present inside the power supplies, power backplane, and ac box. There are no serviceable parts inside the power supplies, power backplane, or ac box. 1. If the server has only one power supply installed, turn off the server - IBM 866011U | Hardware Maintenance Manual - Page 194
c. Grasp the handle 5 on the power supply and pull the handle toward the center of the server; then, slide the power supply out of the chassis. Note During normal operation, each power-supply bay should have either a power supply or filler panel installed for proper cooling. 4. If you are not - IBM 866011U | Hardware Maintenance Manual - Page 195
Hot-swap fan assembly The server comes with three hot-swap fan assemblies. Attention: Replace a fan that has failed within 48 hours to help ensure proper cooling. Note You do not need to turn off the power to the server to replace a hot-swap fan assembly. The following illustration shows the - IBM 866011U | Hardware Maintenance Manual - Page 196
Caution The power cable to the fan should be disconnected whenever the fan assembly is not installed in the server; otherwise, the fan might start turning while you are holding it and the fan blades could injure your fingers. 1. Remove the top cover (see "Top cover removal" on page 262). Attention: - IBM 866011U | Hardware Maintenance Manual - Page 197
Information LED panel The information LED panel on the front of the server contains status lights. System POST Complete Light System Error Light System Power Light SCSI Hard Drive Activity Light Processor 1 Activity Light OK 1 2 Processor 2 Activity Light 100 LINK TX MB OK RX Ethernet - IBM 866011U | Hardware Maintenance Manual - Page 198
Ethernet Speed 100 Mbps: When this green light is lit, the Ethernet speed is 100 Mbps. Ethernet Link Status Light: When this green light is lit, there is an active connection on the Ethernet port. Ethernet Transmit/Receive Activity Light: When this green light is lit, it indicates transmit or - IBM 866011U | Hardware Maintenance Manual - Page 199
Information panel cover removal Before you begin: Read "Safety information" on page 308. To remove the information-panel cover, do the following: 1. Remove the door, see "Server door and trim bezels removal" on page 252. 2. Remove the information-panel cover. a. Place your fingers inside the right - IBM 866011U | Hardware Maintenance Manual - Page 200
Information panel LED assembly removal Before you begin: Read "Safety information" on page 308. To remove the information panel LED assembly, do the following: 1. Remove the server door and trim bezels, see "Server door and trim bezels removal" on page 252. 2. Remove the top cover, see "Top cover - IBM 866011U | Hardware Maintenance Manual - Page 201
a. Remove the information panel LED assembly screws, then; remove the assembly. Netfinity 5500 - Type 8660 193 - IBM 866011U | Hardware Maintenance Manual - Page 202
cable connects here. NetBAY3: The tower model of the Netfinity 5500 comes with a NetBAY3 attached. You can install devices, such as the IBM EXP10 or a power distribution unit, in the NetBAY3. Refer to "Installing devices in the NetBAY3" for more information. Management C Connector: This connector - IBM 866011U | Hardware Maintenance Manual - Page 203
it is on. The meaning of the Attention lights is defined by the operating system. Refer to the operating system documentation to determine if it supports hot-plug PCI adapters and, if so, what the Attention lights indicate. Power Connector: The power cord for power supply 1 connects here. (The power - IBM 866011U | Hardware Maintenance Manual - Page 204
Interior LED and speaker assembly Before you begin: Read "Safety information" on page 308. To remove the interior LED and speaker assembly (diagnostic LEDs), do the following: 1. Remove the top cover, see "Top cover removal" on page 262 2. Disconnect the cables attached to interior LED and speaker - IBM 866011U | Hardware Maintenance Manual - Page 205
Internal drive installation Different types of drives allow the system to read multiple types of media and store more data. Several types of drives are available, such as: Diskette Hard disk CD-ROM Tape Internal drive bays: Internal drives are installed in bays. The server comes with one 3.5-inch, - IBM 866011U | Hardware Maintenance Manual - Page 206
a 68-pin to 50-pin converter. The server supports six slim (1-inch) or three half-high (1.6-inch Some drives have a special design called small computer system interface, or SCSI. This design allows follow the instructions in "External options" on page 165, in addition to the instructions in this - IBM 866011U | Hardware Maintenance Manual - Page 207
.) If you need to set IDs for SCSI devices, refer to the instructions that come with those devices. The server automatically sets SCSI IDs for hot indicator lights above each hot-swap bay. The SCSI backplane in the server supports up to six hot-swap bays. Table 8 shows the default SCSI IDs that - IBM 866011U | Hardware Maintenance Manual - Page 208
" on page 308. Read the documentation that comes with the internal drive. 1. Choose the bay in which you want to install the drive. 2. Check the instructions that come with the drive to see if you need to set any switches or jumpers on the drive. 3. To install the drive, go to - IBM 866011U | Hardware Maintenance Manual - Page 209
1 Screws for filler panel 2 Filler panel with EMI shield 3 Slide rails 4 Screws for slide rails 5 Drive Netfinity 5500 - Type 8660 201 - IBM 866011U | Hardware Maintenance Manual - Page 210
screws are included in the drive accessory kit that comes with the server. 7. Place the drive so that the slide rails engage in the bay guide rails. Push the drive into the bay and attach it with the two screws 1 from the filler panel. 8. Loosen the four thumbscrews 8 on the shuttle - IBM 866011U | Hardware Maintenance Manual - Page 211
now; otherwise, go to "Completing the installation" on page 154. Installing a drive in a hot-swap bay: The bays on the right front of the server support hot-swap drives only. Note You do not have to turn off the server to install hot-swap drives in these bays. However, you must - IBM 866011U | Hardware Maintenance Manual - Page 212
hot-swap bay: a. Ensure the tray handle 3 is open (that is, perpendicular to the drive). b. Align the drive/tray assembly so that it engages the guide rails in the bay. c. Gently push the drive assembly into the bay until the drive connects to the backplane. d. Push the tray handle to the - IBM 866011U | Hardware Maintenance Manual - Page 213
Note Because the server has a RAID controller, you must reconfigure the disk arrays after installing hard disk drives. Record the configuration information. Replacing a drive in a hot-swap bay Note You do not have to turn off the server to remove a drive from the hot-swap bays. Attention Before you - IBM 866011U | Hardware Maintenance Manual - Page 214
1 Hard disk drive 2 Drive tray handle (open position) 206 Netfinity Server HMM - IBM 866011U | Hardware Maintenance Manual - Page 215
3 Screws for half-high drive 4 Screw holes for slim-high drive 5 Drive tray 6 Drive 7 Connector for half-high drive 8 Screws for half-high drive connector To replace a drive in a hot-swap bay: 1. Unlock and open the server door (see "Preparing to install options" on page 220). Attention: To maintain - IBM 866011U | Hardware Maintenance Manual - Page 216
hot-swap bay: a. Ensure the tray handle is open (that is, perpendicular to the drive). b. Align the drive/tray assembly so that it engages the guide rails in the bay. c. Push the drive assembly into the bay until the drive connects to the backplane. d. Push the tray handle to the right - IBM 866011U | Hardware Maintenance Manual - Page 217
not need to remove the NetBAY3 to install devices. General considerations: You can install three types of devices in the NetBAY3: Devices, such as the IBM EXP10, that sit on side rails Cantilevered devices, such as a power distribution unit (PDU), that are screwed to the front or rear of the NetBAY3 - IBM 866011U | Hardware Maintenance Manual - Page 218
in a rack enclosure. The device side rails must be screwed to the NetBAY3 vertical mounting rails. Follow the instructions in the documentation that comes with the device and use the following illustrations as a guide. If you need to remove or move the cage nuts at the rear of the NetBAY3 to hold - IBM 866011U | Hardware Maintenance Manual - Page 219
Removing cage nuts: Device installation might require the removal or moving of the rear-pane cage nuts. If you need to move the cage nuts, follow this procedure to move them and then go to "Installing cage nuts" on page 212 to install them in the correct position. 1. Hold the cage nut in place and - IBM 866011U | Hardware Maintenance Manual - Page 220
devices can be installed in the front or rear of the NetBAY3. The devices must be screwed to the NetBAY3 vertical mounting rails. Follow the instructions in the documentation that comes with the device and use the following figure as - IBM 866011U | Hardware Maintenance Manual - Page 221
Installing devices on the NetBAY3 base plate: Some devices rest on the NetBAY3 base plate. These devices must be screwed to the NetBAY3 vertical mounting rails. Netfinity 5500 - Type 8660 213 - IBM 866011U | Hardware Maintenance Manual - Page 222
connector J2, and so forth. Notes 1. The memory-module kit sizes available for the server are 64 MB, 128 MB, and 256 MB. The server supports a minimum of 128 MB and a maximum of 1 GB of system memory. 2. Install only 3.3 V, 168-pin, 8-byte DIMMs. Only 100 MHz, 72-bit, unbuffered, synchronous, error - IBM 866011U | Hardware Maintenance Manual - Page 223
Refer to this illustration while you perform the steps in this procedure. Note The illustration shows only the processor board for simplicity; you do not need to remove the processor board to install a memory module. 1 Memory socket (Bank) 1 (J4) 2 Memory socket (Bank) 2 (J3) 3 Memory socket (Bank) - IBM 866011U | Hardware Maintenance Manual - Page 224
a. Locate the lowest-numbered, empty memory-module connector on the processor board. b. Turn the memory module (DIMM) 6 so that the pins align correctly with the connector 4 . c. Insert the DIMM into the connector by pressing on one edge of the DIMM and then on the other edge of the DIMM. Be sure to - IBM 866011U | Hardware Maintenance Manual - Page 225
input/output system (BIOS). The latest level of BIOS for the server is available through the World Wide Web and the IBM Bulletin Board System (BBS). See "Online support" on page iv for the appropriate World Wide Web addresses and bulletin-board telephone numbers. Obtain an SMP-capable operating - IBM 866011U | Hardware Maintenance Manual - Page 226
Note The illustration shows only the processor board for simplicity; you do not need to remove the processor board to install a microprocessor kit. 1 Voltage regulator module (VRM) for secondary microprocessor 2 VRM for primary microprocessor 3 Primary microprocessor (CPU or processor 1) 4 Secondary - IBM 866011U | Hardware Maintenance Manual - Page 227
b. Center the microprocessor 6 over the secondary connector 4 . Attention Make sure the microprocessor is oriented and aligned correctly before you try to press it into the connector. c. Press in on the latches 7 and carefully insert the microprocessor into the connector. d. Press outward on the - IBM 866011U | Hardware Maintenance Manual - Page 228
listed in the preceding list, continue with the following steps. 1. Unlock and open the server door. Caution When unlocked, the server door will not support the weight of the server. To avoid personal injury, be sure to remove or lock the server door before moving or lifting the server. 2. Remove - IBM 866011U | Hardware Maintenance Manual - Page 229
injury or equipment damage, disconnect the attached power cords, telecommunications systems, networks, and modems before you open the server covers, unless instructed otherwise in the installation and configuration procedures. Go to "Top cover removal" on page 262. Netfinity 5500 - Type 8660 221 - IBM 866011U | Hardware Maintenance Manual - Page 230
Power backplane removal Before you begin: Read "Safety information" on page 308. To remove the power backplane, to the following 1. Remove the top cover (see "Top cover removal" on page 262). 2. To access the power backplane cables, slide the shuttle to the rear of the system, see "Shuttle removal" - IBM 866011U | Hardware Maintenance Manual - Page 231
a. Remove the power backplane screws 1 , then; remove the power backplane. Netfinity 5500 - Type 8660 223 - IBM 866011U | Hardware Maintenance Manual - Page 232
You cannot hot-swap a power supply if the server has only one power supply installed. (See "Hot-swap power supply installation" on page 181 for instructions.) Power Switch: This switch turns the power supply on and off. AC and DC Power Lights: These lights provide status information about the power - IBM 866011U | Hardware Maintenance Manual - Page 233
Power supply filler plate Before you begin: Read "Safety information" on page 308. To remove the power supply filler plate, do the following: 1. Remove the power supply filler plate screws 1 , then; remove the power supply filler plate. Netfinity 5500 - Type 8660 225 - IBM 866011U | Hardware Maintenance Manual - Page 234
NetBAY3 bezel installation The NetBAY3 bezel is shipped, unattached, inside the NetBAY3. To install the NetBAY3 bezel: 1. Remove the package containing the NetBAY3 bezel and unpack the bezel. 2. Hook the tabs on the left side of the NetBAY3 bezel around the posts on the NetBAY3. 3. Gently push the - IBM 866011U | Hardware Maintenance Manual - Page 235
Processor board component locations A layout of the processor board is shown in the following illustration. 34 35 36 37 33 32 31 1 - 4 Microprocessor core-frequency-selection jumper block (J27-J30) 5 Primary microprocessor VRM error LED (CR17) 6 Reserved (J20) 7 System board interface connector - IBM 866011U | Hardware Maintenance Manual - Page 236
19 DIMM socket 3 (J2) 2 DIMM socket 2 (J3) 21 DIMM socket 1 (J4) 22 Secondary microprocessor error LED (CR13) 23 Reserved (J7) 24 Reserved (J24) 25 Reserved (J6) 26 Reserved (J16) 27 Secondary microprocessor card connector (U6) 28 Reset-system jumper block (J23) 29 Reserved (J15) 3 Reserved (J14) 31 - IBM 866011U | Hardware Maintenance Manual - Page 237
Processor board jumpers Table 9 on page 230 contains the names and descriptions of the jumper blocks located on the processor board. The highlighted numbers in the table refer to the highlighted numbers in the illustration in "Processor board component locations" on page 227. Notes 1. Turn off the - IBM 866011U | Hardware Maintenance Manual - Page 238
Table 9. Processor Board Jumpers Jumper Name 1-4 Microprocessor core frequency selection (J27-J30) Description The default core/bus fraction is 3.5 (350/100 MHz). Jumpers are installed on pins 1 and 2 of J27 and J30; and jumpers are installed on pins 2 and 3 of J28 and J29. For the core/bus - IBM 866011U | Hardware Maintenance Manual - Page 239
Table 10. Microprocessor Core Frequency Selection Core/Bus Fraction J27 Jumper J28 Jumper J29 Jumper J30 Jumper 350/100 Pins 1 and 2 Pins 2 and 3 Pins 2 and 3 Pins 1 and 2 400/100 Pins 2 and 3 Pins 1 and 2 Pins 1 and 2 Pins 1 and 2 450/100 Pins 2 and 3 Pins 1 and 2 Pins 2 and 3 - IBM 866011U | Hardware Maintenance Manual - Page 240
Processor board removal Before you begin: Read "Safety information" on page 308. To remove the processor board, do the following. 1. Remove the top cover (see "Top cover removal" on page 262). 2. Disconnect all processor board cables. 3. Remove the processor board. 4. Remove the processor board - IBM 866011U | Hardware Maintenance Manual - Page 241
Rack installation This chapter provides instructions for installing a server in a rack and for removing a server from in the rack starting from the bottom. For more information, refer to the IBM Netfinity Rack Configurator program provided with ServerGuide. Review the documentation that comes with - IBM 866011U | Hardware Maintenance Manual - Page 242
machine. In this section, you will use the following parts: IBM Installation Template Two slide-bracket assemblies One cable-management arm Two bezel Remove the rack front door. Refer to the rack documentation for instructions. 2. Mark the positions of the slide-bracket assemblies, bezel brackets, - IBM 866011U | Hardware Maintenance Manual - Page 243
3. Attach a slide-bracket assembly to the front of the rack: Notes: Get another person to help you attach the slide-bracket assemblies to the rack. The slide-bracket assemblies can be installed on either the left or right side of the rack. Refer to the illustrations for examples of the proper - IBM 866011U | Hardware Maintenance Manual - Page 244
Screws 236 Netfinity Server HMM - IBM 866011U | Hardware Maintenance Manual - Page 245
c. Insert screws (6M by 16 mm) through the mounting rail to the slide-bracket assembly. Do not tighten the screws. 4. Attach the slide bracket assembly to the rear of the rack: a. Position the slide-bracket assembly inside the mounting rail. b. Insert screws (6M by 16 mm) through the mounting rail - IBM 866011U | Hardware Maintenance Manual - Page 246
7. Tighten all screws to secure both slide-bracket assemblies. If you are using a torque screwdriver, use the following torque setting: 8-11 Nm (70.8-97.0 in/lbs). 8. Attach the cable-management arm to the rear of the rack: a. Position the cable-management arm bracket on the outside of the mounting - IBM 866011U | Hardware Maintenance Manual - Page 247
Netfinity 5500 - Type 8660 239 - IBM 866011U | Hardware Maintenance Manual - Page 248
Installing the server in the rack: In this section, you will use eight screws (M4 by 8). To install the server in the rack: 1. Fully extend the slide-bracket assemblies until they lock. 2. Install the four lift handles on the sides of the server: a. Press in on the sides of the lift handle near the - IBM 866011U | Hardware Maintenance Manual - Page 249
32 kg (70.5 lbs) 55 kg (121.2 lbs) Caution Use safe lifting practices when lifting the machine. 3. Lift and position the server so that the bayonet slots on the server are above the bayonets on the slide-bracket assemblies. 4. Lower the server and slip the bayonets into the bayonet slots. 5. - IBM 866011U | Hardware Maintenance Manual - Page 250
6. Remove the four lift handles from the sides of the server: a. Grasp the lift handle and press in on the sides of the lift handle near the tabs until the tabs touch the inside edges of the slots. b. Move the handle down in the slots so that the hooked parts of the tabs clear the top edges of the - IBM 866011U | Hardware Maintenance Manual - Page 251
server using the captive screws. 9. Attach the monitor, keyboard, and power cables to the corresponding connectors on the server. Refer to the rack documentation for instructions. 10. Attach the cables to the cable-management arm using cable ties. Netfinity 5500 - Type 8660 243 - IBM 866011U | Hardware Maintenance Manual - Page 252
11. Attach the two bezel brackets (one for each side) to the front sides of the server with the six screws provided. 244 Netfinity Server HMM - IBM 866011U | Hardware Maintenance Manual - Page 253
12. Secure the server in the rack: a. Slide the server into the rack. b. Secure the server to both sides of the rack by inserting screws (M6 by 16 mm) through the bezel brackets, mounting rails, and cage nuts. 13. Install the rack front door. 14. To complete the installation, refer to the - IBM 866011U | Hardware Maintenance Manual - Page 254
Removing the server from a rack Before you begin Read "Safety information" on page 308. Turn off the server. Follow any additional installation and safety instructions that come with the rack. To remove the server from a rack: 1. If you have a modem or fax machine attached to the server, disconnect - IBM 866011U | Hardware Maintenance Manual - Page 255
32 kg (70.5 lbs) 55 kg (121.2 lbs) Caution Use safe lifting practices when lifting the machine. 9. Install the four lift handles on the sides of the server: a. Press in on the sides of the lift handle near the tabs and insert the handle tabs into the slots on the side of the server. b. Move the - IBM 866011U | Hardware Maintenance Manual - Page 256
10. Lift the server from the slide bracket assemblies and place the server on a flat, nonconductive surface. 248 Netfinity Server HMM - IBM 866011U | Hardware Maintenance Manual - Page 257
SCSI backplane component locations The following simplified layout of the SCSI backplane identifies the components. Refer to this figure when you set the jumpers on the backplane. 1 Wide (16-bit) SCSI connector 2 Option jumper block (J10) 3 SCSI hot-swap drive connectors (on reverse side of - IBM 866011U | Hardware Maintenance Manual - Page 258
No 13 12 11 10 9 8 jumper Notes: 1. No jumper on pins 5-6 and 11-12 is the default. 2. Jumpers on pins 5-6 and 11-12 is not supported. 250 Netfinity Server HMM - IBM 866011U | Hardware Maintenance Manual - Page 259
Server cabling Make sure you have an adequate number of properly grounded electrical outlets for the server, monitor, and any other options that you installed. Place the server in a location that is dry. Rain or spilled liquids might damage the server. Leave about 50 mm (2 inches) of space at the - IBM 866011U | Hardware Maintenance Manual - Page 260
Server door and trim bezels removal Refer to the following illustration while you perform the steps in this procedure. To remove the server door: 1. Unlock and open the server door 1 . 2. Lift the server door up and off its hinges. Store the door in a safe place. To remove the NetBAY3 bezel (tower - IBM 866011U | Hardware Maintenance Manual - Page 261
Shuttle removal Before you begin: Read "Safety information" on page 308. To remove the shuttle, do the following: 1. Remove the top cover (see "Top cover removal" on page 262). 2. Remove the shuttle. a. Remove the screws 2. b. Loosen the screws 1, then: slide the shuttle to the rear of the system. - IBM 866011U | Hardware Maintenance Manual - Page 262
Side cover(s) removal To remove the side cover(s), do the following: 1. Remove the top cover (see "Top cover removal" on page 262). 2. Remove the side cover. a. Release the three tabs 1 on the top edge of one side cover and tilt the cover away from the server. b. Lift the cover off the server and - IBM 866011U | Hardware Maintenance Manual - Page 263
System board component locations The following illustration shows the system board and identifies system board components. You might need to refer to this figure before you install hardware in the server, or when you record information in the tables in this chapter. You might also need to refer to - IBM 866011U | Hardware Maintenance Manual - Page 264
22 IDE connector (J33) 23 System reset jumper block (J51) 24 Fan connector (J36) 25 Diskette drive connector (J22) 26 Power on password override jumper block (J24) 27 Flash ROM page swap jumper block (J30) 28 Control panel connector (J20) 29 Battery 3 Reserved (J46) 31 Hot-plug PCI controller - IBM 866011U | Hardware Maintenance Manual - Page 265
System board jumpers Table 13 describes the jumpers on the system board. The numbers in the table correspond to the highlighted numbers on the illustration in "System board component locations" on page 255. Note Turn off the server, and disconnect the power cords before moving any jumpers. Table 13 - IBM 866011U | Hardware Maintenance Manual - Page 266
Bypassing an unknown power-on password: When a power-on password is set, POST does not complete until you enter the password. If you forget the power-on password, you can regain access to the server through either of the following methods: Enter the administrator password at the power-on prompt, if - IBM 866011U | Hardware Maintenance Manual - Page 267
procedure for each adapter divider. 4. Remove the processor board (see "Processor board removal" on page 232). 5. Disconnect all system board cables. 6. Remove the processor card support tray housing. Netfinity 5500 - Type 8660 259 - IBM 866011U | Hardware Maintenance Manual - Page 268
a. Remove the processor card support tray housing screws 1 . b. Lift the support tray housing latches 2 to release the housing from the shuttle, then; lift the housing out of the system. 7. Remove the system board dust cover 1 .. 8. Remove the system board. 260 Netfinity Server HMM - IBM 866011U | Hardware Maintenance Manual - Page 269
a. Remove the system board mounting screws, then; remove the system board. Netfinity 5500 - Type 8660 261 - IBM 866011U | Hardware Maintenance Manual - Page 270
Top cover removal Before you begin: Read "Safety information" on page 308. Note You do not have to power-off the system to replace a hot-swap fan. To remove the server top cover: 1. Turn off the server and all attached devices and disconnect all external cables and power cords (see "Preparing to - IBM 866011U | Hardware Maintenance Manual - Page 271
Voltage regulator card removal Note Read "Safety information" on page 308. To remove the voltage regulator card, do the following: 1. Turn off the server and all eternal devices. 2. Disconnect the server and all external devices from the power source. 3. Remove the voltage regulator card mounting - IBM 866011U | Hardware Maintenance Manual - Page 272
5500 - Type 8660 servers. Notes 1. Check the configuration before you replace a FRU. Configuration problems can cause false errors and symptoms. 2. For IBM devices not supported by index, refer to the manual for that device. 3. Always start with "General Checkout" on page 7. The Symptom-to-FRU - IBM 866011U | Hardware Maintenance Manual - Page 273
Beep/Symptom 1-2-3 (DMA page register write/read failed) 1-2-4 RAM refresh verification failed 1-3-1 (1st 64K RAM test failed) 1-3-2 (1st 64K RAM parity test failed) 2-1-1 (Secondary DMA register failed) 2-1-2 (Primary DMA register failed) 2-1-3 (Primary interrupt mask register failed) 2-1-4 ( - IBM 866011U | Hardware Maintenance Manual - Page 274
Beep/Symptom 3-1-3 (RAM test failed above address 0FFFFH) 3-1-4 (Time-Of-Day clock failed) 3-2-1 (Serial port failed) 3-2-2 (Parallel port failed) 3-2-3 (Math coprocessor failed) 3-2-4 (Failure comparing CMOS memory size against actual) 3-3-1 (Memory size mismatch occurred, see"Memory settings" on - IBM 866011U | Hardware Maintenance Manual - Page 275
the cover and check the diagnostic panel LEDs. The following is a complete list of diagnostic panel LEDs followed by the FRU/Action for replacing the problem. Notes 1. To locate the LEDs on the processor board see "Processor board component locations" on page 227. 2. To locate the LEDs on the system - IBM 866011U | Hardware Maintenance Manual - Page 276
Diagnostic Panel LED DASD 1 LED on (The LED located next to the drive bay that the failing drive is installed in will be turned on.) FAN 1 LED on FAN 2 LED on FAN 3 LED on MEM LED on (The LED next to the failing DIMM is on.) NMI LED on (Machine check error) PCI 1 LED on PCI 2 LED on PS1 LED on PS2 - IBM 866011U | Hardware Maintenance Manual - Page 277
Diagnostic Panel LED TEMP LED on VRM LED on (Check the VRM (voltage regulator module) LEDs on the processor board.) FRU/Action 1. Be sure the fans are operating correctly and the air flow is good. 2. Check processor 1 and 2 LEDs 3. Be sure the power supply fans are operating correctly and the air - IBM 866011U | Hardware Maintenance Manual - Page 278
Diagnostic error codes Attention In the following error codes, if XXX is 000, 195, or 197 do not replace a FRU. The description for these error codes are: 000 The test passed. 195 The Esc key was pressed to abort the test. 197 This is a warning error and may not indicate a hardware failure - IBM 866011U | Hardware Maintenance Manual - Page 279
Error Code/Symptom 020-XXX-004 (Failed Hot-Swap Slot 4 PCI Latch test) 030-XXX-000 (Failed Internal SCSI interface test) 035-XXX-000 DUPLICATE ERROR CODE (Failed System Board RAID test. Check System Error Log before replacing a FRU.) 035-XXX-000 DUPLICATE ERROR CODE (Check System Error Log before - IBM 866011U | Hardware Maintenance Manual - Page 280
slot 5 1. Fixed Disk with SCSI ID NN on RAID adapter in PCI slot 5 1. ServeRAID Adapter is not configured correctly. Refer to the ServeRAID Hardware Maintenance Manual for more information. 1. Power Supply 272 Netfinity Server HMM - IBM 866011U | Hardware Maintenance Manual - Page 281
Error Code/Symptom 089-XXX-001 (Failed Microprocessor test) 089-XXX-002 (Failed Optional Microprocessor test) 165-XXX-000 (Failed System Board test) 175-XXX-001 (Failed Fan 1 test) 175-XXX-002 (Failed Fan 2 test) 175-XXX-003 (Failed Fan 2 test) 175-XXX-004 (Processor Board Temperature sensor out of - IBM 866011U | Hardware Maintenance Manual - Page 282
Error Code/Symptom 201-XXX-002 (Failed Memory test, see"Memory settings" on page 98 ) 201-XXX-003 (Failed Memory test, see"Memory settings" on page 98 ) 201-XXX-004 (Failed Memory test, see"Memory settings" on page 98 ) 201-XXX-999 (Multiple DIMM failure, see error text.) 202-XXX-001 (Failed System - IBM 866011U | Hardware Maintenance Manual - Page 283
Error Code/Symptom 217-XXX-002 (Failed BIOS Fixed Disk test) Note If RAID is configured, the fixed disk number refers to the RAID logical array. 217-XXX-003 (Failed BIOS Fixed Disk test) Note If RAID is configured, the fixed disk number refers to the RAID logical array. 217-XXX-004 (Failed BIOS - IBM 866011U | Hardware Maintenance Manual - Page 284
Error Code/Symptom 264-XXX-999 (Errors on muliple tape drives, see error text for more info) 301-XXX-000 (Failed Keyboard test) 405-XXX-000 (Failed Ethernet test) 405-XXX-00N (Failed Ethernet test on adapter in PCI slot N) 415-XXX-000 (Failed Modem test) FRU/Action 1. See error messages/text in the - IBM 866011U | Hardware Maintenance Manual - Page 285
or the system bypasses the diskette drive. Monitor problems (general) Some IBM monitors have their own self-tests. If you suspect a problem with the monitor, refer to the information that comes with the monitor for adjusting and testing instructions. FRU/Action 1. Clean the CD 2. Clean the optical - IBM 866011U | Hardware Maintenance Manual - Page 286
Power supply LED errors Use the power supply LED information on the following page to trouble shoot power supply problems. Note The minimum configuration required for the DC Good light to come on is. Power Supply Power Backplane Power AC Inlet Box System Board (With - IBM 866011U | Hardware Maintenance Manual - Page 287
279 Table 14. Power Supply LED Errors AC Good LED DC Good LED Description Off Off No power to system or ac problem. On Off Standby mode or dc problem. On On Power is OK FRU/Action 1. Check ac power to system 2. Power Supply 3. Power Backplane 4. Power AC Inlet Box 1. Verify power - IBM 866011U | Hardware Maintenance Manual - Page 288
POST error codes In the following error codes, X can be any number or letter. Error Code/Symptom 062 (Three consecutive boot failures using the default configuration.) 101, 102 (System and processor error) 106 (System and processor error) 111 (Channel check error) 114 (Adapter read-only memory - IBM 866011U | Hardware Maintenance Manual - Page 289
Error Code/Symptom 176 (Computer cover or cable cover was removed without a key being used) error) FRU/Action 1. Run Configuration/Setup 2. System Board 1. Run Configuration/Setup 2. Service Processor Adapter 3. System Board 1. Run Configuration/Setup 2. System Board 1. Run Configuration/Setup - IBM 866011U | Hardware Maintenance Manual - Page 290
Error Code/Symptom 262 (DRAM parity configuration error) 289 (DIMM has been disabled the user or system, see "Memory settings" on page 98) 301 (Keyboard or keyboard controller error) 303 (Keyboard controller error) 602 (Invalid diskette boot record) 604 (Diskette drive error) 605 (Unlock failure) - IBM 866011U | Hardware Maintenance Manual - Page 291
Error Code/Symptom 178X (Fixed Disk error) 1800 (No more hardware interrupt available for PCI adapter) 1801 (No room for PCI option ROM) 1802 (No more I/O space available for PCI adapter) 1803 (No more memory (above 1MB for PCI adapter) 1804 (No more memory (below 1MB for PCI adapter) 1805 (PCI - IBM 866011U | Hardware Maintenance Manual - Page 292
Error Code/Symptom FRU/Action 5962 (IDE CD-ROM configuration error) 1. Run Configuration/Setup 2. CD-ROM Drive 3. Battery/CMOS Chip 8603 (Pointing Device Error) 1. Pointing Device 2. System Board 8603 (Pointing Device Error) 1. Pointing Device 2. System Board 0001200 (Machine check - IBM 866011U | Hardware Maintenance Manual - Page 293
SCSI error codes Error Code All SCSI Errors One or more of the following might be causing the problem: A failing SCSI device (adapter, drive, controller) An improper SCSI configuration or SCSI termination jumper setting Duplicate SCSI IDs in the same SCSI chain A missing or - IBM 866011U | Hardware Maintenance Manual - Page 294
the adapter BIOS version screen similar to the following appears. IBM PC ServeRAID Adapter BIOS Copyright IBM Corp. 1995,1997 BIOS Ver. x.xx.x xx/xx/xx IPSR code. Note Do Not replace a planar (system board) for RAID problems that has an integrated on-board ServeRAID Controller if the system board is - IBM 866011U | Hardware Maintenance Manual - Page 295
Board, if integrated controller. 1. Install the download jumpers (two jumpers on J15, installed parallel to PCI slots) and Flash the Controller with the latest IBM ServeRAID BIOS/Firmware from the IBM Web site, then; remove the jumpers. 2. RAID Controller System Board, if integrated controller. - IBM 866011U | Hardware Maintenance Manual - Page 296
288 Netfinity Server HMM IPSR Error 9xxx thru Bxxx(hex) (SCSI bus error caused by either defective drives, termination, etc.) FRU/Action 1. Note The Controller will detect a configuration change. Do not select Save Changes. Press F10 to bypass any save options. Isolate between the SCSI subsystem - IBM 866011U | Hardware Maintenance Manual - Page 297
channel. d. Backplane attached to the failing channel. e. Disconnect one drive at a time attached to failing channel and reboot to determine which drive is causing the problem. 2. If the IPSR code remains after disconnecting all SCSI cables then rebooting, replace system planar. - IBM 866011U | Hardware Maintenance Manual - Page 298
system error log for additional information before replacing a FRU. System Board LED Service Processor LED SCSI LED(s) on (Blinking or solid) FRU/Action 1. with the system for instructions on creating a bootable ServeRAID Flash diskette. Or refer to the WEB, see "Online support" on page iv. - IBM 866011U | Hardware Maintenance Manual - Page 299
configuration conflicts" on page 73. 2. A corrupt CMOS can cause undetermined problems. Check the LEDs on all the power supplies, see "Power supply on the computer and reconfigure each time). Any external devices Surge suppressor device (on the computer) Modem, printer, mouse, or non-IBM devices Each - IBM 866011U | Hardware Maintenance Manual - Page 300
that the J10 and J17 connectors are are installed correctly.) Memory-Module Kits (Minimum requirement = 1 bank of 64 MB DIMMs) 4. Power-on the computer. If the problem remains, suspect the following FRUs in the order listed: Power Supply Power Backplane System Board Processor Board Note If the - IBM 866011U | Hardware Maintenance Manual - Page 301
Parts listing (Type 8660) 1 2 25 3 4 5 6 7 8 24 9 23 20 19 18 17 22 21 16 15 10 11 12 13 14 Netfinity 5500 - Type 8660 293 - IBM 866011U | Hardware Maintenance Manual - Page 302
, 4RX, 4SU, 4SX, 51U, 51X, 52U, 52X, 5RU, 5RX, 5SU, 5SX, 61U, 61X, 62U, 62X, 6RU, 6RX, 6SU, 6SX, 71U, 72U, 7RU, 7SU) 2 Processor Card Support Tray (Housing) (Models 11U, 11X, 1RU, 1RX, 41U, 41X, 42U, 42X, 4RU, 4RX, 4SU, 4SX, 51U, 51X, 52U, 52X, 5RU, 5RX, 5SU, 5SX, 61U, 61X - IBM 866011U | Hardware Maintenance Manual - Page 303
Index 6 7 8 9 10 11 12 System (Netfinity 5500 - Type 8660) Models 11U, 11X, 1RU, 1RX, 41U, 41X, 42U, 42X, 4RU, 4RX, 4SU, 4SX, 51U, 51X, 52U, 52X, 5RU, 5RX, 5SU, 5SX, 61U, 61X, 62U, 62X, 6RU, 6RX, 6SU, 6SX, 71U, 72U, 7RU, 7SU Hard Disk Drive See"Hard disk drives and cables" on page 302 . Hard Disk - IBM 866011U | Hardware Maintenance Manual - Page 304
Index 13 14 15 16 17 18 19 20 21 System (Netfinity 5500 - Type 8660) Models 11U, 11X, 1RU, 1RX, 41U, 41X, 42U, 42X, 4RU, 4RX, 4SU, 4SX, 51U, 51X, 52U, 52X, 5RU, 5RX, 5SU, 5SX, 61U, 61X, 62U, 62X, 6RU, 6RX, 6SU, 6SX, 71U, 72U, 7RU, 7SU CD-ROM Signal Cable (IDE) (Models 11U, 11X, 1RU, 1RX, 41U, 41X, - IBM 866011U | Hardware Maintenance Manual - Page 305
Index 22 23 24 25 System (Netfinity 5500 - Type 8660) Models 11U, 11X, 1RU, 1RX, 41U, 41X, 42U, 42X, 4RU, 4RX, 4SU, 4SX, 51U, 51X, 52U, 52X, 5RU, 5RX, 5SU, 5SX, 61U, 61X, 62U, 62X, 6RU, 6RX, 6SU, 6SX, 71U, 72U, 7RU, 7SU Front LED (Models 11U, 11X, 1RU, 1RX, 41U, 41X, 42U, 42X, 4RU, 4RX, 4SU, 4SX, - IBM 866011U | Hardware Maintenance Manual - Page 306
Index System (Netfinity 5500 - Type 8660) Models 11U, 11X, 1RU, 1RX, 41U, 41X, 42U, 42X, 4RU, 4RX, 4SU, 4SX, 51U, 51X, 52U, 52X, 5RU, 5RX, 5SU, 5SX, 61U, 61X, 62U, 62X, 6RU, 6RX, 6SU, 6SX, 71U, 72U, 7RU, 7SU 512 KB Processor Card without Processor (Models 11U, 11X, 1RU, 1RX, 41U, 41X, 42U, 42X, 4RU - IBM 866011U | Hardware Maintenance Manual - Page 307
Index System (Netfinity 5500 - Type 8660) Models 11U, 11X, 1RU, 1RX, 41U, 41X, 42U, 42X, 4RU, 4RX, 4SU, 4SX, 51U, 51X, 52U, 52X, 5RU, 5RX, 5SU, 5SX, 61U, 61X, 62U, 62X, 6RU, 6RX, 6SU, 6SX, 71U, 72U, 7RU, 7SU Keylock with Keys and Pawl (Models 11U, 11X, 41U, 41X, 42U, 42X, 4SU, 4SX, 51U, 51X, 52U, - IBM 866011U | Hardware Maintenance Manual - Page 308
Screws (2 each) Insulator with Light Pipes (5 each) Hot-Swap PCI Card Clamps (4 each) Hot-Swap PCI Card Guides (5 each) Hot-Swap PCI I/O Card Guides (6 each) ISA I/O Card Guide (1 each) PCI Filler Plate Bracket (4 each) Hot-Swap Retention Handles (4 each) Switch Card Mounting to Chassis (1 each - IBM 866011U | Hardware Maintenance Manual - Page 309
, 4RU, 4RX, 4SU, 4SX, 51U, 51X, 52U, 52X, 5RU, 5RX, 5SU, 5SX, 61U, 61X, 62U, 62X, 6RU, 6RX, 6SU, 6SX, 71U, 72U, 7RU, 7SU) System Service Label (Models 11U, 11X, 1RU, 1RX, 41U, 41X, 42U, 42X, 4RU, 4RX, 4SU, 4SX, 51U, 51X, 52U, 52X, 5RU, 5RX, 5SU, 5SX, 61U, 61X, 62U - IBM 866011U | Hardware Maintenance Manual - Page 310
Hard disk drives and cables Index Hard Disk Drive Option 6 4 GB Hard Disk Drive (Models 11U, 11X, 1RU, 1RX, 41U, 41X, 42U, 42X, 4RU, 4RX, 4SU, 4SX) 6 4 GB Hard Disk Drive (2nd Source) (Models 11U, 11X, 1RU, 1RX, 41U, 41X, 42U, 42X, 4RU, 4RX, 4SU, 4SX) 6 9 GB Hard Disk Drive (Models 11U, - IBM 866011U | Hardware Maintenance Manual - Page 311
Keyboards Keyboards Arabic Belgian-French Belgian-UK/Dutch Brazil/Portugal Bulgarian Chinese/US Czech Danish Dutch French French/Canadian - 58 French/Canadian - 445 German Greek Hebrew Hungarian Icelandic Italian Japanese Korean FRU No. 37L2555 37L0818 02K0870 37L2556 37L0819 02K0871 37L2557 - IBM 866011U | Hardware Maintenance Manual - Page 312
Keyboards Norwegian Polish Portuguese Romanian Russian Serbian/Cyrillic Slovak Spanish Spanish - Latin America Swedish/Finnish Swiss French/German Thailand Turkish - 179 Turkish - 440 UK English US English UK English (ISO Compliant) Yugoslavia/Lithuania 304 Netfinity Server HMM FRU No. 37L252569 - IBM 866011U | Hardware Maintenance Manual - Page 313
Power cords Power Cords Arabic Belgium Bulgaria Czech Republic Denmark Finland France Germany Hungary Israel Italy Latvia Netherlands Norway Poland Portugal Serbia Slovakia South Africa Spain Switzerland Switzerland (French/German) U.S. English U.K./Ireland Yugoslavia FRU No. 14F0033 1339520 - IBM 866011U | Hardware Maintenance Manual - Page 314
306 Netfinity Server HMM - IBM 866011U | Hardware Maintenance Manual - Page 315
with the computers, functions, terminology, and service information provided in this manual. Safety information 308 General safety 308 Electrical safety 309 Safety inspection guide 310 Handling electrostatic discharge-sensitive devices 312 Grounding requirements 312 © Copyright IBM Corp. 1999 - IBM 866011U | Hardware Maintenance Manual - Page 316
Safety information The following section contains the safety information that you need to be familiar with before servicing an IBM mobile computer. General safety Follow these rules to ensure general safety: Observe good housekeeping in the area of the machines during and after maintenance. When - IBM 866011U | Hardware Maintenance Manual - Page 317
telecommunication systems, networks, and modems before you open the server covers, unless instructed otherwise in the installation and configuration procedures. Observe the following rules when working equipment; keep the other hand in your pocket or behind your back. Related service information 309 - IBM 866011U | Hardware Maintenance Manual - Page 318
high voltages; these instructions are in the injury and machine damage. Do not service the following parts with the power on get medical aid. Safety inspection guide The intent of this inspection guide is to assist you in protect users and service personnel from injury. This guide addresses only those - IBM 866011U | Hardware Maintenance Manual - Page 319
first correcting the problem. Consider these loose or missing hardware The guide consists of a series of or sharp edges). 2. Power-off the computer. Disconnect the power cord. 3. Check the non-IBM alterations. Use good judgment as to the safety of any non-IBM alterations service information 311 - IBM 866011U | Hardware Maintenance Manual - Page 320
such as those listed below, to provide protection that meets the specific service requirement. Note: The use of a grounding system is desirable but prong of the ac plug on ac-operated computers. Grounding requirements Electrical grounding of the computer is required for operator safety and correct - IBM 866011U | Hardware Maintenance Manual - Page 321
Desconectar 1. DESLIGUE tudo. 2. Remova primeiro o(s) cabo(s) de alimentação das tomadas. 3. Remova os cabos de sinal dos receptáculos. 4. Remova todos os cabos dos dispositivos. Related service information 313 - IBM 866011U | Hardware Maintenance Manual - Page 322
CAUTION: Ao substituir a bateria, utilize apenas o Número de Peça IBM 33F8354 ou um tipo de bateria equivalente recomendado pelo fabricante. Se seu sistema possuir um módulo com uma bateria de lítio, substitua-o apenas pelo mesmo - IBM 866011U | Hardware Maintenance Manual - Page 323
de fácil acesso. >50 kg (110 lbs) CAUTION: Não coloque qualquer objeto com peso superior a 50 kg (110 lbs) sobre o modelo de gaveta do servidor. Related service information 315 - IBM 866011U | Hardware Maintenance Manual - Page 324
316 Netfinity Server HMM - IBM 866011U | Hardware Maintenance Manual - Page 325
Related service information 317 - IBM 866011U | Hardware Maintenance Manual - Page 326
318 Netfinity Server HMM - IBM 866011U | Hardware Maintenance Manual - Page 327
Related service information 319 - IBM 866011U | Hardware Maintenance Manual - Page 328
DANGER To avoid a shock hazard, do not connect or disconnect any cables or perform installation, maintenance, or reconfiguration of this product during an electrical storm. To avoid shock hazard: The power cord must be connected to a properly wired and earthed receptacle. Any equipment to which this - IBM 866011U | Hardware Maintenance Manual - Page 329
CAUTION: When replacing the battery, use only IBM Part Number 33F8354 or an equivalent type battery recommended by of the CD-ROM drive could result in exposure to hazardous laser radiation. There are no serviceable parts inside the CD-ROM drive. Do not remove the CD-ROM drive covers. DANGER Some - IBM 866011U | Hardware Maintenance Manual - Page 330
32 kg (70.5 lbs) 55 kg (121.2 lbs) CAUTION: Use safe lifting practices when lifting the machine. CAUTION: The Power Control button on the front of the server does not turn off the electrical current supplied to the server. The server also might have more than one power cord. To remove all - IBM 866011U | Hardware Maintenance Manual - Page 331
le présent produit ou des périphériques qui lui sont raccordés, reportez-vous aux instructions ci-dessous pour connecter et déconnecter les différents cordons. Connexion 1. Mettez les unités câbles d'interface des prises. 4. Débranchez tous les câbles des unités. Related service information 323 - IBM 866011U | Hardware Maintenance Manual - Page 332
CAUTION: Remplacez la pile usagée par une pile de référence identique exclusivement - voir la référence IBM - ou par une pile équivalente recommandée par le fabricant. Si votre système est doté d'un module contenant une pile au lithium, vous devez le - IBM 866011U | Hardware Maintenance Manual - Page 333
courant électrique facile d'accès. >50 kg CAUTION: Ne posez pas d'objet dont le poids dépasse 50 kg sur les modèles tiroir de serveur. Related service information 325 - IBM 866011U | Hardware Maintenance Manual - Page 334
DANGER Aus Sicherheitsgründen bei Gewitter an diesem Gerät keine Kabel anschließen oder lösen. Ferner keine Installations-, Wartungsoder Rekonfigurationsarbeiten durchführen. Aus Sicherheitsgründen: Gerät nur an eine Schutzkontaktsteckdose mit ordnungsgemäß geerdetem Schutzkontakt anschließen. Alle - IBM 866011U | Hardware Maintenance Manual - Page 335
CAUTION: Eine verbrauchte Batterie nur durch eine Batterie mit der IBM Teilenummer 33F8354 oder durch eine vom Hersteller empfohlene Batterie ersetzen. Wenn Ihr Laserstrahl sehen, nicht direkt mit optischen Instrumenten betrachten und den Strahlungsbereich meiden. Related service information 327 - IBM 866011U | Hardware Maintenance Manual - Page 336
32 kg 55 kg CAUTION: Beim Anheben der Maschine die vorgeschriebenen Sicherheitsbestimmungen beachten. CAUTION: Mit dem Betriebsspannungsschalter an der Vorderseite des Servers wird die Stromversorgung für den Server nicht unterbrochen. Der Server könnte auch mehr als ein Netzkabel aufweisen. Um - IBM 866011U | Hardware Maintenance Manual - Page 337
scollegare 1. SPEGNERE tutti i dispositivi. 2. Rimuovere prima il(i) cavo(i) di alimentazione dalla presa elettrica. 3. Rimuovere i cavi di segnale dalle prese. 4. Rimuovere tutti i cavi dalle unità. Related service information 329 - IBM 866011U | Hardware Maintenance Manual - Page 338
Quando si sostituisce la batteria, utilizzare solo una batteria IBM o batterie dello stesso tipo o di tipo equivalente utilizzo di controlli, regolazioni o l'esecuzione di procedure non descritti nel presente manuale possono provocare l'esposizione a radiazioni pericolose. L'apertura di un'unità CD - IBM 866011U | Hardware Maintenance Manual - Page 339
prossimità di una presa elettrica facilmente accessibile. >50 kg ATTENZIONE: Non poggiare oggetti che pesano più di 50 kg sulla parte superiore del servente. Related service information 331 - IBM 866011U | Hardware Maintenance Manual - Page 340
332 Netfinity Server HMM - IBM 866011U | Hardware Maintenance Manual - Page 341
Related service information 333 - IBM 866011U | Hardware Maintenance Manual - Page 342
DANGER Para evitar una posible descarga eléctrica, no conecte ni desconecte los cables ni lleve a cabo ninguna operación de instalación, de mantenimiento o de reconfiguración de este producto durante una tormenta eléctrica. Para evitar una posible descarga: El cable de alimentación debe conectarse a - IBM 866011U | Hardware Maintenance Manual - Page 343
CAUTION: Al cambiar la batería, utilice únicamente la batería IBM Número de pieza 33F8354 o un tipo de batería equivalente recomendado por el fabricante. Si el sistema tiene un de CD-ROM no existen piezas reparables. No retire las cubiertas de la unidad de CD-ROM. Related service information 335 - IBM 866011U | Hardware Maintenance Manual - Page 344
DANGER Algunas unidades de CD-ROM tienen incorporado un diodo de láser de Clase 3A o de Clase 3B Tenga en cuenta la siguiente información. Cuando la unidad está abierta se generan emisiones de rayos láser. No dirija la mirada al haz, no lo observe directamente con instrumentos ópticos y evite la - IBM 866011U | Hardware Maintenance Manual - Page 345
>50 kg CAUTION: No coloque ningún objeto cuyo peso sea superior a los 50 kilos sobre la bandeja modelo del servidor. Related service information 337 - IBM 866011U | Hardware Maintenance Manual - Page 346
338 Netfinity Server HMM - IBM 866011U | Hardware Maintenance Manual - Page 347
5500 M10 - Type 8661 Hardware Maintenance Manual (Part Number 37L5210). You can upgrade the IBM® Netfinity™ server with Intel® Pentium® IBM Netfinity 5500/5500 M10 Diagnostic Update Diskette 2 of 2 IBM Netfinity Upgrade Kit for Pentium II Xeon Processors Installation Instructions (this book) IBM - IBM 866011U | Hardware Maintenance Manual - Page 348
Note The server might come with memory modules that are not compatible with the Processor Upgrade Kit. For more information about the memory configurations supported, see "Installing memory-modules" on page 353. You need the following items to install the Processor Upgrade Kit: A medium flat-blade - IBM 866011U | Hardware Maintenance Manual - Page 349
pages will guide you in installing at system BIOS revision level 2.0 or later to support the Processor Upgrade Kit. Complete this procedure to screen. When the server startup begins POST (power-on self-test) and the IBM logo appears, note the BIOS revision level in the left-hand corner of the - IBM 866011U | Hardware Maintenance Manual - Page 350
procedure. Complete this procedure to update the system BIOS. 1. Insert the IBM Netfinity 5500 BIOS Update Diskette in the diskette drive. 2. Press Ctrl+Alt the advanced system management processor code. 1. Insert the IBM Netfinity 5500 Advanced System Management Processor Update Diskette into the - IBM 866011U | Hardware Maintenance Manual - Page 351
Flash Utility Select one: 1. Update Advanced System Management Processor 2. Configure OS WatchDog Timer 3. Exit Enter F1=Help F3=Exit 3. Select 1. Update Advanced System Management Processor and press Enter. A warning message appears on the screen with information similar to the following. - IBM 866011U | Hardware Maintenance Manual - Page 352
remove the diskette, turn off the system, and contact your service representative for assistance. Updating the System Diagnostic programs: Complete this procedure to update the system diagnostic programs. 1. Insert the IBM Netfinity 5500/5500 M10 Diagnostic Update Diskette 1 of 2 into - IBM 866011U | Hardware Maintenance Manual - Page 353
Reading the flash image $ 21 .us1 After this message appears, you will be prompted to insert the IBM Netfinity Diagnostic Update Diskette 2 of 2 into the diskette drive. 5. Insert the diskette into the diskette drive and press Enter. A message similar to the following appears. - IBM 866011U | Hardware Maintenance Manual - Page 354
Staying up to date with the latest software: Periodically check the World Wide Web at http://www.ibm.com/pc/us/netfinity for future releases of: Netfinity 5500 system BIOS Netfinity 5500 advanced system management processor code Netfinity 5500 system diagnostics programs 346 Netfinity Server HMM - IBM 866011U | Hardware Maintenance Manual - Page 355
Installing the hardware The information on the following pages will guide you in installing the hardware included in this processor upgrade. Removing the processor assembly Complete this procedure to remove the processor assembly. 1. Remove all media ( - IBM 866011U | Hardware Maintenance Manual - Page 356
the fan. To do this, slide the air diffuser up and off of the clips. Then, lift it out of the server. You will be instructed when to replace the funnel later in this procedure. 12. Remove the four screws 1 securing the processor assembly. 348 Netfinity Server HMM - IBM 866011U | Hardware Maintenance Manual - Page 357
13. If the processor assembly has two levers 2 at the top corners, pull the levers up. 14. Lift the processor assembly 1 out of the server and put it aside. This processor assembly is not used for the upgrade. 2-way Xeon upgrade installation 349 - IBM 866011U | Hardware Maintenance Manual - Page 358
Installing a microprocessor kit Refer to the following illustrations of the processor assembly and processor board while you perform the steps in this procedure. 1 Processor assembly top cover 2 Quarter-turn fasteners 350 Netfinity Server HMM - IBM 866011U | Hardware Maintenance Manual - Page 359
3 Latches 4 Secondary microprocessor 5 Terminator card 6 Secondary microprocessor connector 7 Voltage regulator modules (VRMs) for secondary microprocessor 8 VRM connectors for secondary microprocessor 9 VRMs for primary microprocessor 1 Primary microprocessor Complete this procedure to install a - IBM 866011U | Hardware Maintenance Manual - Page 360
microprocessor over the microprocessor connector. c. Make sure the microprocessor is oriented and aligned correctly. d. Insert the microprocessor into the guides until it seats in the connector. Close the latches. 3. Install the two VRMs (voltage regulator modules) 9 in the primary microprocessor - IBM 866011U | Hardware Maintenance Manual - Page 361
minimum of 128 MB and a maximum of 2 GB of system memory. Only 100 MHz, 72-bit, registered, synchronous, ECC, x4 configuration DIMMs are supported for the 128, 256 MB and 512 MB DIMMs. Installing or removing memory modules changes the configuration information in the server. After adding or removing - IBM 866011U | Hardware Maintenance Manual - Page 362
Secondary Microprocessor VRM Connectors Primary Microprocessor VRM Connectors Microprocessor Core-Frequency-Selection Switch Block (SW1) Secondary Microprocessor Connector DIMM Socket 1 DIMM Socket 2 DIMM Socket 3 DIMM Socket 4 Primary Microprocessor Connector Complete this procedure to install - IBM 866011U | Hardware Maintenance Manual - Page 363
2. Press the DIMM into the connector until the latches 2 snap into the locked position. 3. Repeat this procedure for additional DIMMs. 4. Replace the processor assembly top cover 1 . 5. Turn the quarter-turn fasteners 2 to the locked position. Installing the processor assembly Complete this - IBM 866011U | Hardware Maintenance Manual - Page 364
2. Carefully lower the processor assembly into the server shuttle until it is fully seated. 3. Install and tighten the four screws 2 that you removed in step 12 on page 348. Note If you removed the air diffuser, reinstall it now. 4. Reconnect the two cables that you disconnected in step 11 on page - IBM 866011U | Hardware Maintenance Manual - Page 365
5. Slide the shuttle into place and tighten the four shuttle thumbscrews. 6. Reinstall the top cover. a. Check that all cables, adapters, and other components are installed and seated correctly and that you have not left loose tools or parts inside the server. b. Lower the cover with the rear edge - IBM 866011U | Hardware Maintenance Manual - Page 366
Processor board component locations A layout of the processor board is shown in the following illustration. 1 Secondary microprocessor cache VRM connector (U15) 2 Secondary microprocessor cache VRM error LED (CR36) 3 Secondary microprocessor core VRM connector (U7) 4 Secondary - IBM 866011U | Hardware Maintenance Manual - Page 367
9 Primary microprocessor cache VRM connector (U17) 1 Primary microprocessor core VRM connector (U22) 11 Microprocessor core-ratio-selection switch block (SW1) 12 Reserved (J22) 13 Reserved (J20) 14 Reserved (J18) 15 System board connector (J9) (on reverse side of processor board) - IBM 866011U | Hardware Maintenance Manual - Page 368
Parts listing (2-way upgrade kit) 2-Way Upgrade Kit FRU No. Processor Board Support Tray Slot 2 Goalpost D2SP Processor Board without CPU CPU Terminator Card 400/100MHz DS2P 512KB/L2 400/100MHz DS2P 1MB/L2 450MHZ Pentium II Xeon W/ - IBM 866011U | Hardware Maintenance Manual - Page 369
to the Netfinity 5500 M20 - Type 8662 Hardware Maintenance Manual (Part Number 37L2020). You can upgrade the Netfinity 5500 or service personnel. Contact IBM or a trained service provider for assistance. Before you begin Read through these instructions housing guide © Copyright IBM Corp. 1999 361 - IBM 866011U | Hardware Maintenance Manual - Page 370
5500 M20 Diagnostic Update Diskette 2 of 2 IBM Netfinity Four-Way Processor Upgrade Kit Installation Instructions (this book) IBM Netfinity 5500 M20 Server Library, which includes the ServerGuide CDs IBM Netfinity 5500 M20 system service label Intel microprocessor label Two upgrade stickers Note - IBM 866011U | Hardware Maintenance Manual - Page 371
For more information about the memory configurations supported, see "Installing memory-modules" on page 376. 3. Optionally, you can install a second 500-watt power supply for redundant power. With a redundant power supply installed, you - IBM 866011U | Hardware Maintenance Manual - Page 372
jumper (J51) on the system board has a jumper installed, remove the jumper. Refer to the "Hardware Information" section of the IBM Netfinity 5500 M20 Server Library for instructions on working with jumpers. Note In normal operation, there is no jumper on J51. A jumper installed on J51 disables the - IBM 866011U | Hardware Maintenance Manual - Page 373
procedure to update the system BIOS. 1. Insert the IBM Netfinity 5500 M20 BIOS Update Diskette in the diskette Important: The backup image of the current POST/BIOS is helpful with troubleshooting the upgrade, if troubleshooting becomes necessary. 5. Select N when you are asked if you would like - IBM 866011U | Hardware Maintenance Manual - Page 374
Removing the shuttle and processor housing Complete this procedure to remove the shuttle and processor housing. 1. Remove all media (diskettes, CDs, optical discs, or tapes) from the drives. 2. Turn off the server and any attached devices. Caution The power control button on the device and the power - IBM 866011U | Hardware Maintenance Manual - Page 375
8. Loosen the four thumbscrews 1 at the rear of the shuttle. 9. Slide the shuttle 2 to the rear of the server. 10. Remove the power supply cables from the rear of the processor housing. 11. Remove the four screws 1 securing the processor housing. 12. If the processor housing has two levers at the - IBM 866011U | Hardware Maintenance Manual - Page 376
Note Keep the processor housing nearby and in a safe place for use in troubleshooting the upgrade, if troubleshooting becomes necessary. 14. Note the location of all cables connected to the shuttle and disconnect the cables. 15. Remove the shuttle from the server and - IBM 866011U | Hardware Maintenance Manual - Page 377
Replacing the diagnostic panel and front panel assemblies Complete this procedure to replace the diagnostic panel assembly and the front panel assembly. 1. Replace the diagnostic panel assembly 1 : a. Disconnect the cable 3 and remove the screws 2 that secure the diagnostic panel assembly. b. Remove - IBM 866011U | Hardware Maintenance Manual - Page 378
in this option: a. Lower the power backplane with the power supply connectors toward the rear of the server. b. Seat the power backplane on the guide pins and secure with screws. 5. Install the power supply separator 2 contained in this option and secure with screws 1 . 370 Netfinity Server HMM - IBM 866011U | Hardware Maintenance Manual - Page 379
Note The power supply separator replaces the ac box in this option. 6. Install the power supply contained in this option 3 : Note The power supplies you might have in the server are not compatible with this option. a. Secure the handle to the power supply with screws. b. Place the handle 4 on the - IBM 866011U | Hardware Maintenance Manual - Page 380
Installing a microprocessor kit The following table shows the order in which microprocessors and VRMs must be installed. Table 15. Microprocessor and VRM Installation Order Note: A terminator card must be installed in each microprocessor connector that does not contain a microprocessor. One - IBM 866011U | Hardware Maintenance Manual - Page 381
3 Latches 4 Second installed microprocessor (CPU or processor 4) 5 First installed microprocessor (CPU or processor 1) 6 Microprocessor connector 1 (J1) 7 Microprocessor connector 2 (J2) 8 Microprocessor connector 3 (J3) 9 Microprocessor connector 4 (J4) 1 Terminator card 11 VRM connectors 5 (J17) - IBM 866011U | Hardware Maintenance Manual - Page 382
b. Hold the microprocessor 4 by the open latches 3 , and center the microprocessor over the microprocessor connector 9 . Attention Make sure the microprocessor is oriented and aligned correctly before you try to close the latches. c. Press the microprocessor into the connector and carefully close - IBM 866011U | Hardware Maintenance Manual - Page 383
For the core/bus ratio 5.0 (500/100 MHz), jumpers are installed on pins 1 and 2 of J30 and J31 and on pins 2 and 3 of J28 and J29. 7. Install the voltage regulator modules (VRMs) 12 included in the microprocessor kit: a. Determine the connectors where the VRMs are to be installed. See Table 15 on - IBM 866011U | Hardware Maintenance Manual - Page 384
Installing memory-modules You install memory-modules on the memory board included in the Processor Upgrade Kit. Notes: 1. Install memory modules in connectors J1, J5, J2, J6, J3, J7, J4, and J8, in that order. (See the illustration on the next page for memory connector locations.) 2. If you mix DIMM - IBM 866011U | Hardware Maintenance Manual - Page 385
4 Retaining clips 5 Memory connector 1 (J1) 6 Memory connector 2 (J2) 7 Memory connector 3 (J3) 8 Memory connector 4 (J4) 9 Memory connector 5 (J5) 1 Memory connector 6 (J6) 11 Memory connector 7 (J7) 12 Memory connector 8 (J8) 13 DIMM Complete this procedure to install memory-modules. 1. Remove the - IBM 866011U | Hardware Maintenance Manual - Page 386
c. Place the memory board on a static-protective surface, such as the static-protective package in which the option came. 2. Locate the memory-module connectors on the memory board. Determine the memory-module connector into which you will install the memory module. 3. Touch the static-protective - IBM 866011U | Hardware Maintenance Manual - Page 387
adapters will fit in slot 5.) 2. Remove the slot 5 and 6 plastic guides opposite the bulkhead. 3. If you have installed the SCSI Controller-to-Bulkhead with either 01K7234 or 28L1019 as the system board assembly part number support the RS-485 cable option. The system board assembly part number is - IBM 866011U | Hardware Maintenance Manual - Page 388
J27 5. Install the jumper extension cable on the Power on control jumper (J32): a. Note the position of the jumper on the pin block and remove the jumper. J32 b. Align the white cable with pin 1 and insert the connector over the pin block. c. If necessary, change the position of the jumper on the - IBM 866011U | Hardware Maintenance Manual - Page 389
pins 1 and 2. Refer to the "Hardware Information" section of the IBM Netfinity 5500 M20 Server Library for a description of the jumper. d. Route press on the fasteners to lock in place. 9. Align the shuttle with the guides and slide the shuttle partially into the server. 10. Reconnect the cables to - IBM 866011U | Hardware Maintenance Manual - Page 390
it is aligned correctly before seating in the shuttle. Incorrect seating might cause damage to server components. 14. Align the processor housing with the guides. Carefully lower the processor housing into the shuttle until it is fully seated. 15. Install and tighten the four blue thumbscrews. 16 - IBM 866011U | Hardware Maintenance Manual - Page 391
20. Place the IBM Netfinity 5500 M20 system service label on the inside of the top cover. 21. Place one upgrade sticker near the machine type serial number on the information label. The upgrade - IBM 866011U | Hardware Maintenance Manual - Page 392
upgrade installation Information on the following pages will guide you in completing the hardware installation and installing the Configuration/Setup program. 6. Insert the HardwareGuide CD that comes with the IBM Netfinity 5500 M20 Server Library contained in this option package, into the CD-ROM - IBM 866011U | Hardware Maintenance Manual - Page 393
Reading the flash image $ 21 .us1 After this message appears, you will be prompted to insert the IBM Netfinity 5500 M20 Diagnostic Update Diskette 2 of 2 into the diskette drive. 5. Insert the diskette into the diskette drive and press Enter. 6. Press Enter to confirm - IBM 866011U | Hardware Maintenance Manual - Page 394
Updating the Advanced System Management Processor code Complete this procedure to update the advanced system management processor code. 1. Insert the IBM Netfinity 5500 M20 Advanced System Management Processor Firmware Update Diskette into the diskette drive. 2. Press Ctrl+Alt+Del to restart the - IBM 866011U | Hardware Maintenance Manual - Page 395
the advanced system management processor code matches the level on the update diskette. a. Turn off the server; then, restart the server. b. When the IBM logo appears, press F1 to use the Configuration/Setup program. c. Select System Information and Product Data to check the code level. d. Press Esc - IBM 866011U | Hardware Maintenance Manual - Page 396
Front LED Card Assembly Internal LED Card and Outline Assembly System Service Label Status Panel Lens AC Blank Filler Panel Power Backplane Assembly DIMM 512MB ECC 3.3V REG SDRAM DIMM Fan #4 Assembly Processor Board Support Tray Short Insulator Air Baffle Fan #4 Cable System Board without Memory or - IBM 866011U | Hardware Maintenance Manual - Page 397
this survey, complete it, and then fax it to IBM HMM Survey at 919-543-8167 (USA). Name Phone Number 1. Do you like this manual? Yes No 2. What would you like to see added, changed, or deleted in this manual? 3. What is your service experience level? Less than five years More than five years - IBM 866011U | Hardware Maintenance Manual - Page 398
software combinations that can be encountered, use the following information to assist you in problem determination. If possible, have this information available when requesting assistance from Service Support and Engineering functions. Machine type and model Processor or hard disk upgrades Failure - IBM 866011U | Hardware Maintenance Manual - Page 399
Unit Customized Operational Services EduQuest (Educational Computers) End User HelpDesk Support IBM Anti-Virus Services IBM Authorized Dealer Referrals IBM Dealer Referral IBM Information Referral Service IBM Service IBM PC HelpCenter and HelpDesk IBM Technical Manuals Multimedia Information Center - IBM 866011U | Hardware Maintenance Manual - Page 400
8343 800-487-7426 800-663-7662 800-IBM-9990 800-263-2769 416-443-5808 Service (DOAs) Publications Ordering Service Management Support Service Management Support Service (Warranty) Manager Service (Warranty) Manager Service Quality Programs Service Quality Programs Skill Dynamics (Education) ThinkPad - IBM 866011U | Hardware Maintenance Manual - Page 401
Corporation in the United States or other countries or both: EduQuest HelpCenter IBM OS/2 Predictive Failure Analysis SystemXtra HelpClub HelpFax Netfinity PS/1 Skill Dynamics ThinkPad The following terms are trademarks of other companies: Notes Lotus Development Corporation MMX and Pentium - IBM 866011U | Hardware Maintenance Manual - Page 402
IBM® Part Number: 00N5902 Printed in U.S.A. S1 L-98 - 3
-
 1
1 -
 2
2 -
 3
3 -
 4
4 -
 5
5 -
 6
6 -
 7
7 -
8
-
9
-
10
-
11
-
12
-
13
-
14
-
15
-
16
-
17
-
18
-
19
-
20
-
21
-
22
-
23
-
24
-
25
-
26
-
27
-
28
-
29
-
30
-
31
-
32
-
33
-
34
-
35
-
36
-
37
-
38
-
39
-
40
-
41
-
42
-
43
-
44
-
45
-
46
-
47
-
48
-
49
-
50
-
51
-
52
-
53
-
54
-
55
-
56
-
57
-
58
-
59
-
60
-
61
-
62
-
63
-
64
-
65
-
66
-
67
-
68
-
69
-
70
-
71
-
72
-
73
-
74
-
75
-
76
-
77
-
78
-
79
-
80
-
81
-
82
-
83
-
84
-
85
-
86
-
87
-
88
-
89
-
90
-
91
-
92
-
93
-
94
-
95
-
96
-
97
-
98
-
99
-
100
-
101
-
102
-
103
-
104
-
105
-
106
-
107
-
108
-
109
-
110
-
111
-
112
-
113
-
114
-
115
-
116
-
117
-
118
-
119
-
120
-
121
-
122
-
123
-
124
-
125
-
126
-
127
-
128
-
129
-
130
-
131
-
132
-
133
-
134
-
135
-
136
-
137
-
138
-
139
-
140
-
141
-
142
-
143
-
144
-
145
-
146
-
147
-
148
-
149
-
150
-
151
-
152
-
153
-
154
-
155
-
156
-
157
-
158
-
159
-
160
-
161
-
162
-
163
-
164
-
165
-
166
-
167
-
168
-
169
-
170
-
171
-
172
-
173
-
174
-
175
-
176
-
177
-
178
-
179
-
180
-
181
-
182
-
183
-
184
-
185
-
186
-
187
-
188
-
189
-
190
-
191
-
192
-
193
-
194
-
195
-
196
-
197
-
198
-
199
-
200
-
201
-
202
-
203
-
204
-
205
-
206
-
207
-
208
-
209
-
210
-
211
-
212
-
213
-
214
-
215
-
216
-
217
-
218
-
219
-
220
-
221
-
222
-
223
-
224
-
225
-
226
-
227
-
228
-
229
-
230
-
231
-
232
-
233
-
234
-
235
-
236
-
237
-
238
-
239
-
240
-
241
-
242
-
243
-
244
-
245
-
246
-
247
-
248
-
249
-
250
-
251
-
252
-
253
-
254
-
255
-
256
-
257
-
258
-
259
-
260
-
261
-
262
-
263
-
264
-
265
-
266
-
267
-
268
-
269
-
270
-
271
-
272
-
273
-
274
-
275
-
276
-
277
-
278
-
279
-
280
-
281
-
282
-
283
-
284
-
285
-
286
-
287
-
288
-
289
-
290
-
291
-
292
-
293
-
294
-
295
-
296
-
297
-
298
-
299
-
300
-
301
-
302
-
303
-
304
-
305
-
306
-
307
-
308
-
309
-
310
-
311
-
312
-
313
-
314
-
315
-
316
-
317
-
318
-
319
-
320
-
321
-
322
-
323
-
324
-
325
-
326
-
327
-
328
-
329
-
330
-
331
-
332
-
333
-
334
-
335
-
336
-
337
-
338
-
339
-
340
-
341
-
342
-
343
-
344
-
345
-
346
-
347
-
348
-
349
-
350
-
351
-
352
-
353
-
354
-
355
-
356
-
357
-
358
-
359
-
360
-
361
-
362
-
363
-
364
-
365
-
366
-
367
-
368
-
369
-
370
-
371
-
372
-
373
-
374
-
375
-
376
-
377
-
378
-
379
-
380
-
381
-
382
-
383
-
384
-
385
-
386
-
387
-
388
-
389
-
390
-
391
-
392
-
393
-
394
-
395
-
396
-
397
-
398
-
399
-
400
-
401
-
402
 |
 |

This Manual Supports
The Following Models:
11U,
41U,
4RU,
51U,
5RU,
61U,
6RU,
71U,
11X,
41X,
4RX,
51X,
5RX,
61X,
6RX,
72U,
1RX,
42X,
4SX,
52X,
5SX,
62X,
6SX,
7SU
1RU,
42U,
4SU,
52U,
5SU,
62U,
6SU,
7RU,
S10L-9800-03
IBM Netfinity Servers
IBM Netfinity 5500 - Type 8660
Hardware Maintenance Manual
June 1999
We Want Your Comments!
(Please see page 389)