Icom IP501M Operating Guide - Page 7
Mounting the transceiver
 |
View all Icom IP501M manuals
Add to My Manuals
Save this manual to your list of manuals |
Page 7 highlights
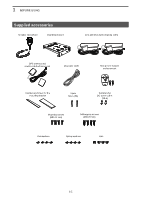
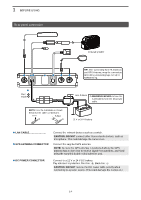
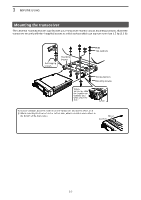
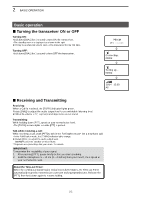
1 Before using Mounting the transceiver The universal mounting bracket supplied with your transceiver enables various mounting positions. Mount the transceiver securely with the 4 supplied screws to a thick surface which can support more than 1.5 kg (3.3 lb). Self-tapping screws Mounting bracket Nuts Flat washers When removing, slide the transceiver towards you while push the lever. Spring washers Mounting screws Lever To reduce vibration, place the cushion on the transceiver and put the sheet on it. LLWhen mounting the bracket on the bottom side, attach a cushion and a sheet to the bottom of the transceiver. Sheet Cushion 1-5
-
 1
1 -
 2
2 -
 3
3 -
 4
4 -
 5
5 -
 6
6 -
 7
7 -
 8
8 -
 9
9 -
 10
10 -
 11
11 -
 12
12 -
13
-
14
-
15
-
16
-
17
-
18
-
19
-
20
-
21
-
22
-
23
-
24
-
25
-
26
-
27
-
28
-
29
-
30
-
31
-
32
-
33
-
34
-
35
-
36
-
37
-
38
-
39
-
40
 |
 |

1
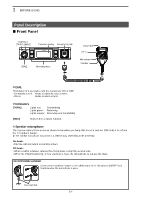
BEFORE USING
1-5
The universal mounting bracket supplied with your transceiver enables various mounting positions. Mount the
transceiver securely with the 4 supplied screws to a thick surface which can support more than 1.5 kg (3.3 lb).
Mounting the transceiver
Flat washers
Mounting
bracket
Nuts
Spring washers
Mounting screws
Self-tapping
screws
When
removing, slide
the transceiver
towards you
while push the
lever.
Lever
To reduce vibration, place the cushion on the transceiver and put the sheet on it.
L
When mounting the bracket on the bottom side, attach a cushion and a sheet to
the bottom of the transceiver.
Sheet
Cushion