Insignia NL19W2QP-10A User Manual (English) - Page 20
Adjusting the picture, Adjusting the TV picture, Adjusting Advanced Video settings, Adjusting
 |
UPC - 600603122286
View all Insignia NL19W2QP-10A manuals
Add to My Manuals
Save this manual to your list of manuals |
Page 20 highlights
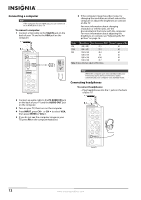
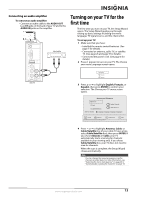
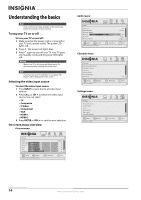
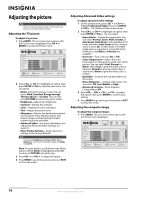
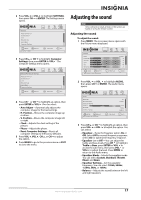
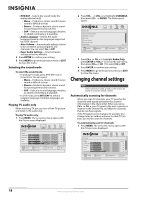
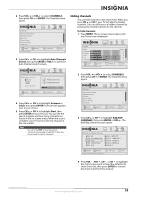
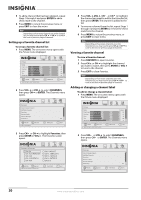
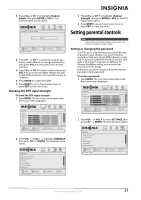
Adjusting the picture Note Unless otherwise noted, all tasks in this section are based on using the remote control. Adjusting the TV picture To adjust the picture: 1 Press MENU. The on-screen menu opens with the Picture menu displayed. Press CH or ENTER to access the Picture menu. Picture Mode Brightness Contrast Color Tint Sharpness PICTURE AUDIO CHANNELS SETTINGS Custom 40 40 40 R5 +5 MOVE OK ENTER SELECT Adjust settings t o affect picture quality MENU PREVIOUS EXIT EXIT 2 Press CH or CH to highlight an option, then press ENTER or VOL enter the sub-menu. You can select: • Mode-Selects the picture mode. You can select Vivid, Standard, Energy Savings, Theater, Sports, or Custom. You can also press PICTURE to select the picture mode. • Brightness-Adjusts the brightness. • Contrast-Adjusts the contrast. • Color-Adjusts the color saturation. • Tint-Adjusts the picture tone. • Sharpness-Adjusts the detail enhancement. Increasing the level, displays cleaner and clearer images, and decreasing the level makes the picture smoother • Advanced Video-For more information, see "Adjusting Advanced Video settings" on page 16. • Reset Picture Settings-Resets all picture settings to the factory defaults. Note If you adjust Brightness, Contrast, Color, Tint, or Sharpness, your TV automatically changes the Mode to Custom. Note: You may need to scroll down to see all the options. When Mode is highlighted, press CH to return to PICTURE icon at the top. 3 Press VOL or VOL to adjust the option. 4 Press MENU to go to the previous menu or EXIT to close the menu. Adjusting Advanced Video settings To adjust advanced video settings: 1 On the picture menu, press CH or CH to highlight Advanced Video, then press ENTER or VOL . The Advanced Video menu opens. 2 Press CH or CH to highlight an option, then press ENTER or VOL . You can select: • Aspect Ratio-Selects the aspect ratio. You can select Normal, Zoom, Wide, Cinema, or Auto Zoom. Auto Zoom is only available in TV mode and when Auto Zoom on the Channels menu is set to On. In VGA mode or in HDMI mode when a computer is connected to the HDMI jack, only Wide and Normal are available. • Overscan-Turns overscan On or Off. • Color temperature-Selects the color temperature to change the overall color of the picture. You can select Cool, Normal, or Warm. Select Cool to give the white colors a blue tint, Normal to give the white colors a neutral tint, Warm to give the white colors a red tint. • Backlight-Controls the overall brilliance of the screen. • Noise Reduction-Controls video noise. You can select Off, Low, Middle, or High. • Advanced Contrast-Turns Adaptive Contrast On or Off. 3 Press VOL , VOL , CH , or CH to adjust the option, then press ENTER to confirm your setting. 4 Press MENU to go to the previous menu or EXIT to close the menu. Adjusting the computer image To adjust the computer image: 1 Press MENU. The on-screen menu opens with the Picture menu displayed. Picture Mode Brightness Contrast Color Tint Sharpness PICTURE AUDIO CHANNELS SETTINGS Custom 40 40 40 R5 +5 MOVE OK ENTER SELECT Adjust settings t o affect picture quality MENU PREVIOUS EXIT EXIT 16 www.insigniaproducts.com
-
 1
1 -
2
-
3
-
4
-
5
-
6
-
7
-
8
-
9
-
10
-
11
-
12
-
13
-
14
-
 15
15 -
 16
16 -
 17
17 -
 18
18 -
 19
19 -
 20
20 -
 21
21 -
 22
22 -
 23
23 -
 24
24 -
 25
25 -
26
-
27
-
28
-
29
-
30
-
31
-
32
-
33
-
34
-
35
-
36
-
37
-
38
-
39
-
40
 |
 |