Insignia NL19W2QP-10A User Manual (English) - Page 9
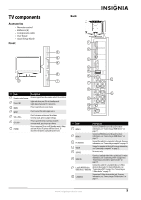
TV components, Accessories, Front, Back
 |
UPC - 600603122286
View all Insignia NL19W2QP-10A manuals
Add to My Manuals
Save this manual to your list of manuals |
Page 9 highlights
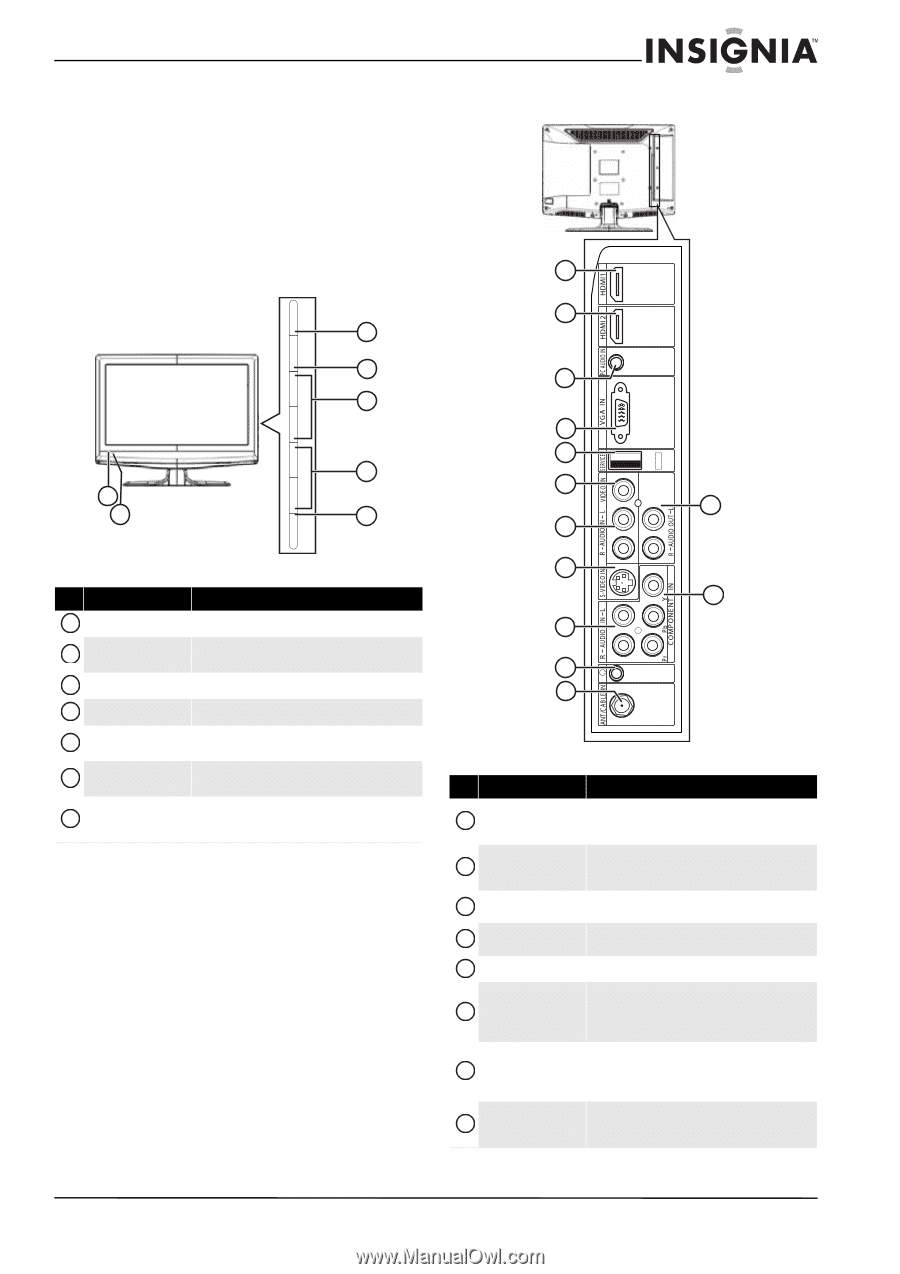
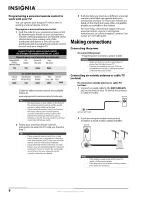
ME NU INP UT VOL+ VOL- C H+ C H- P OWE R TV components Back Accessories • Remote control • Batteries (2) • Component cable • User Guide • Quick Setup Guide Front 1 2 3 4 3 5 4 5 6 6 1 2 7 12 7 # Item Description 1 Remote control sensor Receives signals from the remote control. Do not block. 2 Power LED Lights red when your TV is in Standby mode. Lights blue when your TV is turned on. 3 MENU Press to open the on-screen menu. 4 INPUT Press to select the video input source. 5 VOL+/VOL- Press to increase or decrease the volume. In menu mode, press to adjust settings. 6 CH+/CH- Press to go to the next or previous channel. In menu mode, press to go up or down. 7 POWER Press to turn your TV on or off (Standby mode). When you turn off your TV, power still flows into it. To disconnect all power, unplug the power cord. 8 13 9 10 11 # Item Description 1 HDMI 1 Connect an HDMI device to this jack. For more information, see "Connecting an HDMI device" on page 11. 2 HDMI 2 Connect an HDMI device to this jack. For more information, see "Connecting an HDMI device" on page 11. 3 PC AUDIO IN Connect the audio for a computer to this jack. For more information, see "Connecting a computer" on page 12. 4 VGA IN Connect a computer to this jack. For more information, see "Connecting a computer" on page 12. 5 SERVICE For service only. 6 VIDEO IN Connect a standard video device to this jack. For more information, see "Connecting a VCR" on page 10 or "Connecting a camcorder or game console" on page 10. Connect the audio for a standard video or S-Video 7 L and R AUDIO IN (for device to these jacks. For more information, see VIDEO IN or S-VIDEO IN) "Connecting a VCR" on page 10 or "Connecting an S-Video device" on page 11. 8 S-VIDEO IN Connect an S-Video device to this jack. For more information, see "Connecting an S-Video device" on page 11. www.insigniaproducts.com 5
-
 1
1 -
2
-
3
-
 4
4 -
 5
5 -
 6
6 -
 7
7 -
 8
8 -
 9
9 -
 10
10 -
 11
11 -
 12
12 -
 13
13 -
 14
14 -
15
-
16
-
17
-
18
-
19
-
20
-
21
-
22
-
23
-
24
-
25
-
26
-
27
-
28
-
29
-
30
-
31
-
32
-
33
-
34
-
35
-
36
-
37
-
38
-
39
-
40
 |
 |