Insignia NS-DVDR1 User Manual (English) - Page 10
Setting up your recorder - remote
 |
View all Insignia NS-DVDR1 manuals
Add to My Manuals
Save this manual to your list of manuals |
Page 10 highlights
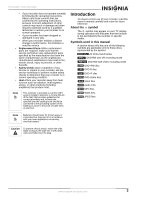
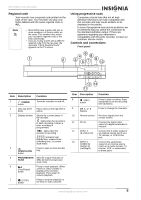
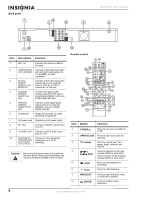
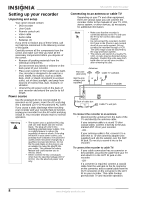
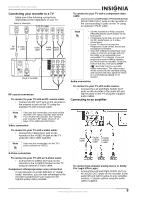
NS-DVDR1 DVD Recorder Setting up your recorder Unpacking and setup Your carton should contain: • DVD recorder • User Guide • Remote control unit • Video cable • Audio cable • Batteries (2) If you need to replace any of these items, call our help line mentioned in the Warranty section of this guide. Carefully remove all the components from the carton and make sure that you have all the necessary components before you dispose of the carton. • Remove all packing materials from the individual components. • Do not remove any labels or stickers on the back panel of your recorder. • Place your recorder in the location you want. Your recorder is designed to be used on a level, stable, flat surface, such as a table, desk, shelf, or stand convenient to a power outlet, out of direct sunlight, and away from sources of excess heat, dust, moisture, or vibration. • Unwind the AC power cord on the back of your recorder and extend the cord to its full length. Power source Use the polarized AC line cord provided for operation on AC power. Insert the AC cord plug into a standard 120 V 60 Hz polarized AC outlet. If you cause a static discharge when touching your recorder and your recorder fails to function, unplug your recorder from the AC outlet and plug it back in. Your recorder should return to normal operation. Warning • The system uses a polarized AC plug with one wide blade and one narrow blade. The plug will only fit into matching polarized power outlets. This is a safety feature to reduce the possibility of electric shock. If the plug will not fit in your power outlets, you probably have outdated, non-polarized outlets which should be changed by a qualified, licensed electrician. Do not file the wide blade on the plug or use an adapter to make the plug fit into your outlet. This defeats the safety feature and could expose you to electric shock. • Never connect the AC cord plug to other than the specified voltage (120 V 60 Hz). Use the attached power cord only. Connecting to an antenna or cable TV Depending on your TV and other equipment, there are various ways you can connect the recorder. Refer to the manuals of your TV, VCR, stereo system, or other devices, as necessary, for additional information. Note • Make sure that the recorder is connected directly to the TV and tune the TV to the correct video input channel. • Do not connect the recorder's AUDIO OUT jack to the Phono in jack (record deck) of your audio system. Do not connect the recorder through a VCR. The DVD image could be distorted by the copy protection system. • The picture and sound of a nearby TV, VCR, or radio may be distorted during playback. Position the units away from each other or turn off your recorder after removing the disc. Antennas Flat wire (300 ohm) Cable TV wall jack 300/75 ohm or or adapter (not supplied) Back of recorder Back of cable box Cable TV wall jack To connect the recorder to an antenna: • Disconnect the antenna from the back of the TV and identify the antenna cable. If your antenna cable is a round 75 ohm coaxial cable, connect it directly to the jack marked ANT. IN on your recorder. - OR - If your antenna cable is flat, connect it to a 300-ohm to 75-ohm antenna adapter (not supplied) and slip the adapter over the ANT. IN jack. Do not try to screw it into to the recorder. To connect the recorder to cable TV: • If your cable connection has no converter or descrambler, unscrew the cable from your TV and attach it to the ANT. IN jack on the recorder. - OR - If a converter is required, connect a coaxial cable from the wall jack to the IN connector on the converter, and a coaxial cable from the OUT connector on the converter to the ANT. IN on your recorder. This cable hookup permits both TV and recorder operation. 8 www.insignia-products.com
-
 1
1 -
2
-
3
-
4
-
 5
5 -
 6
6 -
 7
7 -
 8
8 -
 9
9 -
 10
10 -
 11
11 -
 12
12 -
 13
13 -
 14
14 -
 15
15 -
16
-
17
-
18
-
19
-
20
-
21
-
22
-
23
-
24
-
25
-
26
-
27
-
28
-
29
-
30
-
31
-
32
-
33
-
34
-
35
-
36
-
37
-
38
-
39
-
40
-
41
-
42
-
43
-
44
-
45
-
46
-
47
-
48
-
49
-
50
-
51
-
52
-
53
-
54
-
55
-
56
-
57
-
58
-
59
-
60
-
61
-
62
-
63
-
64
-
65
-
66
-
67
-
68
-
69
-
70
-
71
-
72
-
73
-
74
-
75
-
76
-
77
-
78
-
79
-
80
-
81
-
82
-
83
-
84
-
85
-
86
-
87
-
88
-
89
-
90
-
91
-
92
-
93
-
94
-
95
-
96
-
97
-
98
-
99
-
100
-
101
-
102
-
103
-
104
-
105
-
106
-
107
-
108
-
109
-
110
-
111
-
112
-
113
-
114
-
115
-
116
-
117
-
118
 |
 |