Intel SE7221BK1-E User Guide - Page 25
Removing DIMMs
 |
UPC - 735858168656
View all Intel SE7221BK1-E manuals
Add to My Manuals
Save this manual to your list of manuals |
Page 25 highlights
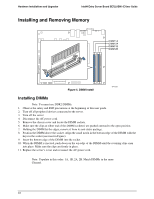
Intel® Entry Server Board SE7221BK1-E User Guide Hardware Installations and Upgrades Removing DIMMs To remove a DIMM, follow these steps: 1. Observe the safety and ESD precautions at the beginning of this chapter. 2. Turn off all peripheral devices connected to the server. Turn off the server. 3. Remove the AC power cord from the server. 4. Remove the server's cover. 5. Gently spread the retaining clips at each end of the socket. The DIMM pops out of the socket. 6. Hold the DIMM by the edges, lift it away from the socket, and store it in an anti-static package. 7. Reinstall and reconnect any parts you removed or disconnected to reach the DIMM sockets. 8. Replace the server cover and reconnect the AC power cord. 11
-
 1
1 -
2
-
3
-
4
-
5
-
6
-
7
-
8
-
9
-
10
-
11
-
12
-
13
-
14
-
15
-
16
-
17
-
18
-
19
-
 20
20 -
 21
21 -
 22
22 -
 23
23 -
 24
24 -
 25
25 -
 26
26 -
 27
27 -
 28
28 -
 29
29 -
 30
30 -
31
-
32
-
33
-
34
-
35
-
36
-
37
-
38
-
39
-
40
-
41
-
42
-
43
-
44
-
45
-
46
-
47
-
48
-
49
-
50
-
51
-
52
-
53
-
54
-
55
-
56
-
57
-
58
-
59
-
60
-
61
 |
 |

Intel® Entry Server Board SE7221BK1-E User Guide
Hardware Installations and Upgrades
11
Removing DIMMs
To remove a DIMM, follow these steps:
1.
Observe the safety and ESD precautions at the beginning of this chapter.
2.
Turn off all peripheral devices connected to the server. Turn off the server.
3.
Remove the AC power cord from the server.
4.
Remove the server’s cover.
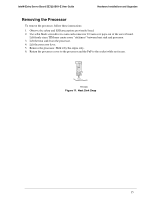
5.
Gently spread the retaining clips at each end of the socket. The DIMM pops out of the socket.
6.
Hold the DIMM by the edges, lift it away from the socket, and store it in an anti-static package.
7.
Reinstall and reconnect any parts you removed or disconnected to reach the DIMM sockets.
8.
Replace the server cover and reconnect the AC power cord.