Intel SE7221BK1-E User Guide - Page 36
Upgrading the BIOS - e reviews
 |
UPC - 735858168656
View all Intel SE7221BK1-E manuals
Add to My Manuals
Save this manual to your list of manuals |
Page 36 highlights
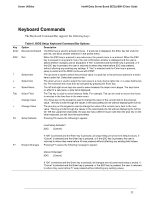
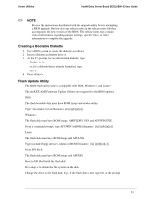
Intel® Entry Server Board SE7221BK1-E User Guide Server Utilities Key Option Description F10 Save Changes and Pressing F10 causes the following message to appear: Exit Save configuration changes and exit setup? [OK] [Cancel] If "OK" is selected and the Enter key is pressed, all changes are saved and setup is exited. If "Cancel" is selected and the Enter key is pressed, or the ESC key is pressed, the user is returned to where they were before F10 was pressed without affecting any existing values. Upgrading the BIOS The upgrade utility allows you to upgrade the BIOS in flash memory. The code and data in the upgrade file include the following: ƒ On-board BIOS, ATA-100 RAID BIOS, and PXE option ROMs for the devices that are embedded on the system board ƒ The Setup Utility ƒ The System BIOS Preparing for the Upgrade Before you upgrade the BIOS, prepare for the upgrade by recording the current BIOS settings, obtaining the upgrade utility, reviewing the release notes, and making a copy of the current BIOS. In the unlikely event that a BIOS error occurs during the BIOS update process, see "Recovering the BIOS" for instructions on performing a BIOS recovery. Recording the Current BIOS Settings 1. Boot the computer and press when you see the message: Press Key if you want to run SETUP 2. Write down the current settings in the BIOS Setup program. ✏ NOTE Do not skip step 2. You will need these settings to configure your computer at the end of the procedure. Obtaining the Upgrade Download the BIOS image file to a temporary folder on your hard drive. See http://support.intel.com/support/motherboards/server/SE7221BK1-E for a link to the update software. If you chose to "Save Custom Defaults," after the new BIOS is flashed, you can restore your settings from the "Load Custom Default" option. 22
-
 1
1 -
2
-
3
-
4
-
5
-
6
-
7
-
8
-
9
-
10
-
11
-
12
-
13
-
14
-
15
-
16
-
17
-
18
-
19
-
20
-
21
-
22
-
23
-
24
-
25
-
26
-
27
-
28
-
29
-
30
-
 31
31 -
 32
32 -
 33
33 -
 34
34 -
 35
35 -
 36
36 -
 37
37 -
 38
38 -
 39
39 -
 40
40 -
 41
41 -
42
-
43
-
44
-
45
-
46
-
47
-
48
-
49
-
50
-
51
-
52
-
53
-
54
-
55
-
56
-
57
-
58
-
59
-
60
-
61
 |
 |