Intel SE7221BK1-E User Guide - Page 29
Removing the Processor
 |
UPC - 735858168656
View all Intel SE7221BK1-E manuals
Add to My Manuals
Save this manual to your list of manuals |
Page 29 highlights
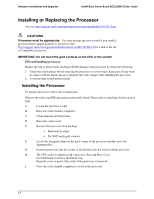
Intel® Entry Server Board SE7221BK1-E User Guide Hardware Installations and Upgrades Removing the Processor To remove the processor, follow these instructions: 1. Observe the safety and ESD precautions previously listed. 2. Use a flat blade screwdriver to turn each connector 1/4 turn so it pops out of the server board. Lift firmly since TIM may create some "stickiness" between heat sink and processor. 3. Lift the heat sink from the processor. 4. Lift the processor lever. 5. Remove the processor. Hold it by the edges only. 6. Return the processor cover to the processor and the PnP to the socket while not in use. TP01360 Figure 11. Heat Sink Snap 15
-
 1
1 -
2
-
3
-
4
-
5
-
6
-
7
-
8
-
9
-
10
-
11
-
12
-
13
-
14
-
15
-
16
-
17
-
18
-
19
-
20
-
21
-
22
-
23
-
 24
24 -
 25
25 -
 26
26 -
 27
27 -
 28
28 -
 29
29 -
 30
30 -
 31
31 -
 32
32 -
 33
33 -
 34
34 -
35
-
36
-
37
-
38
-
39
-
40
-
41
-
42
-
43
-
44
-
45
-
46
-
47
-
48
-
49
-
50
-
51
-
52
-
53
-
54
-
55
-
56
-
57
-
58
-
59
-
60
-
61
 |
 |

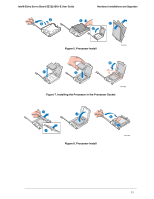
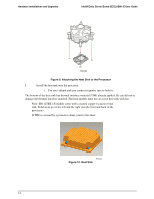
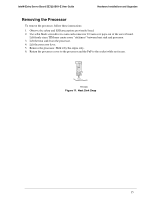
Intel® Entry Server Board SE7221BK1-E User Guide
Hardware Installations and Upgrades
15
Removing the Processor
To remove the processor, follow these instructions:
1.
Observe the safety and ESD precautions previously listed.
2.
Use a flat blade screwdriver to turn each connector 1/4 turn so it pops out of the server board.
Lift firmly since TIM may create some "stickiness" between heat sink and processor.
3.
Lift the heat sink from the processor.
4.
Lift the processor lever.
5.
Remove the processor. Hold it by the edges only.
6.
Return the processor cover to the processor and the PnP to the socket while not in use.
Figure 11. Heat Sink Snap
TP01360