Intel SE7221BK1-E User Guide - Page 28
Attaching the Heat Sink to the Processor, Heat Sink
 |
UPC - 735858168656
View all Intel SE7221BK1-E manuals
Add to My Manuals
Save this manual to your list of manuals |
Page 28 highlights
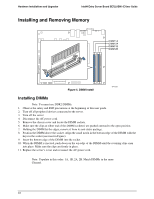
Hardware Installations and Upgrades Intel® Entry Server Board SE7221BK1-E User Guide TP01361 Figure 9. Attaching the Heat Sink to the Processor I. Install the heatsink onto the processor. i. Use one's thumb and turn connector quarter turn to lock in. The bottom of the heat sink has thermal interface material (TIM) already applied. Be careful not to damage the thermal interface material. Platform models must use an active heat sink with fan. Note: SR1425BK1-E models come with a custom copper 1u passive heat sink. Solid areas go on the left and the right (not the front and back of the processor). If TIM is covered by a protective sheet, remove the sheet. TP01359 Figure 10. Heat Sink 14
-
 1
1 -
2
-
3
-
4
-
5
-
6
-
7
-
8
-
9
-
10
-
11
-
12
-
13
-
14
-
15
-
16
-
17
-
18
-
19
-
20
-
21
-
22
-
 23
23 -
 24
24 -
 25
25 -
 26
26 -
 27
27 -
 28
28 -
 29
29 -
 30
30 -
 31
31 -
 32
32 -
 33
33 -
34
-
35
-
36
-
37
-
38
-
39
-
40
-
41
-
42
-
43
-
44
-
45
-
46
-
47
-
48
-
49
-
50
-
51
-
52
-
53
-
54
-
55
-
56
-
57
-
58
-
59
-
60
-
61
 |
 |
Hardware Installations and Upgrades
Intel® Entry Server Board SE7221BK1-E User Guide
14
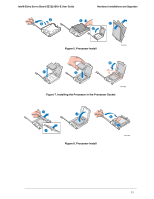
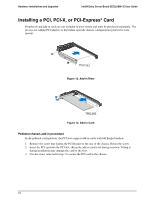
Figure 9. Attaching the Heat Sink to the Processor
I.
Install the heatsink onto the processor.
i.
Use one's thumb and turn connector quarter turn to lock in.
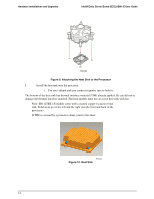
The bottom of the heat sink has thermal interface material (TIM) already applied. Be careful not to
damage the thermal interface material. Platform models must use an active heat sink with fan.
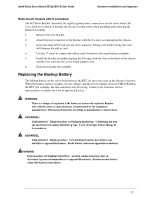
Note: SR1425BK1-E models come with a custom copper 1u passive heat
sink. Solid areas go on the left and the right (not the front and back of the
processor).
If TIM is covered by a protective sheet, remove the sheet.
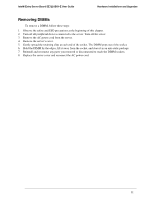
Figure 10. Heat Sink
TP01359
TP01361